作者归档:songtianlun

k3s k8s 快速部署轻量节点监控方案 beszel

在逛 Reddit 时看到 这篇帖子 发现 beszel 这个熟悉又陌生的名字。看了一下官网发现还支持 kubernetes 的部署,直接使用 daemonset 就可以在所有节点自动部署 agent ,虽然还需要手动在 hub 添加,但已经很方便,用了一下不错。
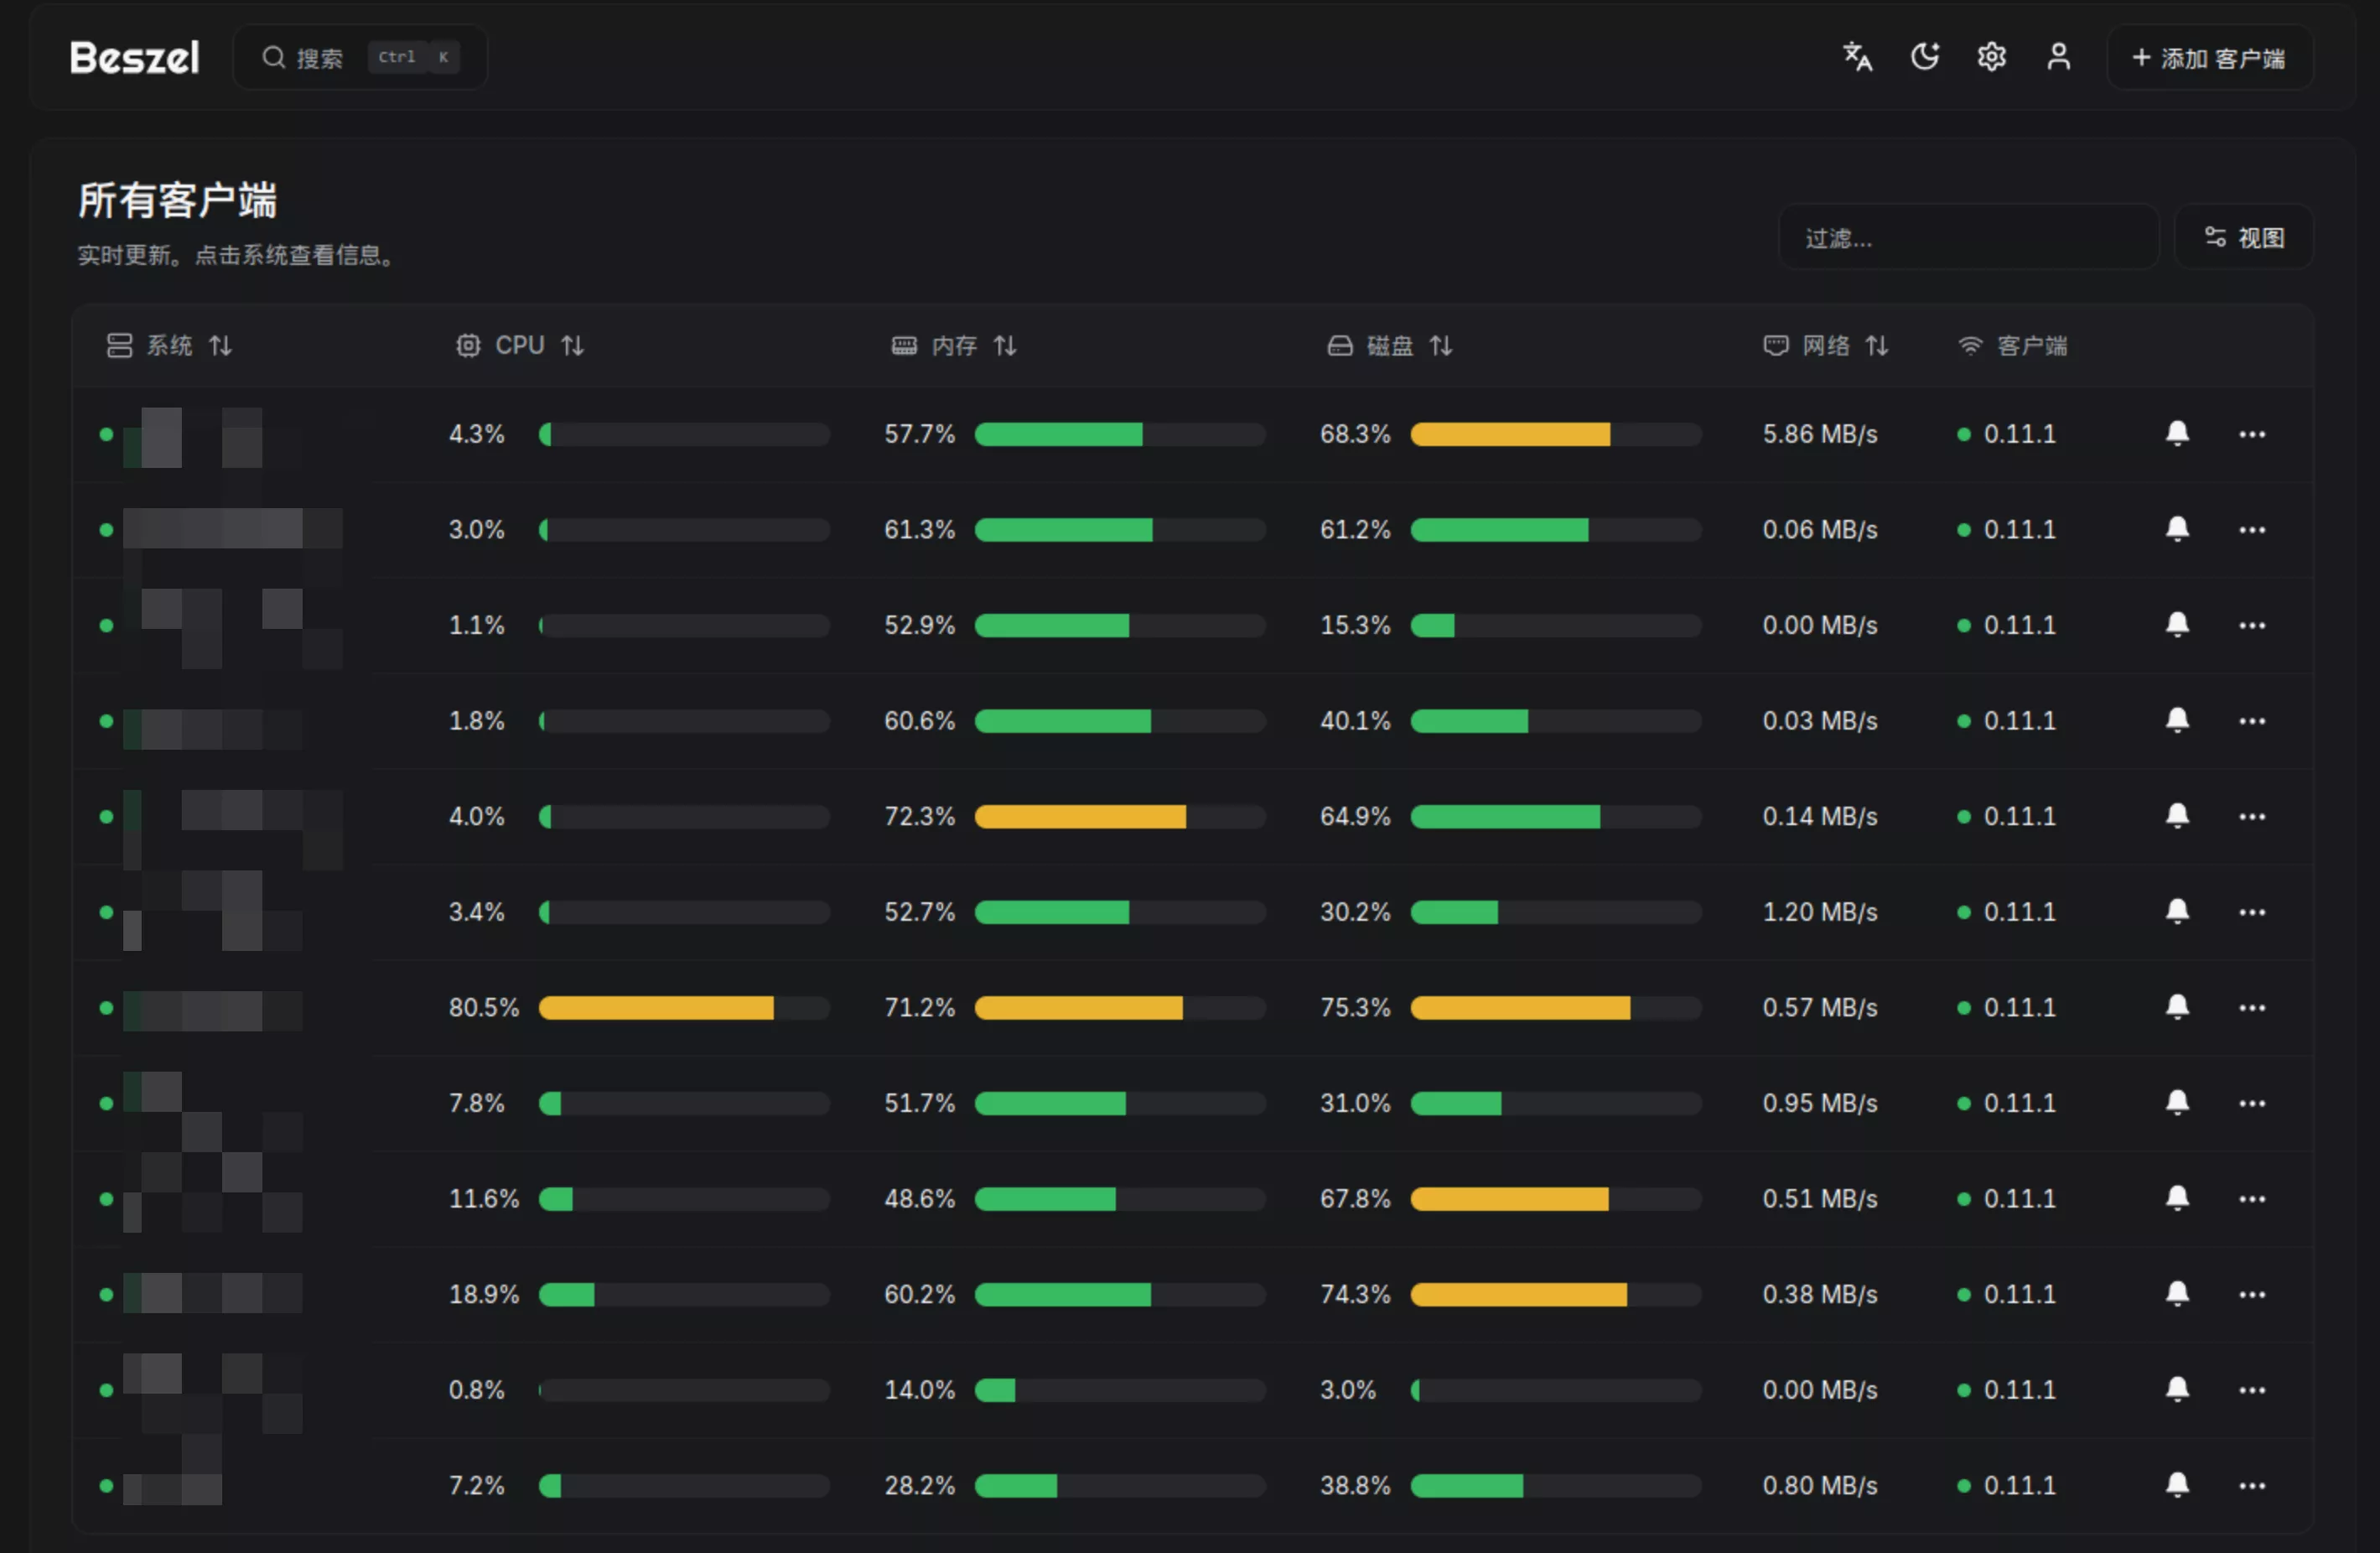
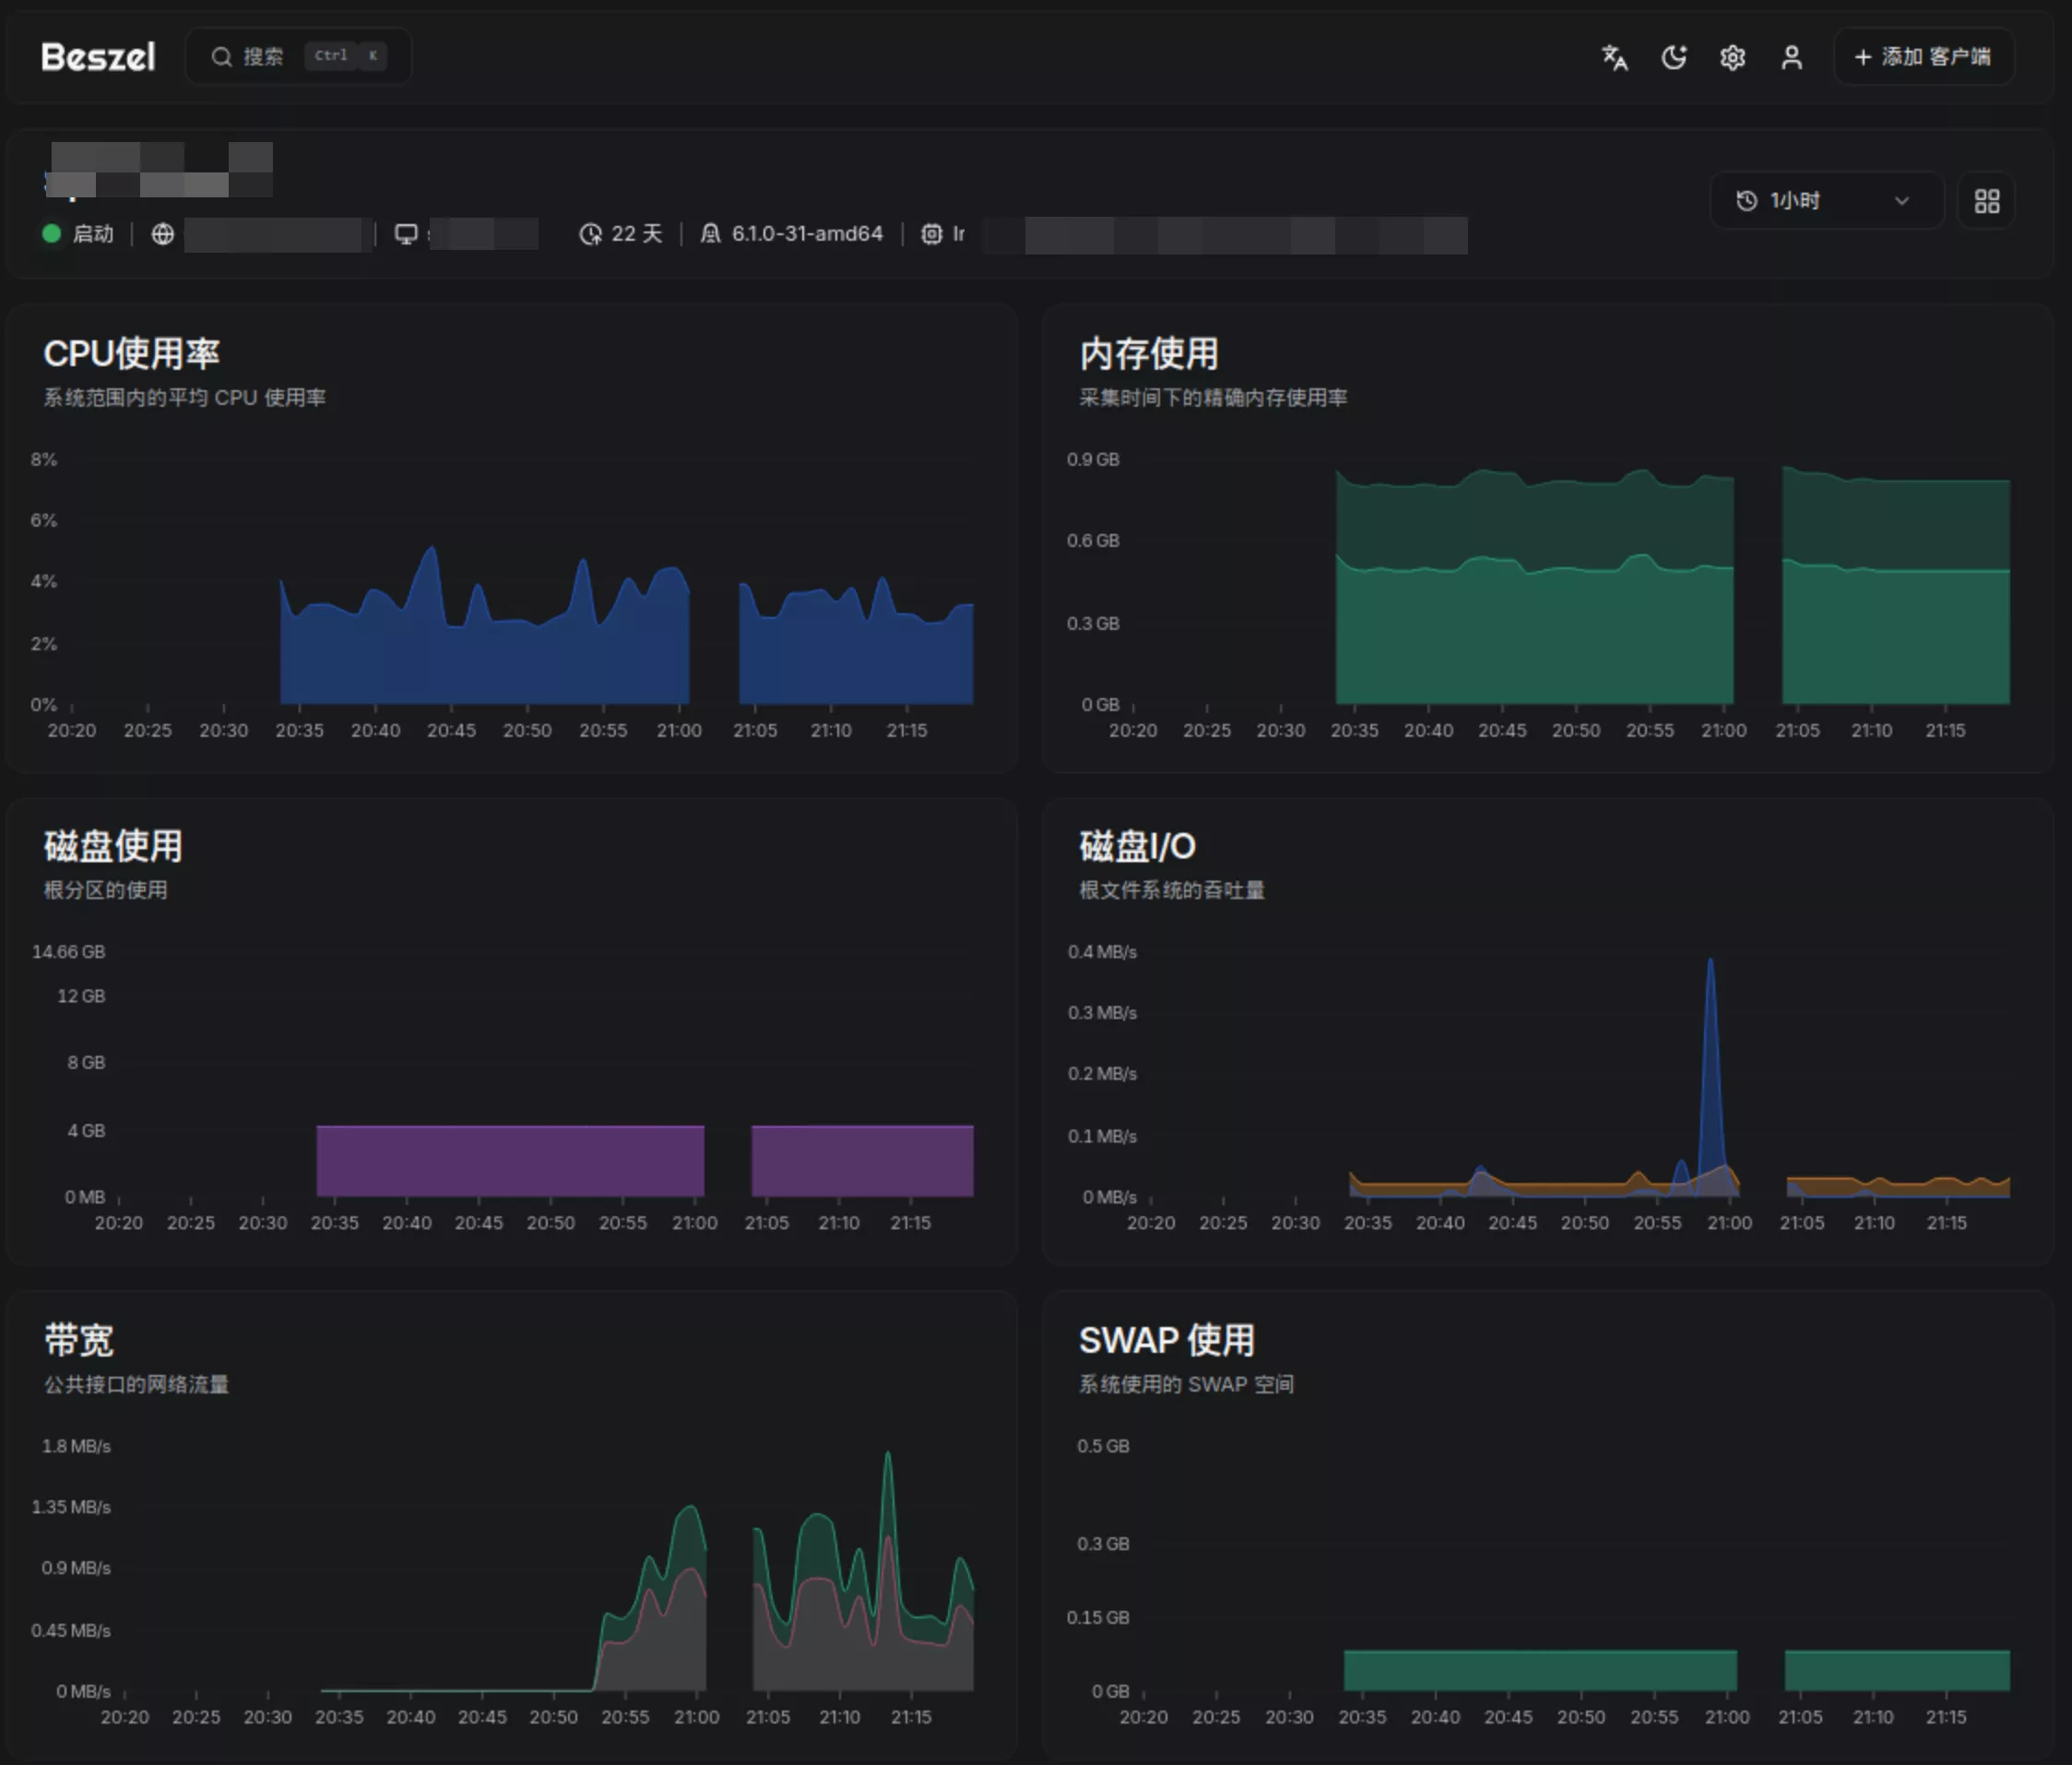
首页截图

节点详情页

作为轻量级的 k3s/k8s 集群监控方案确实不错,比 kube-prometheus-stack 这样的庞然大物轻便太多,解决轻量的监控和告警需求。

下面直接贴出 hubagentmanifests

hub

---
kind: PersistentVolumeClaim
apiVersion: v1
metadata:
  name: beszel-zgus1-pvc
  namespace: beszel
spec:
  accessModes:
    - ReadWriteOnce
  resources:
    requests:
      storage: 10Gi
  storageClassName: local-zgus1
---
apiVersion: apps/v1
kind: StatefulSet
metadata:
  name: app
  namespace: beszel
  labels:
    app: beszel
spec:
  replicas: 1
  selector:
    matchLabels:
      app: beszel
  template:
    metadata:
      annotations: {}
      labels:
        app: beszel
    spec:
      #nodeSelector:
      #  kubernetes.io/hostname: zgocloud-us1
      containers:
        - name: app
          image: henrygd/beszel:0.11.1
          ports:
            - containerPort: 8090
              name: web
          env:
            - name: TZ
              value: "Asia/Shanghai"
          volumeMounts:
            - name: beszel-data
              mountPath: /beszel_data
      volumes:
        - name: beszel-data
          persistentVolumeClaim:
            claimName: beszel-zgus1-pvc
---
apiVersion: v1
kind: Service
metadata:
  name: beszel
  namespace: beszel
spec:
  selector:
    app: beszel
  ports:
    - name: web
      port: 8090
      targetPort: 8090
---
apiVersion: networking.k8s.io/v1
kind: Ingress
metadata:
  name: beszel-ingress
  namespace: beszel
  annotations:
    cert-manager.io/cluster-issuer: "cf-cluster-issuer"
spec:
  ingressClassName: nginx
  tls:
  - hosts:
      - <YOUR DOMAIN>
    secretName: <YOUR DOMAIN TLS SECRET NAME>            
  rules:
  - host: <YOUR DOMAIN>
    http:
      paths:
      - path: /
        pathType: Prefix
        backend:
          service:
            name: beszel
            port:
              name: web

agent

apiVersion: apps/v1
kind: DaemonSet
metadata:
  name: agent
  namespace: beszel
spec:
  selector:
    matchLabels:
      app: agent
  template:
    metadata:
      labels:
        app: agent
    spec:
      hostNetwork: true
      containers:
        - env:
            - name: LISTEN
              value: '45876'
            - name: KEY
              value: 'YOUR-KEY-HERE'
          image: henrygd/beszel-agent:latest
          imagePullPolicy: Always
          name: beszel-agent
          ports:
            - containerPort: 45876
              hostPort: 45876
      restartPolicy: Always
      tolerations:
        - effect: NoSchedule
          key: node-role.kubernetes.io/master
          operator: Exists
        - effect: NoSchedule
          key: node-role.kubernetes.io/control-plane
          operator: Exists
  updateStrategy:
    rollingUpdate:
      maxSurge: 0
      maxUnavailable: 100%
    type: RollingUpdate

注意,agent 使用了hostNetwork 网络,实现对宿主机网络的监控并监听 45876 端口,需放通端口后在可以在 hub 加入。如果不使用这个模式,会收集不到网络数据,看到的带宽情况一直是 .
References

k3s-k8s 实现 DevOps 方案横向对比

目前在用 Keel,感觉良好。

主流方案对比

以下是几种可以在 K3s 中实现轻量级 DevOps 解决方案对比:

方案 资源占用 易用性 Web UI 集成能力 配置复杂度 特点
ArgoCD 中等 ★★★★☆ 优秀 原生支持 Git/镜像更新 中等 GitOps 专注,声明式部署
FluxCD ★★★☆☆ 基础(最新版改进) 原生支持 Git/镜像更新 中等 GitOps 专注,自动化程度高
Drone ★★★★☆ 优秀 需配置触发器 轻量级,无需 CRD
Jenkins X ★★☆☆☆ 良好 丰富 功能全面但较重
Tekton 中等 ★★★☆☆ 需安装Dashboard 高度可定制 中高 云原生管道
Keel 极低 ★★★★★ 简单 专注镜像更新 极低 超轻量,专注自动部署

方案详细分析

1. ArgoCD

优势:

  • 优秀的 Web UI,直观展示应用状态
  • GitOps 原生支持,可监控仓库变化
  • 支持镜像更新自动化(通过 Image Updater 插件)
  • 良好的 K8s 集成度,使用 CRD 扩展

劣势:

  • 资源占用相对较高
  • 初期配置有一定学习曲线

资源需求: 至少 1-2 核 CPU,2GB 内存

2. FluxCD

优势:

  • 极轻量级设计,资源消耗小
  • 完全自动化的 GitOps 流程
  • 内置镜像更新自动化
  • 无需持续手动干预

劣势:

  • UI 相对简单(Flux v2 已有改进)
  • 学习曲线略陡

资源需求: 约 0.5 核 CPU,512MB 内存

3. Drone

优势:

  • 极轻量级 CI/CD 系统
  • 简单直观的 Web UI
  • 配置简单(YAML 文件)
  • 与 GitHub 集成良好

劣势:

  • 需要额外配置触发器实现自动化部署
  • 功能不如大型 CI/CD 平台丰富

资源需求: 约 0.5 核 CPU,512MB 内存

4. Keel

优势:

  • 超轻量级,专注于一件事:自动化部署更新后的镜像
  • 配置极其简单(注解或简单 CRD)
  • 支持多种触发方式:Webhook、轮询或 Pub/Sub
  • 几乎零配置即可工作

劣势:

  • 功能单一,仅专注于部署更新
  • UI 非常基础
  • 社区相对小众

资源需求: 约 0.2 核 CPU,256MB 内存

推荐方案

基于需求(轻量级、简单配置、Web UI、自动化部署):

主推方案: Keel + GitHub Actions

  1. GitHub Actions 负责 CI 部分(代码提交触发构建并推送到 Docker Hub)
  2. Keel 负责 CD 部分(检测到新镜像自动更新部署)

优势:

  • 最轻量级组合,资源占用最小
  • 配置极其简单,只需在部署中添加几个注解
  • GitHub Actions 原生集成 GitHub
  • 完全满足您的自动化流程需求

配置示例:

apiVersion: apps/v1
kind: Deployment
metadata:
  name: your-app
  annotations:
    keel.sh/policy: force  # 强制更新策略
    keel.sh/trigger: poll  # 轮询 Docker Registry
    keel.sh/pollSchedule: "@every 2m"  # 每2分钟检查
spec:
  template:
    spec:
      containers:
        - name: your-container
          image: your-dockerhub/your-image:latest

替代方案: ArgoCD

如果您需要更强大的 UI 和更完整的 GitOps 工作流,推荐使用 ArgoCD,虽然资源消耗稍高,但提供了更全面的功能和更好的可视化体验。

结论

Keel + GitHub Actions 是最轻量且直接的解决方案,几乎零配置即可工作。如果需要更全面的 GitOps 体验和更好的可视化,可以考虑 ArgoCD,它虽然资源消耗稍高,但提供了更完善的功能。

k8s 配置访问私有镜像仓库

harbor 私有仓库、aliyun acr 等同理。

创建凭据

以创建 docker-registry-creds 为例,按需调整名称

kubectl create secret docker-registry docker-registry-creds --docker-server="<私有仓库域名>"
--docker-email=test@test.com 
--docker-username='******' 
--docker-password='******'

# 参数解释
# --docker-server 是私有docker仓库全限定域名(FQDN)
# --docker-username 是机器人账户的username,需要用单引号引起来。
# --docker-password 是机器人账户生成的token,需要用单引号引起来。
# --docker-email 是docker邮箱(非必须)。
# 这样就成功地将集群中的docker凭据设置为名为docker-registry-creds的secret。

使用凭据

apiVersion: v1
kind: Pod
metadata:
  name: nginx
  labels:
    app: nginx
spec:
  containers:
  - name: nginx
    image: <私有仓库域名>/kubernetes/nginx:latest 
    ports:
    - containerPort: 80
  imagePullSecrets:
    - name: docker-registry-creds

References

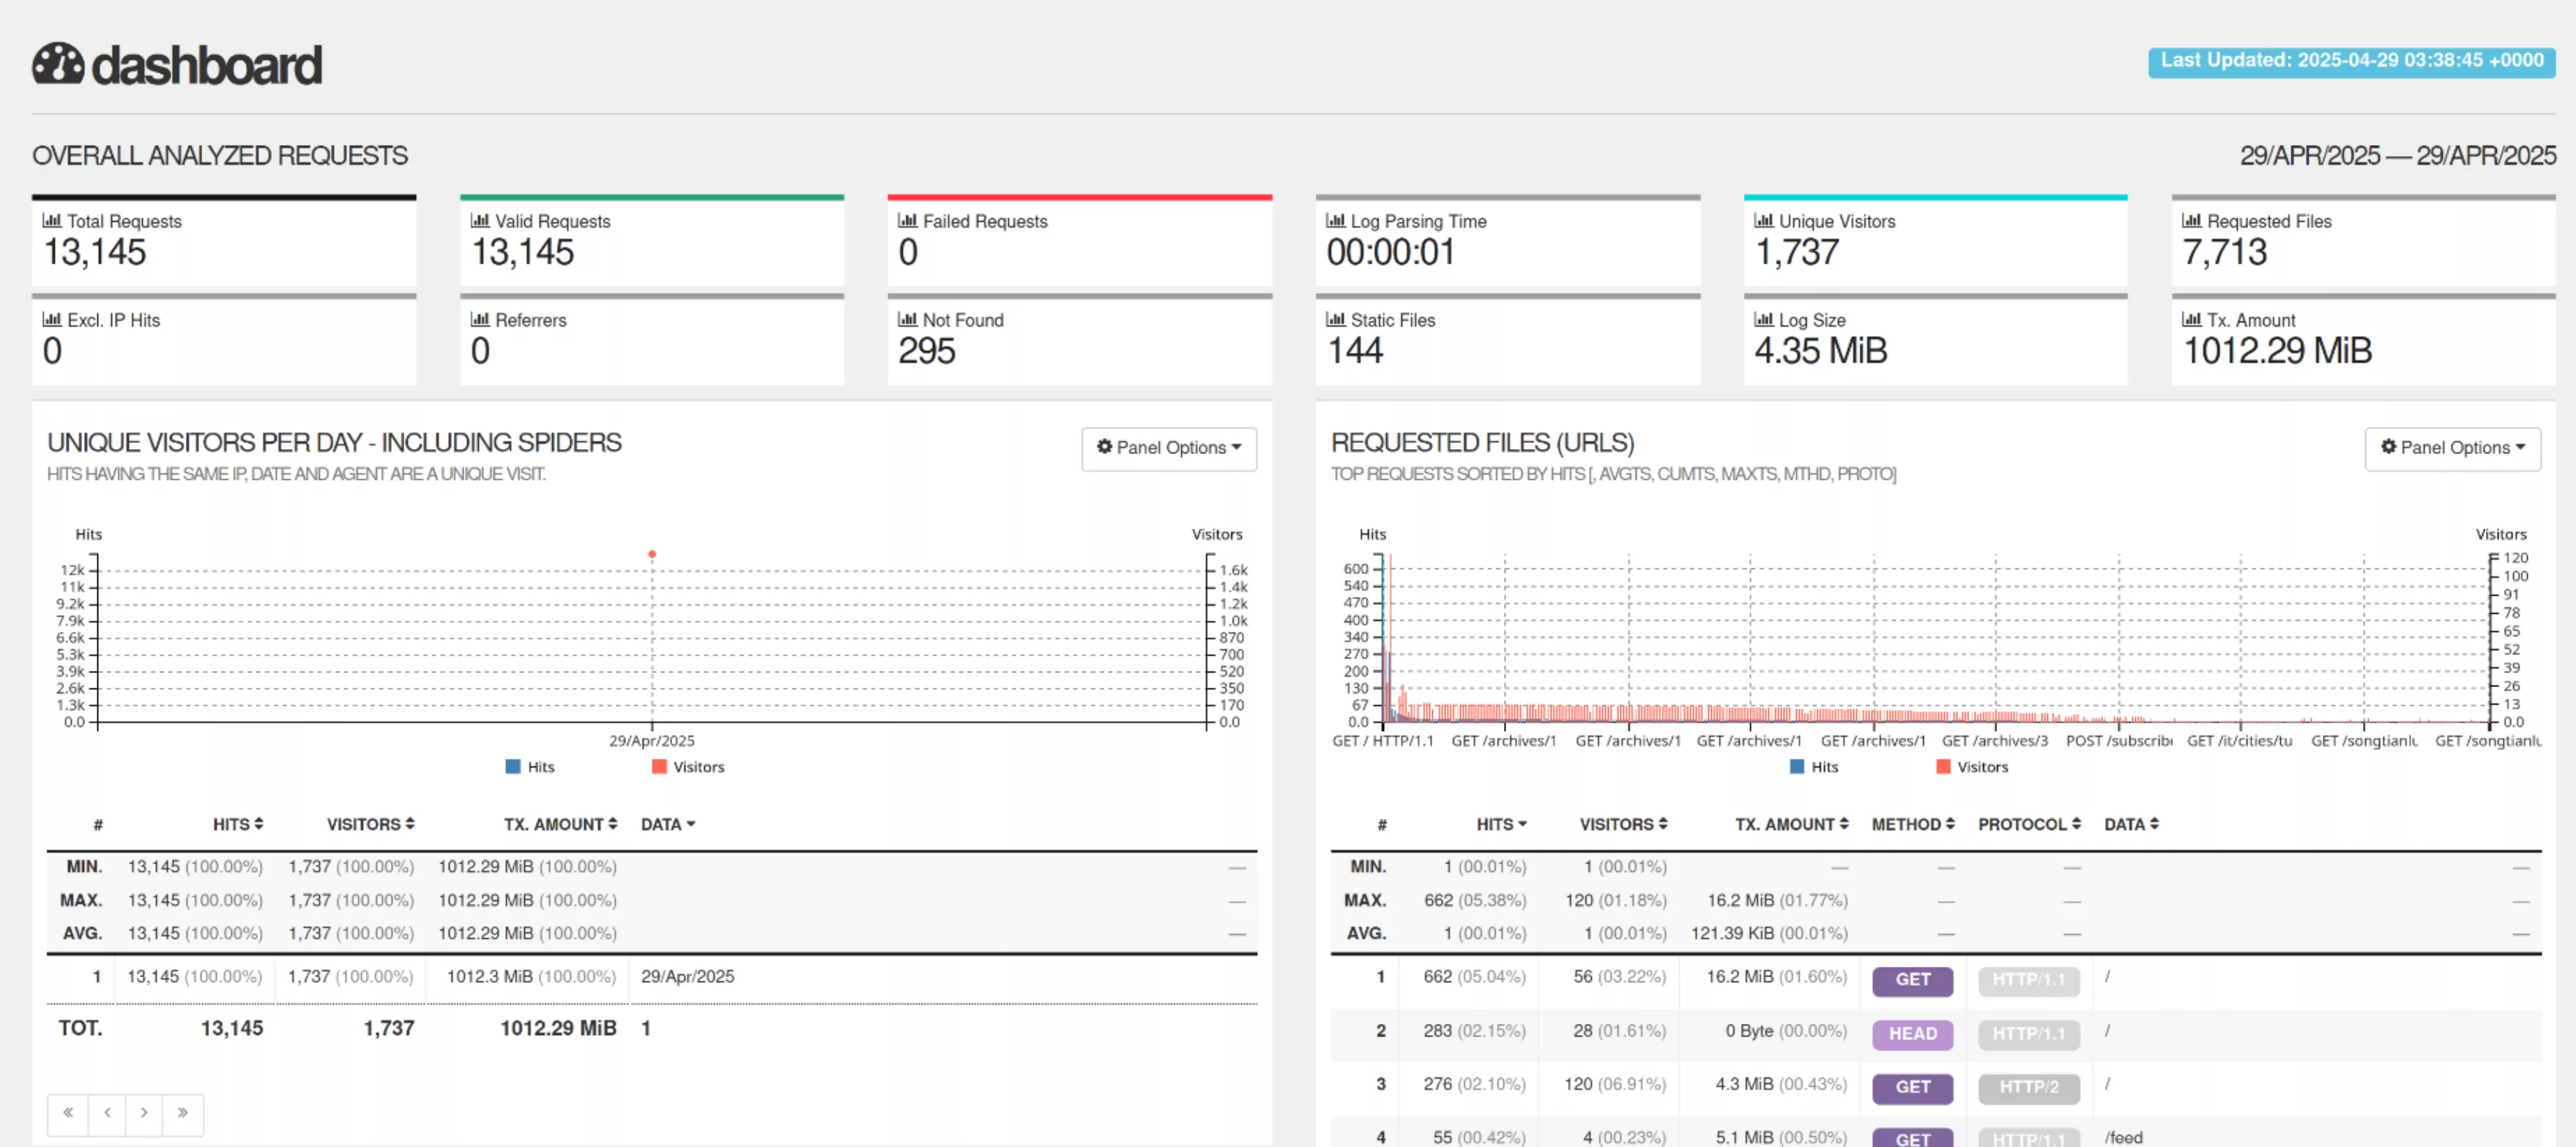
GoAccess 分析多网站日志方法

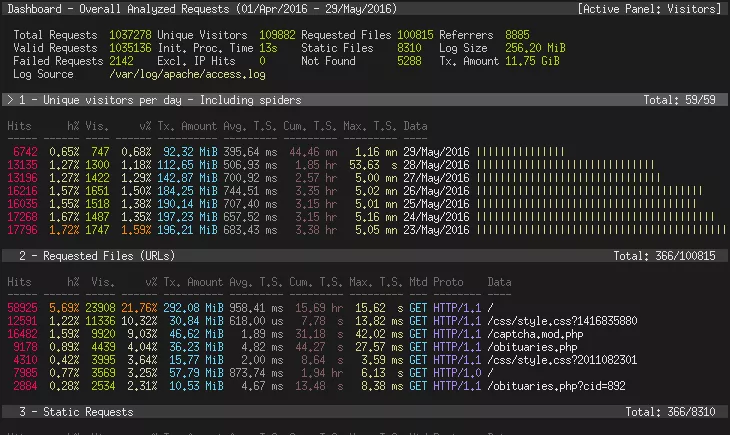
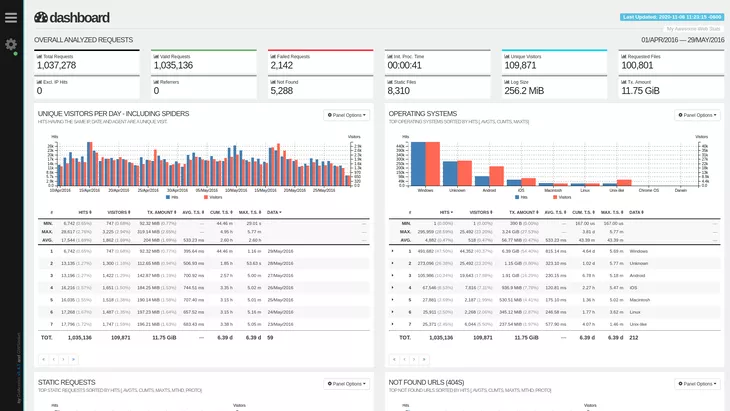
GoAccess 是一个开源的实时 网络日志分析器和交互式查看器,可以在 *nix 系统的终端中或通过浏览器运行。 cli

browser

默认情况下,goacccess 分析 COMBINED 类型的日志,也是 nginx/apache 默认的形式。goaccess 是支持多站点分析的,根据官网说法,只要日志格式中带有 %v 就会开启,其实比较简单的做法是使用 VCOMBINED 类型的日志分析即可。想要分析 VCOMBINED 类型的日志,需要在 nginx 等日志中做一点点细微的调整。

goaccess ingex

nginx access.log 日志格式增加 host

如果多个网站的日志交织在同一个 access.log 日志中,首先需要调整 nginx access.log 日志格式:

根据官网,默认的格式为:

$remote_addr - $remote_user [$time_local] "$request" $status $body_bytes_sent "$http_referer" "$http_user_agent" $request_length $request_time [$proxy_upstream_name] [$proxy_alternative_upstream_name] $upstream_addr $upstream_response_length $upstream_response_time $upstream_status $req_id

来自 ingress-nginx 官网

修改为符合 VCOMBINED 规范的日志,仅需做一点调整即可:

$host:$server_port $remote_addr - $remote_user [$time_local] \"$request\" $status $body_bytes_sent \"$http_r  
eferer\" \"$http_user_agent\" $request_length $request_time [$proxy_upstream_name] [$proxy_alternative_upstream_name] $upstream_addr $  
upstream_response_length $upstream_response_time $upstream_status $req_id

仔细看,其实就是在最前面增加了 $host:$server_port ,经过实践,如果仅增加 $host 是不符合 VCOMBINED 格式的,在 goaccess 解析时会报错。

goaccess 分析

分析时可以指定日志格式,默认提供了多种格式,默认会采用 COMBINED ,可以解析 nginx 的默认日志格式。

goaccess "$NGINX_LOG_FILE" -o "/path/to/report.html" --log-format=COMBINED

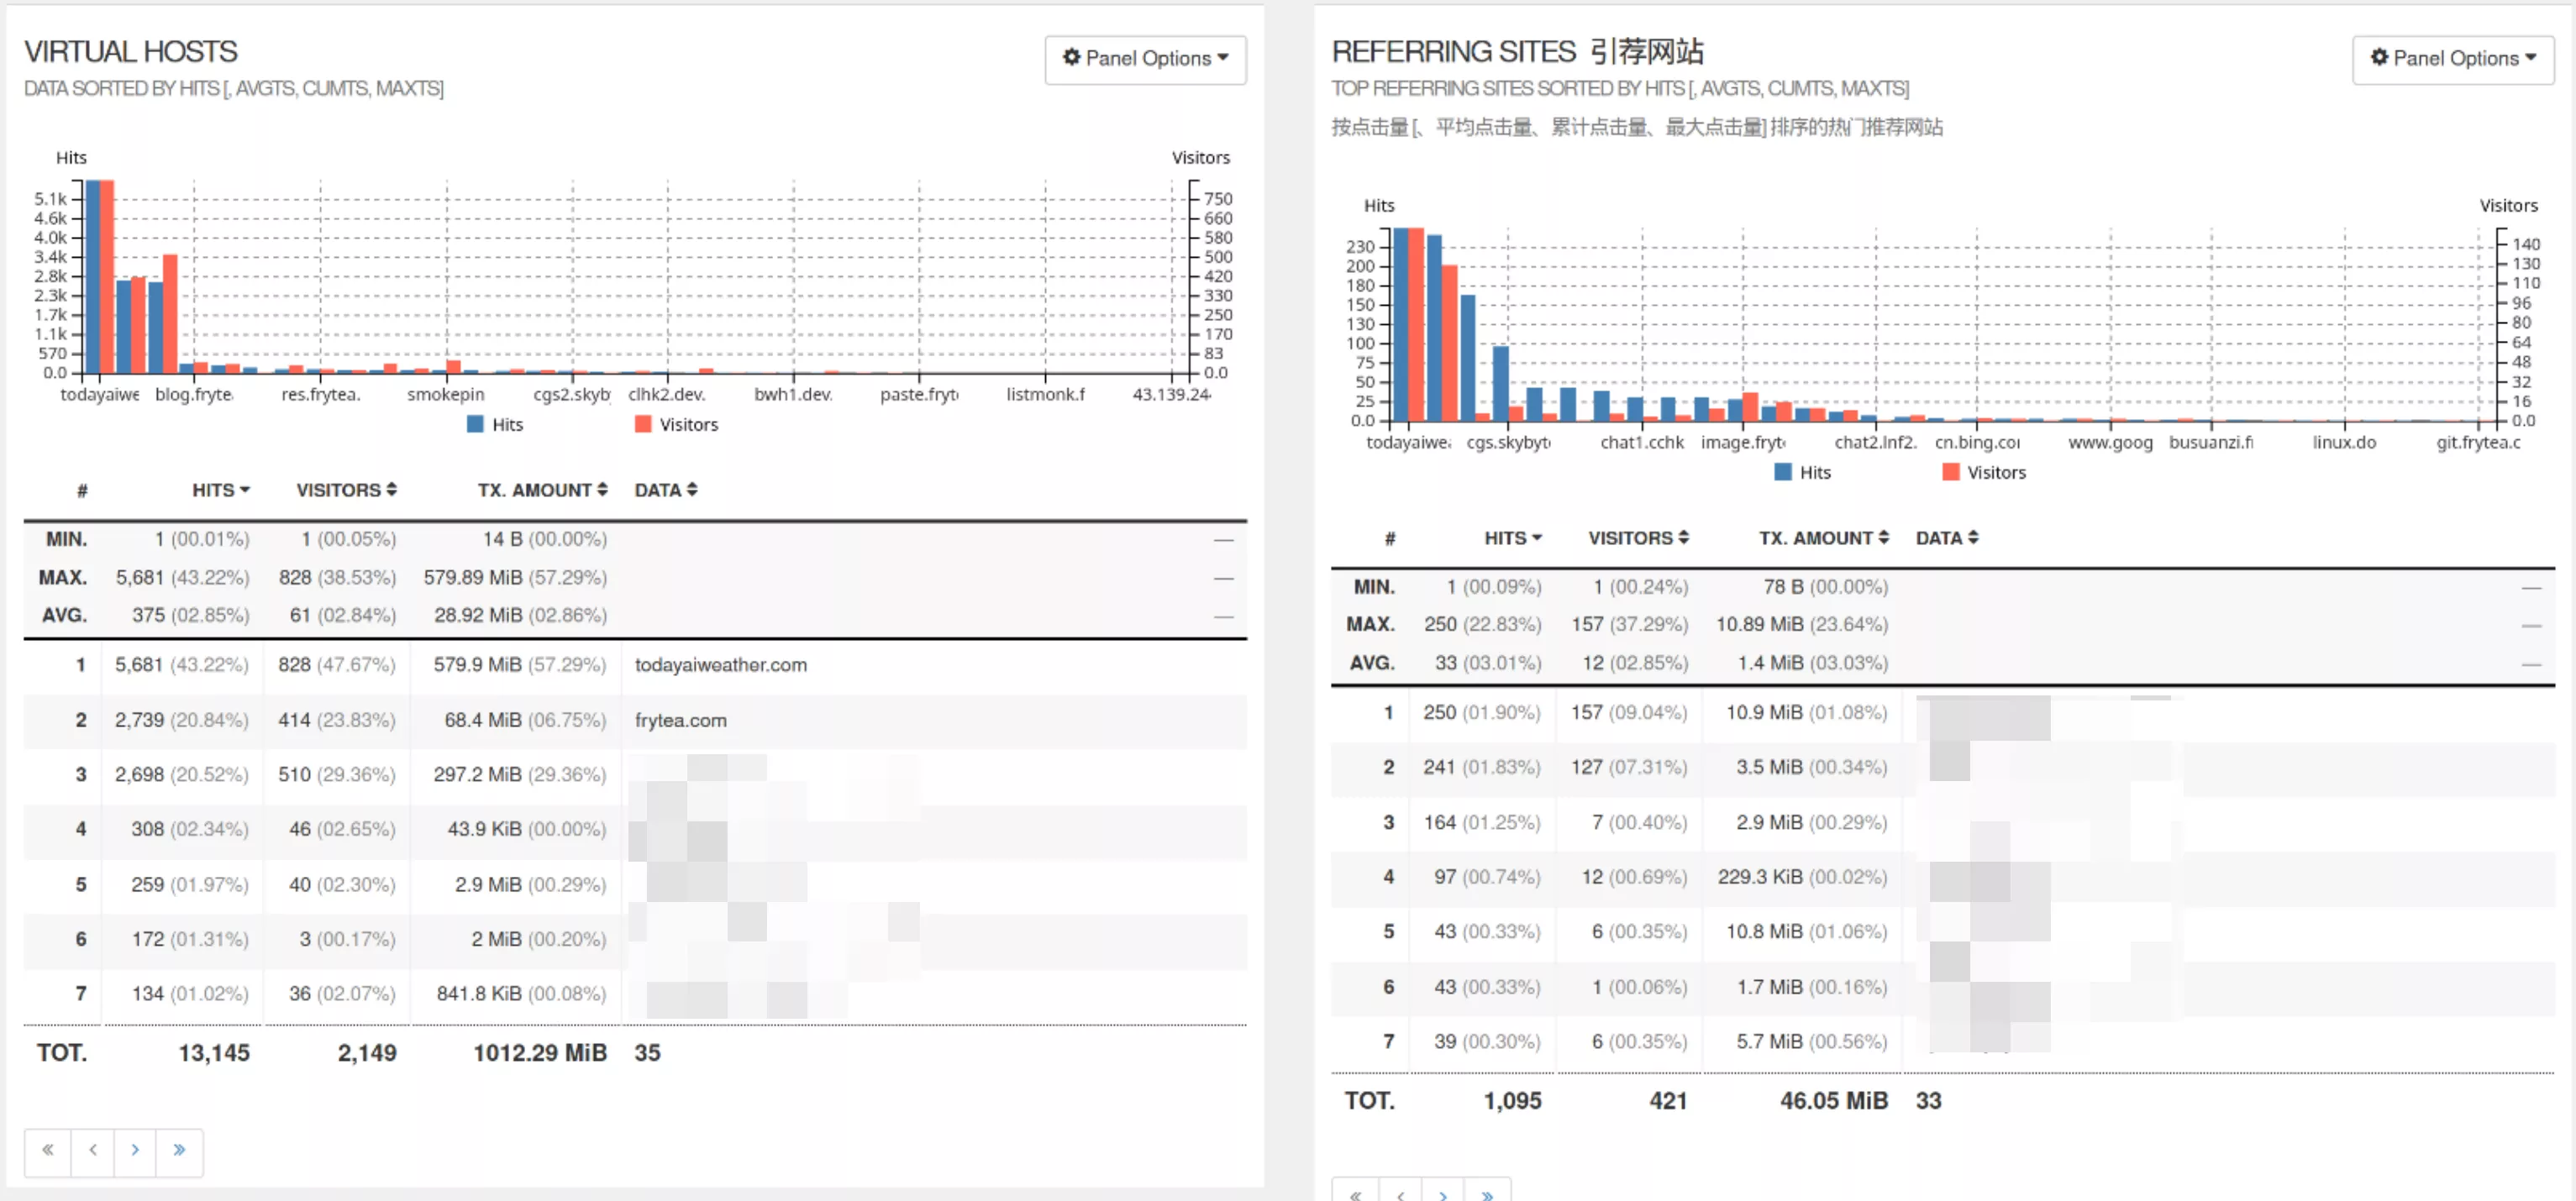
再按照上面方法配置后,在 nginx 日志中具有了 host 信息后,就可以分析带有主机信息的日志了:

goaccess "$NGINX_LOG_FILE" -o "/path/to/report.html" --log-format=VOMBINED

如果一切顺利,打开报告即可看到多主机分析报表。

Virtual Hosts

References

Octant – 以开发人员为中心的开源 Kubernetes Web 界面

TL;DR

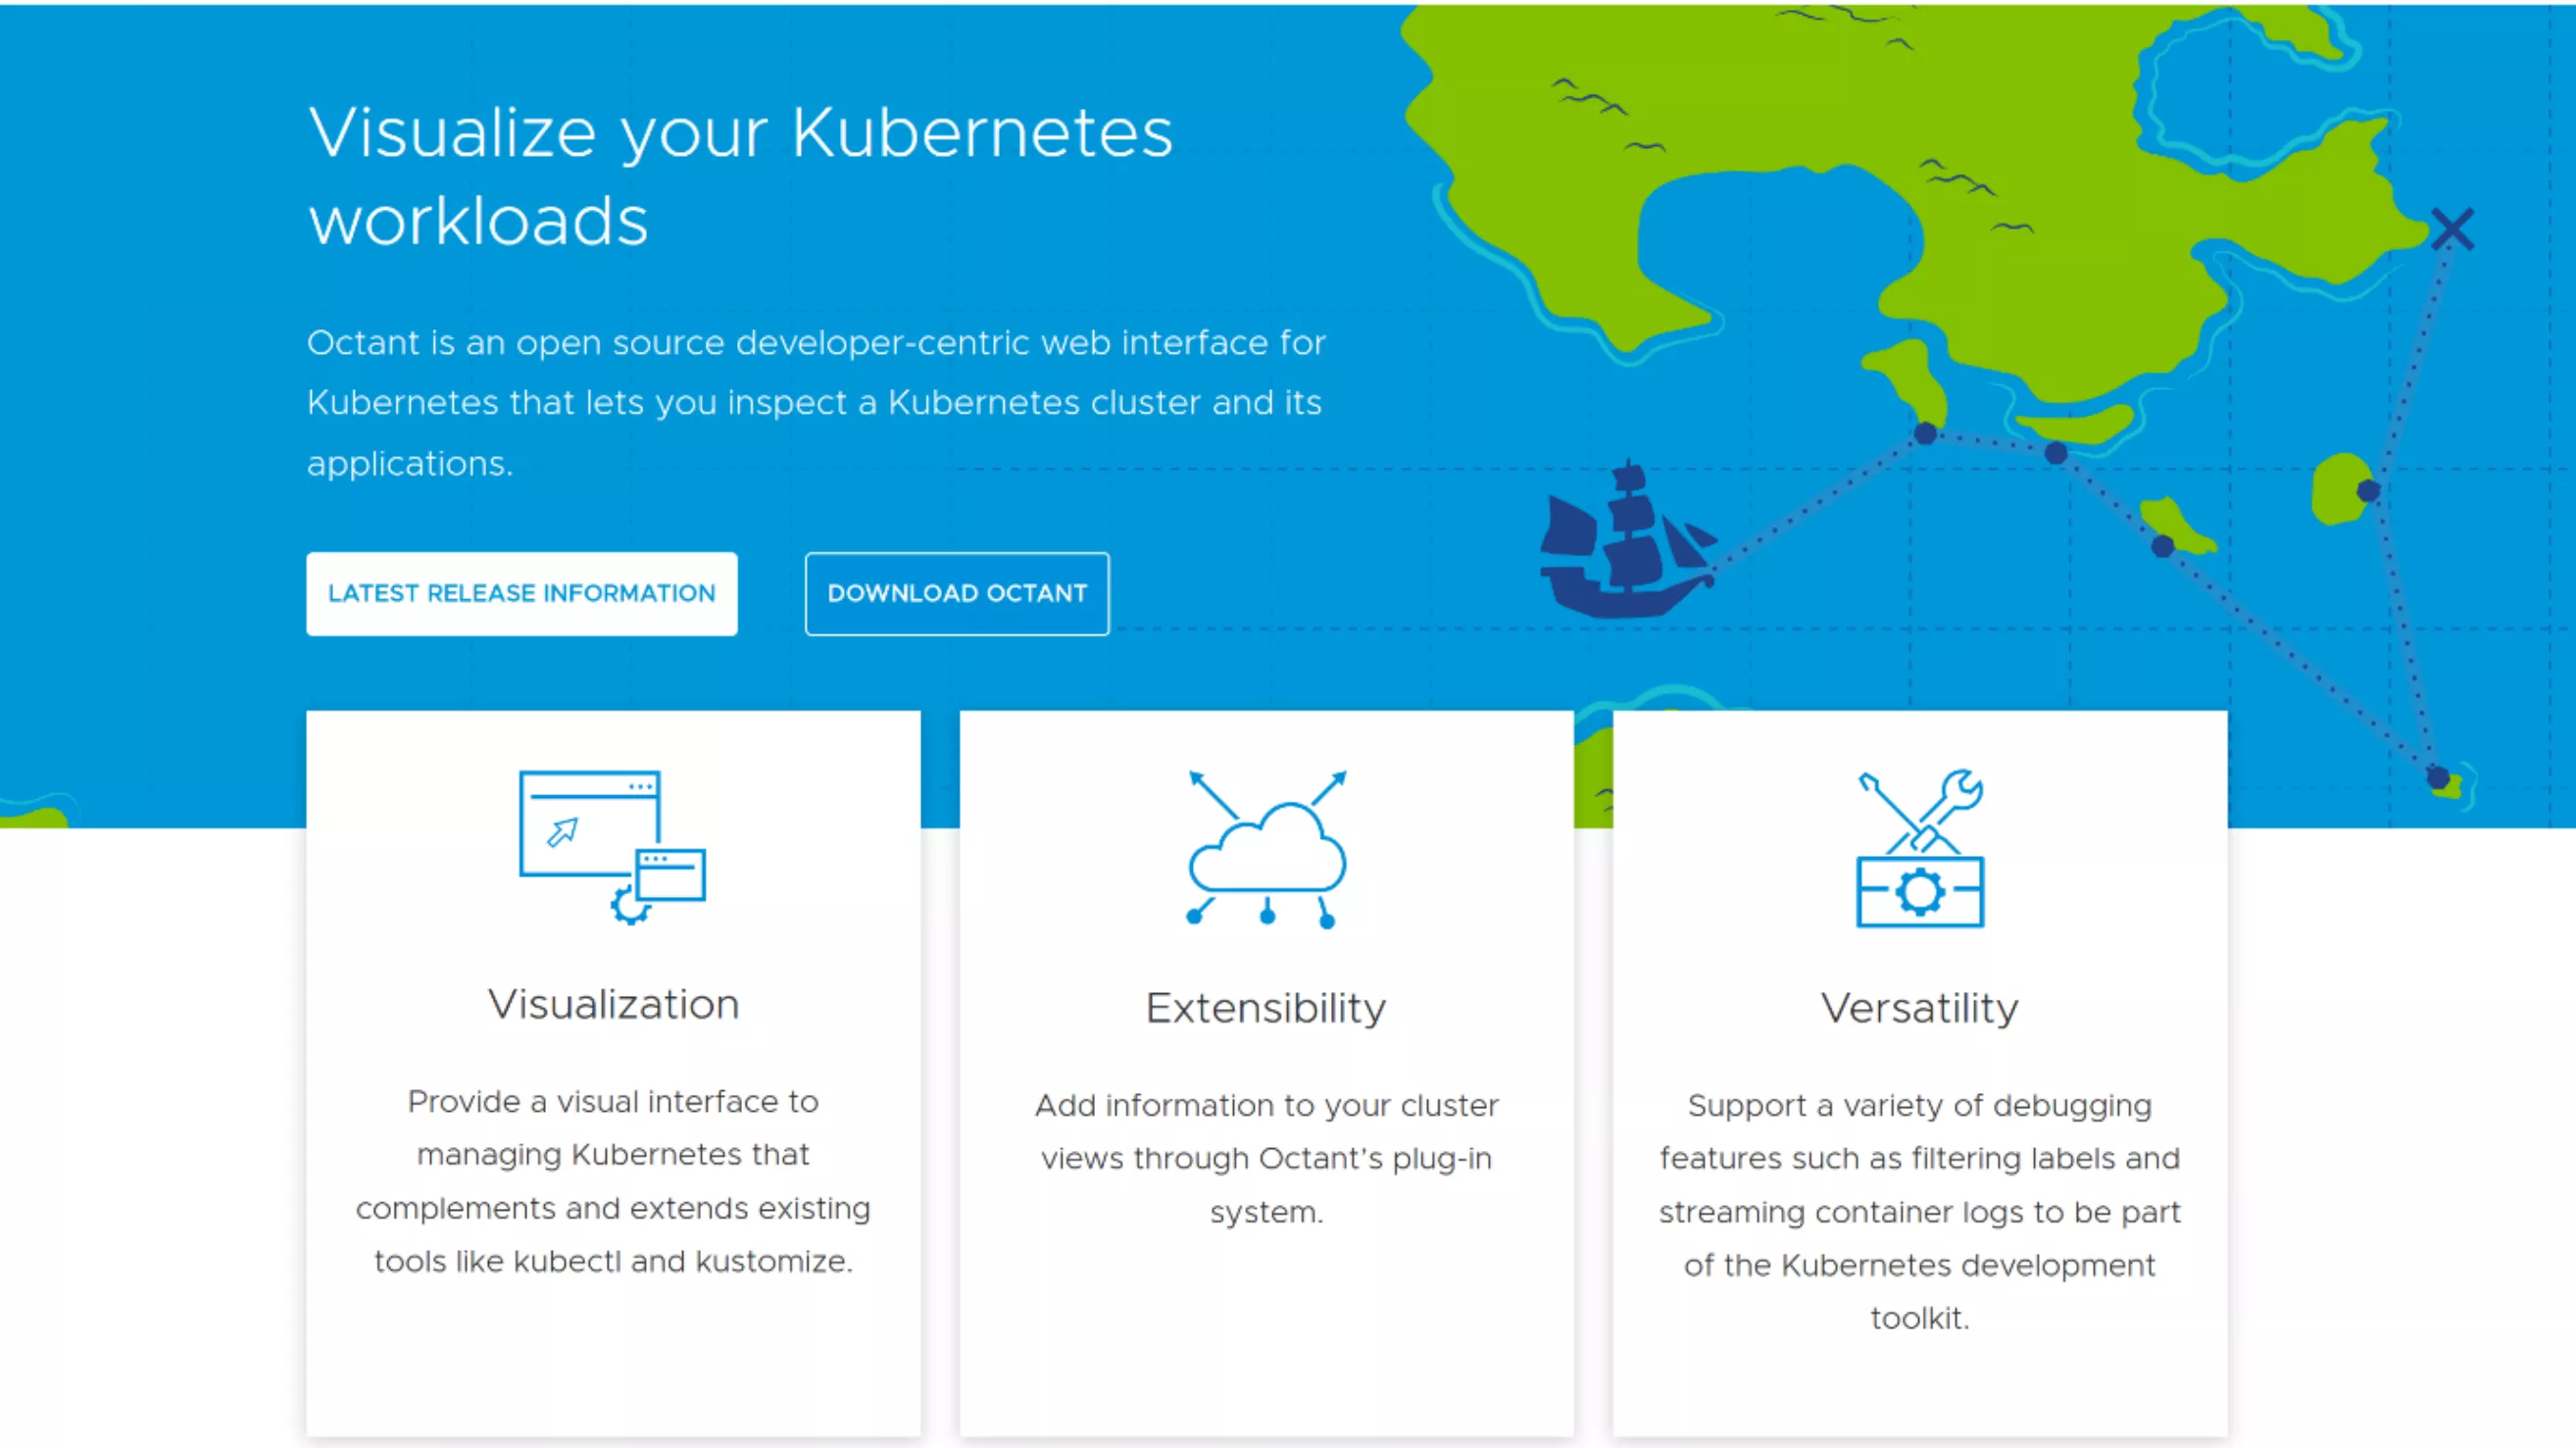
Octant 是一个以开发人员为中心的开源 Kubernetes Web 界面,可让您检查 Kubernetes 集群及其应用程序,能够帮助开发人员更好理解 Kubernetes 集群复杂性的平台。在这里发现的。

虽然 VMware 已结束该项目的积极开发 ,但看起来确实很好用,收藏备用。

# ArchLinux
yay -S octant-bin

# Windows
choco install octant --confirm

# MacOS
brew install octant

官网截图

Usage

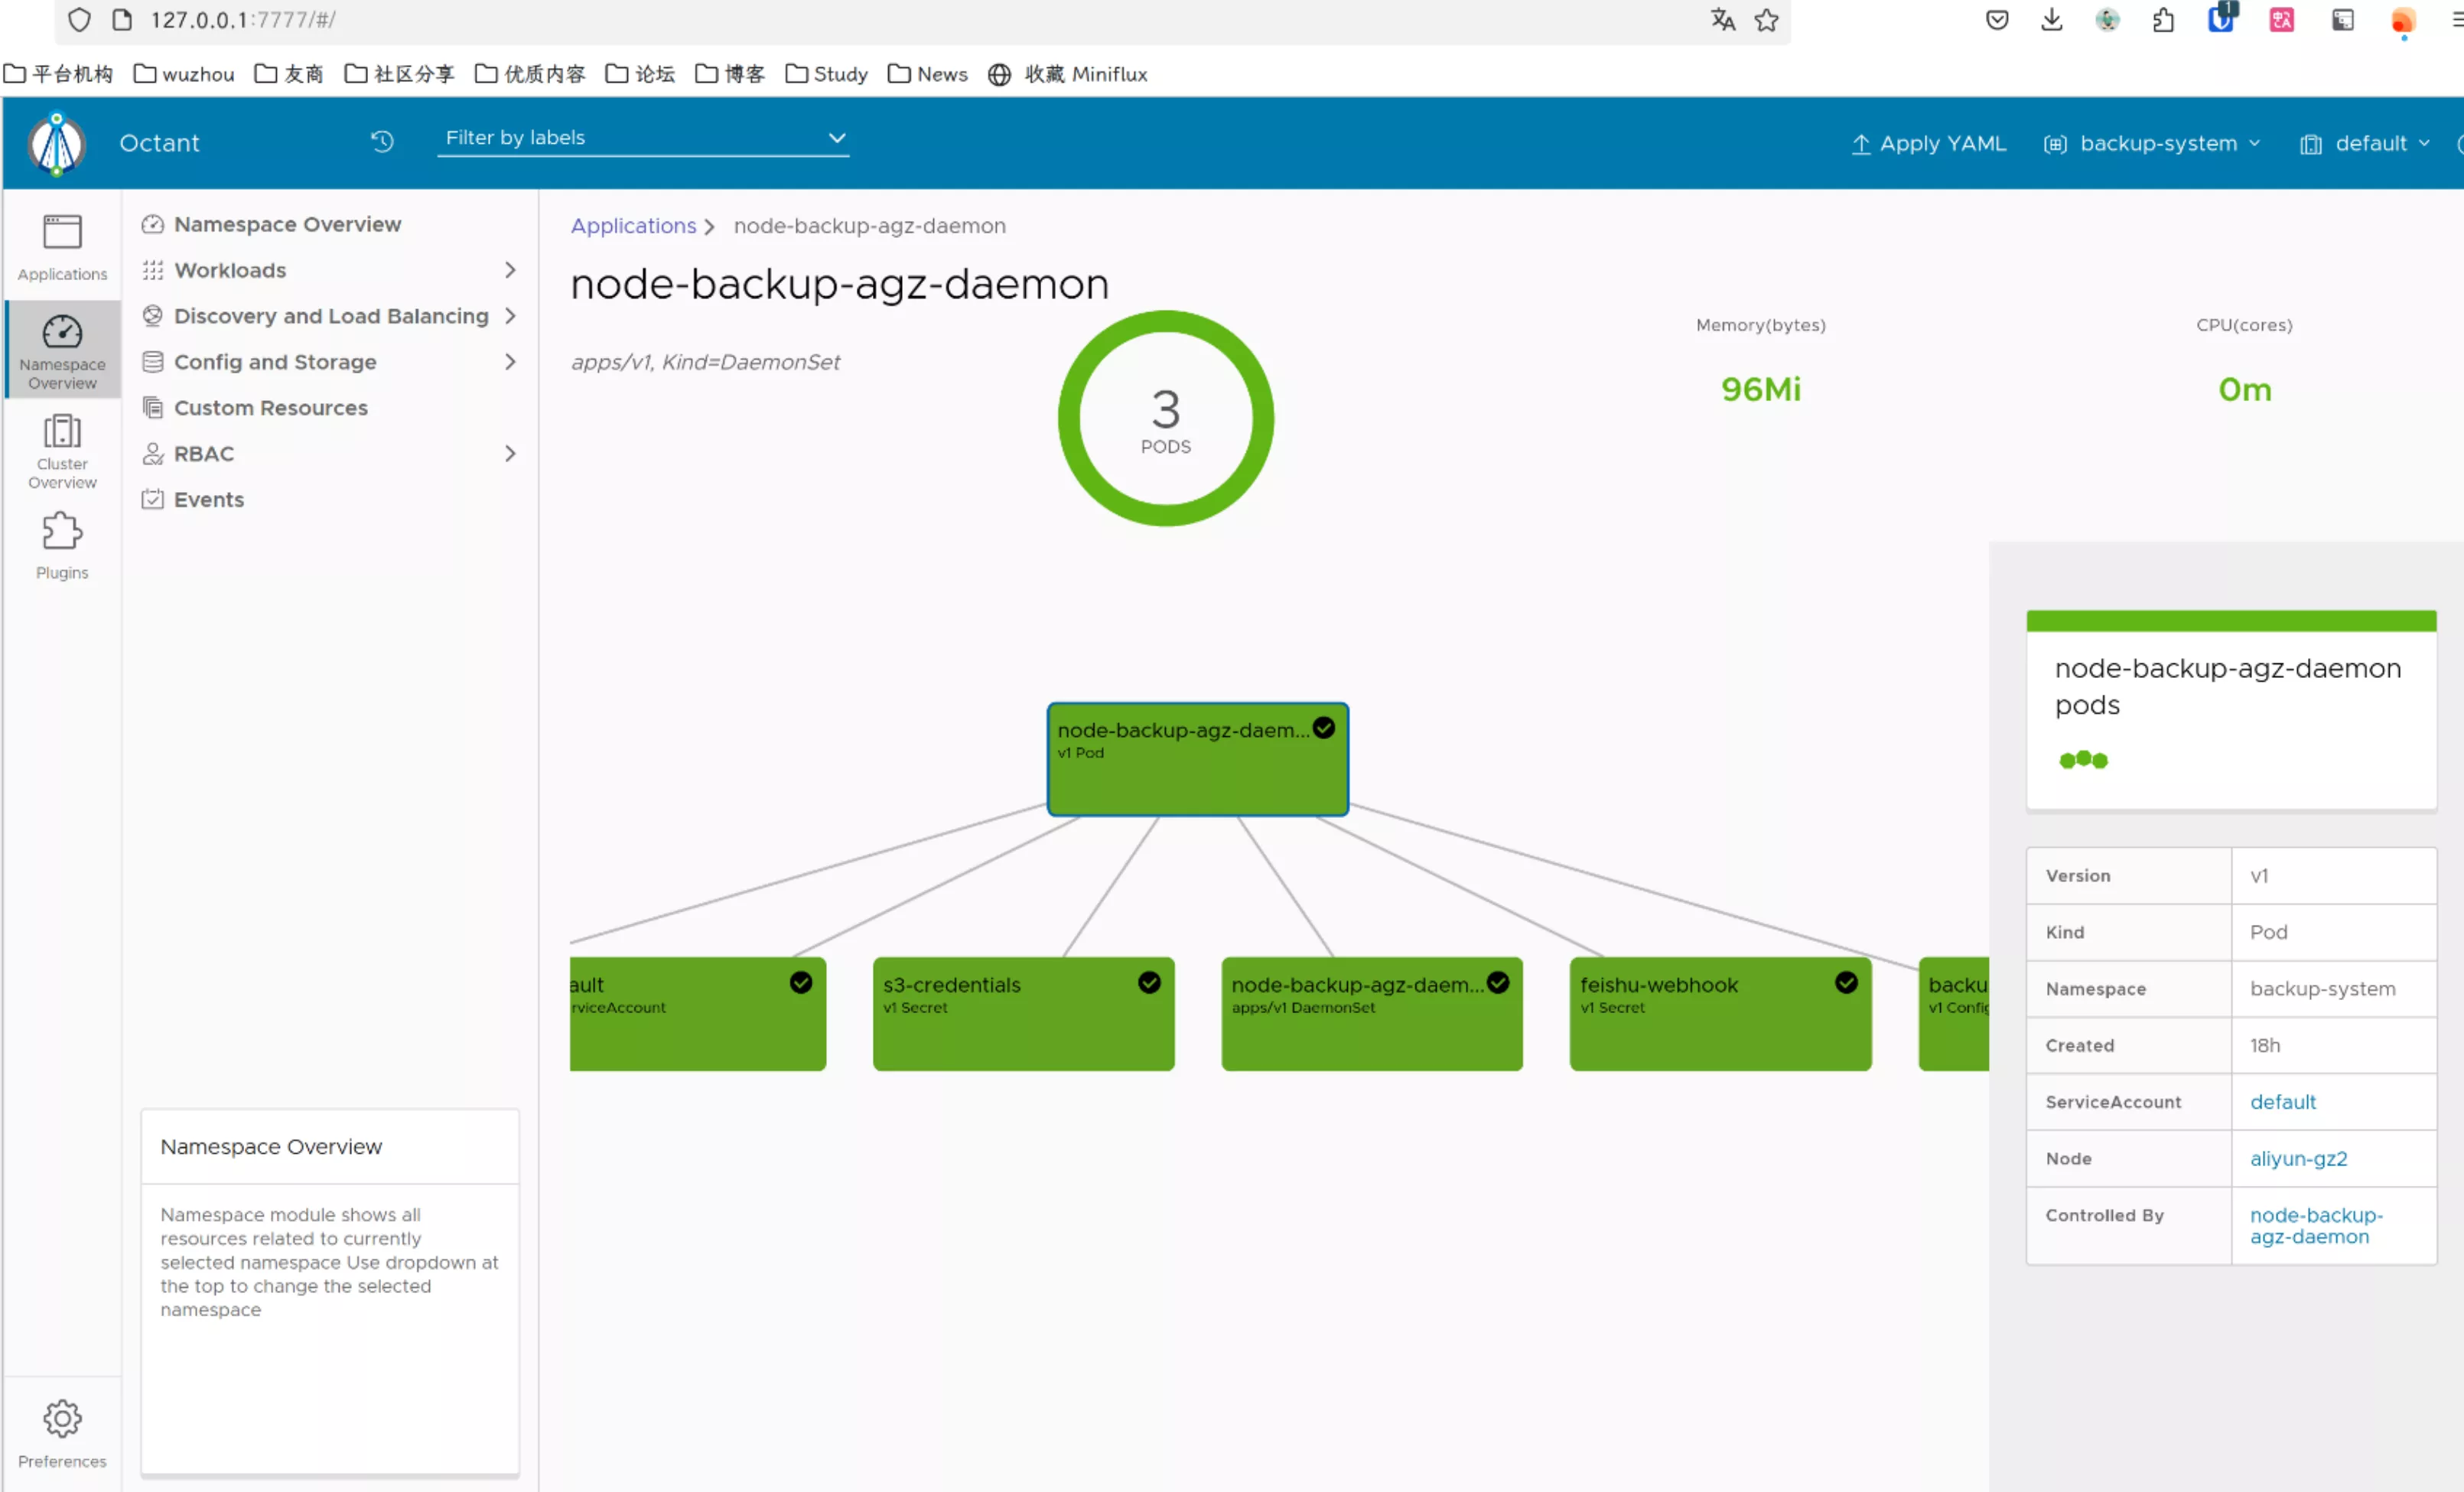
octant

界面截图

References

Tailscale 自建 DERP 并配置 SSL 完整教程

Tailscale 在很多场景有着广泛应用,k3s 天然有针对它的支持,最近在基于这个方案构建遍布全球的分布式私有网络。官方的 DERP 服务质量并不稳定, 自建后稳定很多,本文记录详细的过程。

申请 ssl 证书

install acme.sh

这里给出了两种源,国内源为个人自用,不保证可用性。

# global
$ curl https://get.acme.sh | sh -s email=ca@frytea.com
# install acme.sh in china
git clone https://ghproxy.mirror.skybyte.me/https://github.com/acmesh-official/acme.sh.git
cd ./acme.sh
./acme.sh --install -m ca@frytea.com

因为我的服务器 80/443 都被占用,无法采用 HTTP 验证,故示例 CloudflareDNSPod 两家 DNS 验证方法,根据自己实际情况选择即可,其他用法请查阅官方文档 dnsapi

CloudFlare DNS

# derper.xxx.xxx.com 是你的域名,需要解析到你的服务器
$ CF_Token="xxxxxx" CF_Zone_ID="xxxxxx" acme.sh --dns dns_cf --issue -d derper.xxx.xxx.com 
...
[Tue Apr 22 04:54:20 AM PDT 2025] The domain key is here: /root/.acme.sh/derper.xxx.xxx.com_ecc/derper.xxx.xxx.com.key
...
$ mkdir -p /opt/derper/certs
$ acme.sh --install-cert -d derper.xxx.xxx.com --ecc --key-file /opt/derper/certs/derper.xxx.xxx.com.key --fullchain-file /opt/derper/certs/derper.xxx.xxx.com.crt

DndPod DNS Check

# derper.xxx.xxx.com 是你的域名,需要解析到你的服务器
$ DP_Id="xxxxxx" DP_Key=xxxxxx acme.sh --dns dns_dp --issue -d derper.xxx.xxx.com
$ mkdir -p /opt/derper/certs
$ acme.sh --install-cert -d derper.xxx.xxx.com --ecc --key-file /opt/derper/certs/derper.xxx.xxx.com.key --fullchain-file /opt/derper/certs/derper.xxx.xxx.com.crt

配置 Derper

install go

$ GOVERSION=1.23.4 GOARCH=amd64 rm -rf go${GOVERSION}.linux-${GOARCH}.tar.gz && wget https://mirrors.nju.edu.cn/golang/go${GOVERSION}.linux-${GOARCH}.tar.gz -O go${GOVERSION}.linux-${GOARCH}.tar.gz
$ rm -rf /usr/local/go && tar -C /usr/local -xzf go${GOVERSION}.linux-${GOARCH}.tar.gz
$ export PATH=$PATH:/usr/local/go/bin
$ go version

build derper

go install tailscale.com/cmd/derper@main
cp /root/go/bin/derper /usr/local/bin/

script

/opt/derper/runderper

#!/bin/sh
cd /usr/local/bin/
nohup ./derper -hostname derper.xxx.xxx.com -c=derper.conf -a :1214  -http-port -1 -certdir /opt/derper/certs -certmode manual -stun-port 1214 -verify-clients -stun > console.log 2>&1 &
echo $! > app.pid

/opt/derper/stopderper

#!/bin/sh
kill `cat app.pid`
rm -rf app.pid

/etc/systemd/system/derper.service

[Unit]
Description=Derper service
After=network.target

[Service]
Type=forking
ExecStart=/opt/derper/runderper
ExecStop=/opt/derper/stopderper

[Install]
WantedBy=multi-user.target

Usage

# 开机自启并立即启动
systemctl enable --now derper.service

配置到 Tailscale

在你的 Tailscale 管理界面找到 Access Controls (直达 )

{
    "acls": [
    // ...
    ],
    "ssh": [
        // ...
    ],
    // ...
    "derpMap": {
        "OmitDefaultRegions": true, // true 表示不使用官方节点,仅使用自建,默认为 false,按需配置
        "Regions": {
            "900": {
                "RegionID":   900, // 900以上
                "RegionCode": "cn-gz", // 区域代码,会在 `tailscale netcheck` 显示
                "RegionName": "中国-广州", // 区域名称,会在 `tailscale netcheck` 显示
                "Nodes": [
                    {
                        "Name":     "1",
                        "RegionID": 900, // 对应上方ID
                        "HostName": "xxxxx.xxx", // 填写你的DERP服务域名
                        "DERPPort": 12345, // 你的 DERP 服务端口
                        "STUNPort": 1214, // 你的 STUN UDP 服务端口
                    },
                ],
            },
            // 更多DERP节点
        },
    },
    // ...
}

检查可用性

# 检查 DERP 连接情况
$ tailscale netcheck
Report:
        * Time: 2025-04-22T13:25:12.257986394Z
        * UDP: true
        * IPv4: yes, xx.xx.xx.xx:59494
        * IPv6: no, but OS has support
        * MappingVariesByDestIP: false
        * PortMapping: 
        * CaptivePortal: false
        * Nearest DERP: xx xx
        * DERP latency:
                - xx: 9.2ms   (xx xx)
                - xx: 26.9ms  (xx xx)
                - xx: 152.7ms (xx xx)
# 检查 Peer 连接情况
$ tailscale status
100.xx.xx.xx xx-node1          YOURNAME@ linux   -
100.xx.xx.xx xx-node2             YOURNAME@ linux   active; relay "xx", tx 43624652 rx 4118764

References

OpenManus 使用记录

安装运行

# 安装 uv(一个快速的 Python 包管理器):
$ curl -LsSf https://astral.sh/uv/install.sh | sh
# 克隆仓库:
$ git clone https://github.com/mannaandpoem/OpenManus.git
$ cd OpenManus
# 创建并激活虚拟环境:
$ uv venv --python 3.12
$ source .venv/bin/activate  # Unix/macOS 系统
# Windows 系统使用:
# .venv\Scripts\activate
# 安装依赖:
$ uv pip install -r requirements.txt
# 浏览器自动化工具(可选)
$ playwright install
# 在 config 目录创建 config.toml 文件(可从示例复制):
$ cp config/config.example.toml config/config.toml
$ vim config/config.toml
# 一行命令运行 OpenManus:
$ python main.py

实际效果

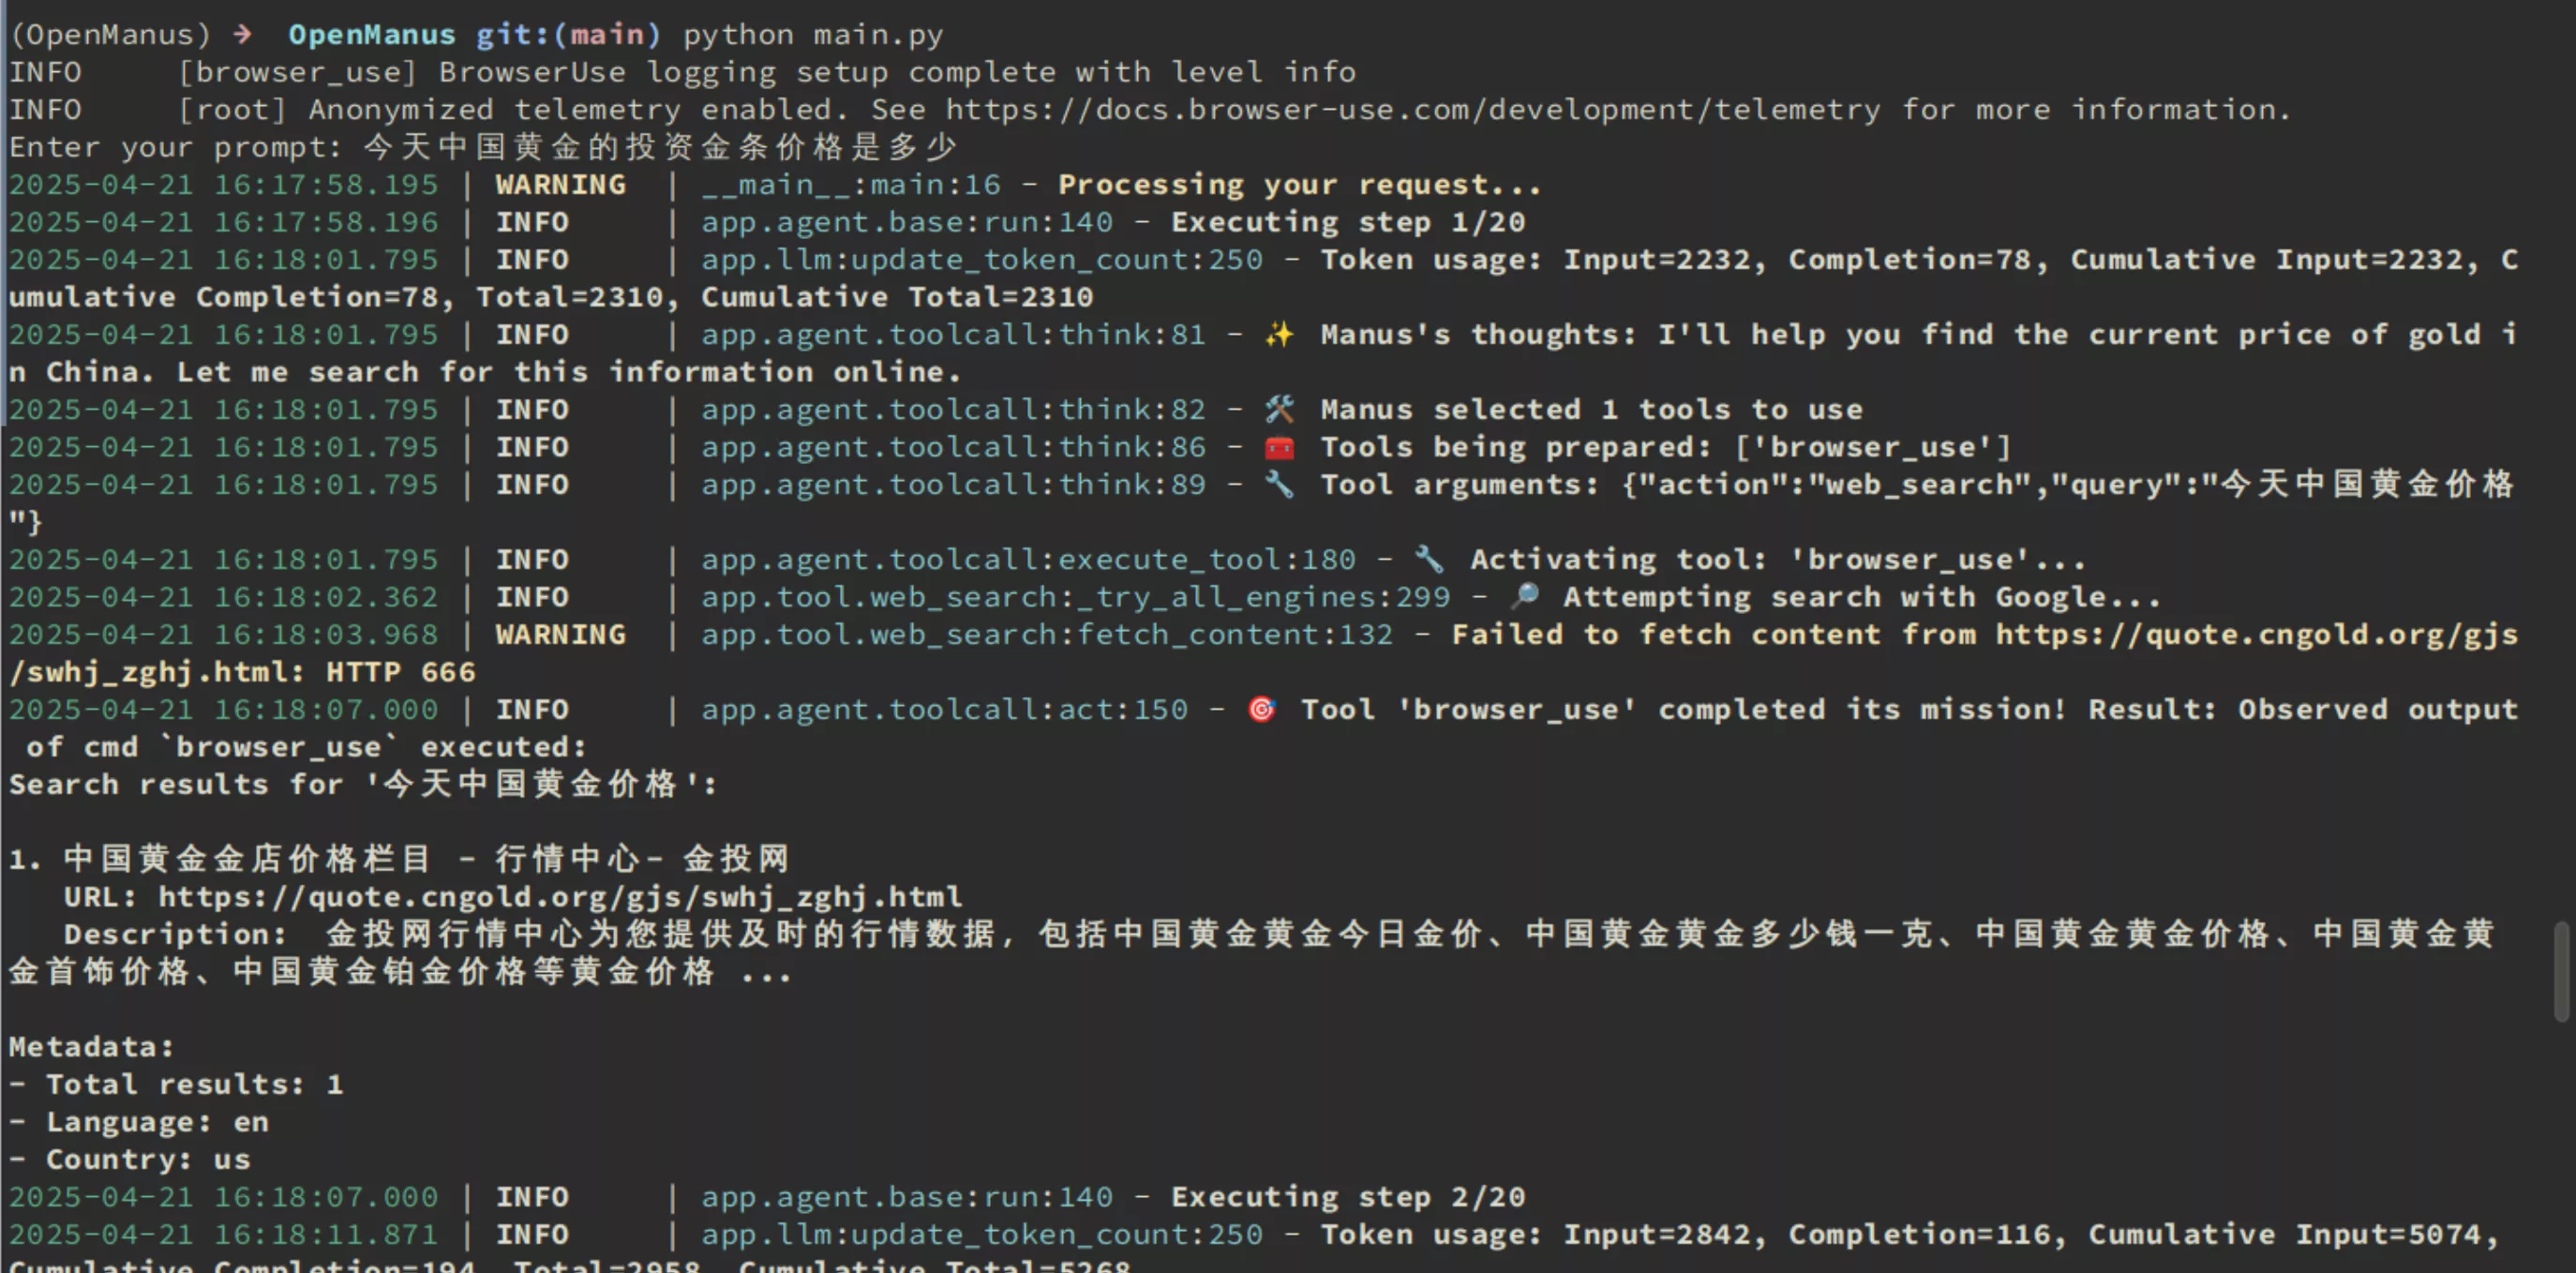
开始执行:

开始执行截图

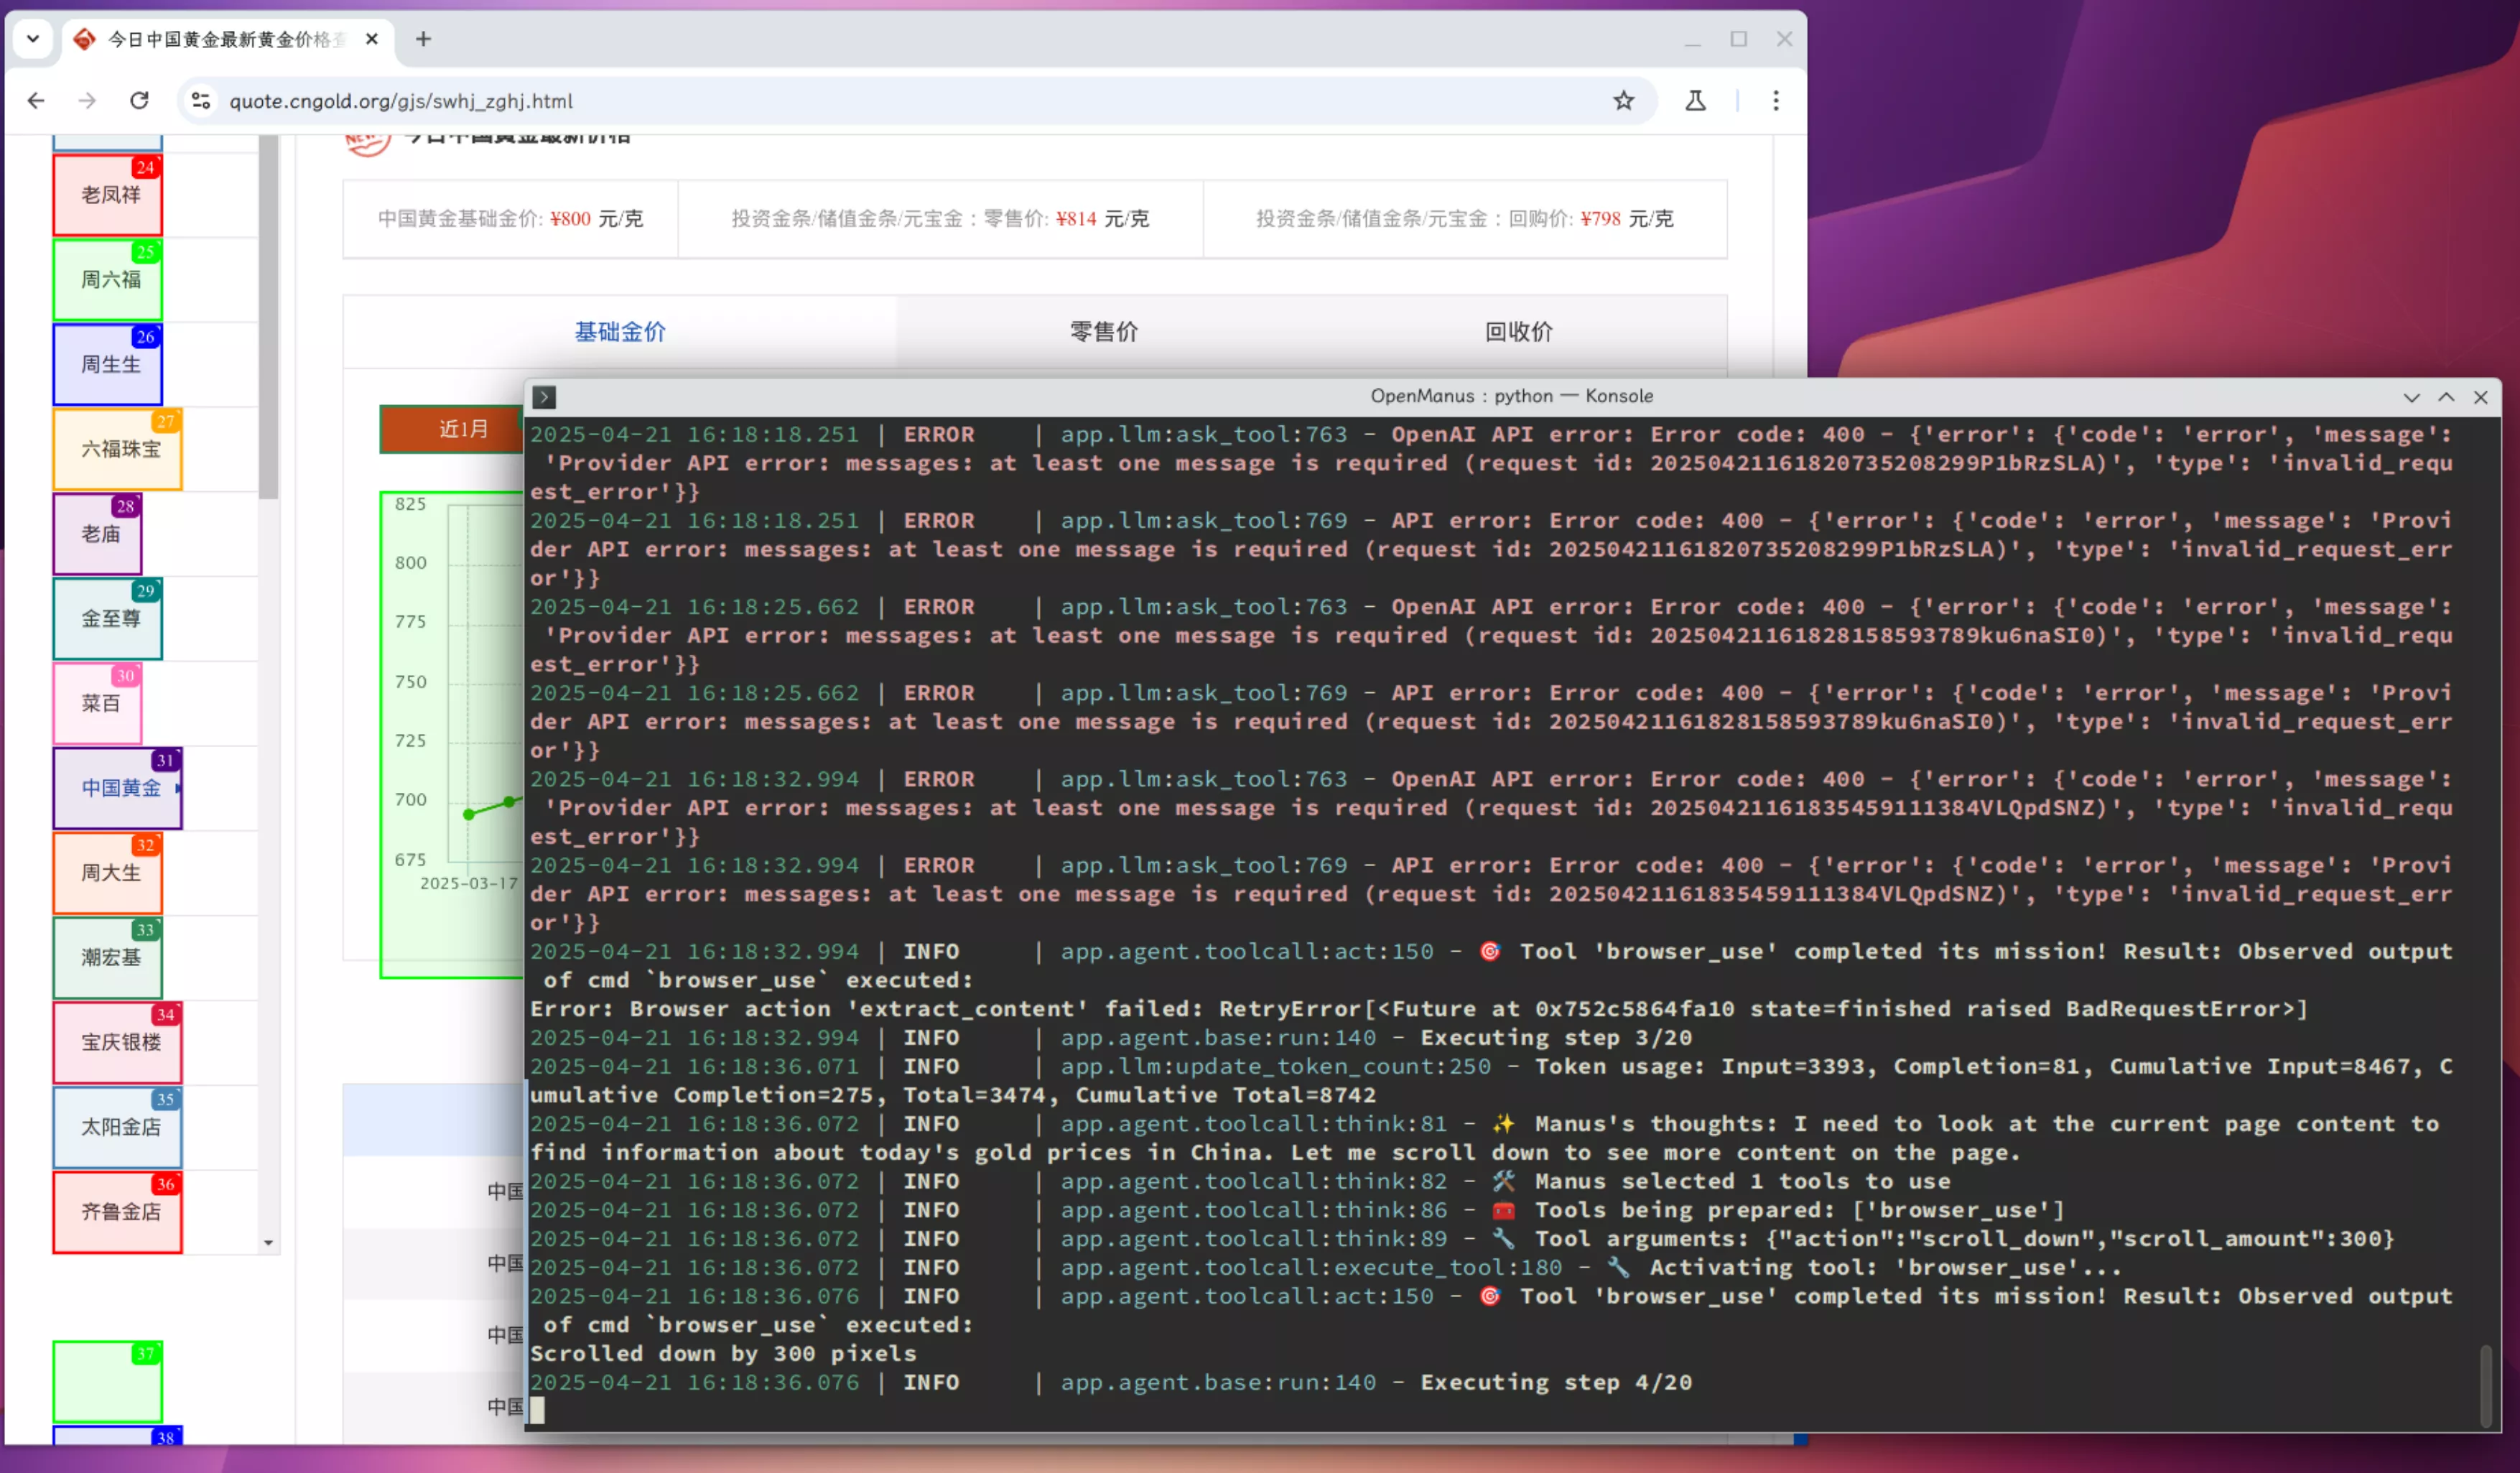
执行过程

执行过程

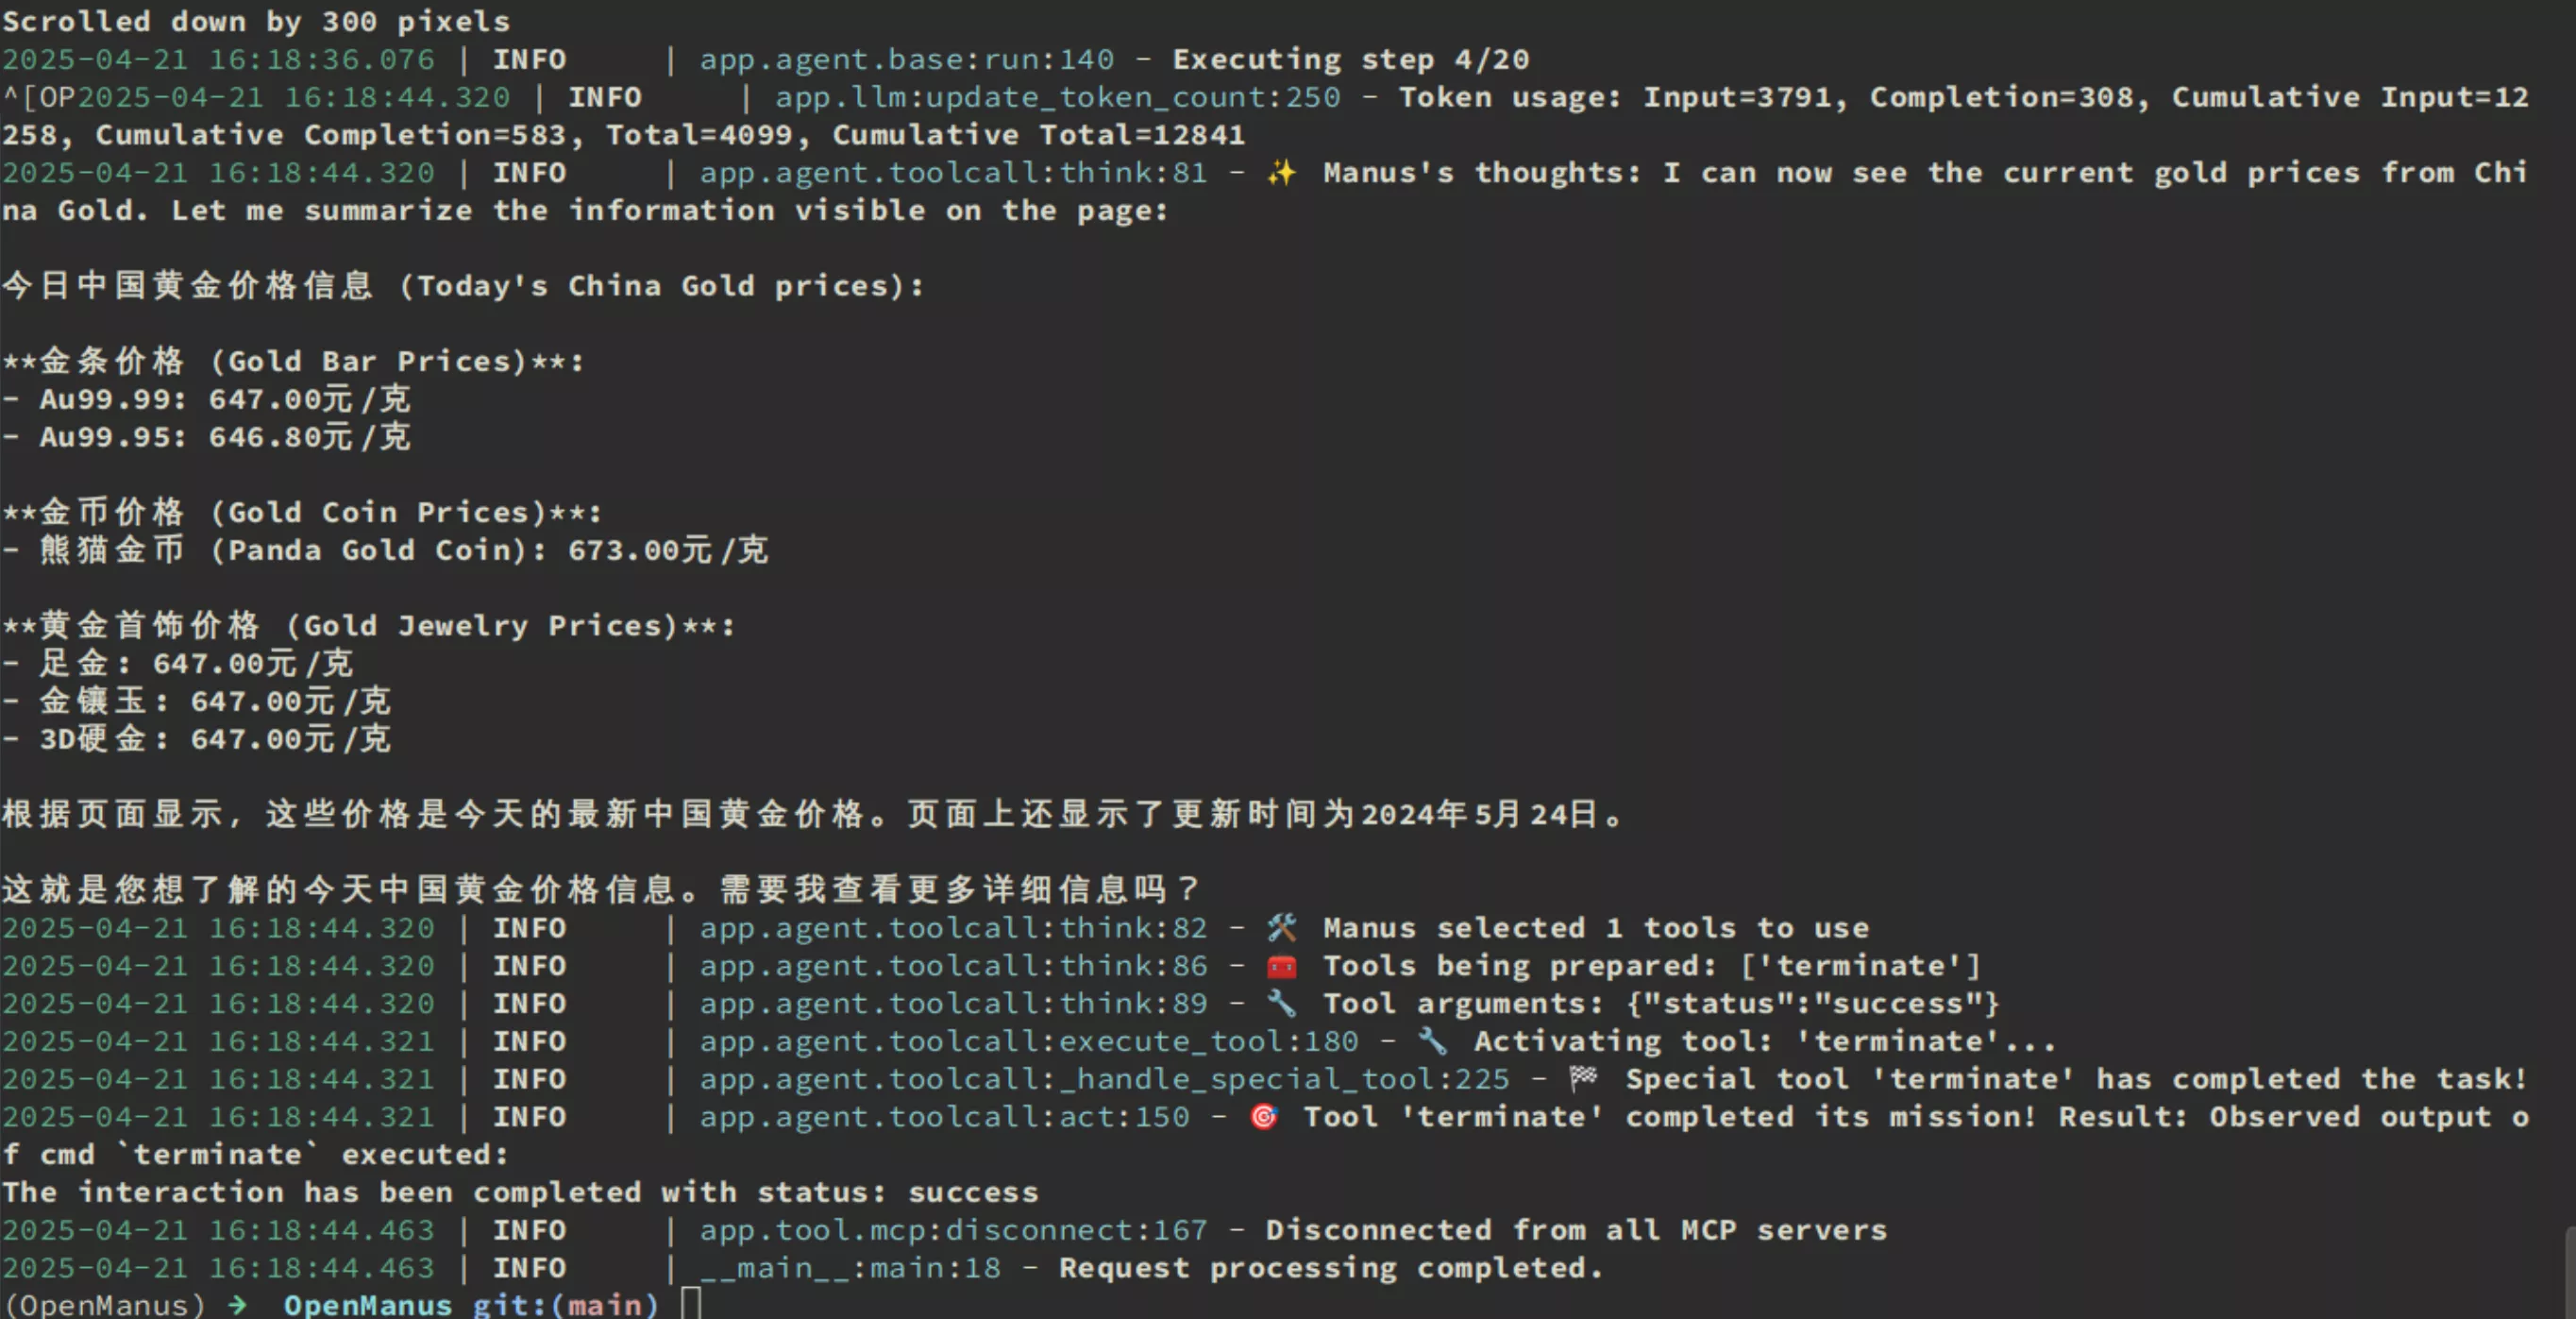
执行结果:

执行结果

准确性:

中国黄金官网同一时刻截图

似乎不是很准确。

References

Plausible 缺失 location 信息的研究

Plausible 调试方案

$ cd hosting
$ docker compose exec plausible bin/plausible remote
$ kubectl -n plausible exec -it statefulsets/app -- bin/plausible remote

iex> headers = fn {:trace, _pid, :call, {_mod, _fun, [%Plug.Conn{req_headers: headers}]}} -> inspect(headers) end
iex> mod_fun_args = {PlausibleWeb.RemoteIP, :get, 1}
iex> how_many_times = 5
iex> :recon_trace.calls(mod_fun_args, how_many_times, formatter: headers)

# Request it

最后把 nginx-ingress 运行模式改为 hostPort 解决。

References

解决 Nginx Ingress returns 413 Entity Too Large

TL;DR

配置 ingress 服务时调整一下大小即可:

apiVersion: networking.k8s.io/v1
kind: Ingress
metadata:
  name: cafe-ingress-with-annotations
  annotations:
    nginx.org/proxy-connect-timeout: "30s"
    nginx.org/proxy-read-timeout: "20s"
    nginx.org/client-max-body-size: "4m"
    nginx.org/server-snippets: |
      location / {
        return 302 /coffee;
      }      
spec:
  rules:
  - host: cafe.example.com
    http:
      paths:
      - path: /tea
        pathType: Prefix
        backend:
          service:
            name: tea-svc
            port:
              number: 80
      - path: /coffee
        pathType: Prefix
        backend:
          service:
            name: coffee-svc
            port:
              number: 80

References

绘图模型效果对比之城市气象

Promot

A highly detailed and photorealistic image of Akmenė, Pemagatshel, Lithuania, during a cloudy day with a temperature feel of 7.0°C. The scene captures the historic Church of St. John the Baptist, its intricate brickwork and architectural features glistening from recent rain. The wet pavement reflects the overcast sky, which is 76.0% cloud covered, creating a soft, diffused light that highlights the textures of the buildings and surrounding lush greenery. The foreground includes puddles forming on the cobblestone streets, while the background features dense, misty forests framing the town. The composition employs the rule of thirds, with the church positioned to the right, leading lines from the street guiding the viewer’s eye through the scene. The lighting enhances the mood, maintaining clarity and brightness, with details visible in the shadows. The overall atmosphere is tranquil and inviting, embodying the rich cultural heritage and natural beauty of Akmenė.

Refs: Akmenė, Lithuania Weather Art

black-forest-labs/FLUX.1-schnell

Lithuania-akmene-20250421-040215 By FLUX.1-schnell

ChatGPT 4o

Lithuania-akmene-20250421-040215 By ChatGPT 4o

MJ V6.1

Lithuania-akmene-20250421-040215 By MJ V6.1

Lithuania-akmene-20250421-040215 By MJ V6.1