分类目录归档:技术笔记

Ascend 310P + openFuyao + NPU-Operator 故障排查

[TOC]

故障 pod describe

[root@master1 ~]# kubectl -n kube-system describe pod ascend-device-plugin-ll46f 
Name:                 ascend-device-plugin-ll46f
Namespace:            kube-system
Priority:             2000001000
Priority Class Name:  system-node-critical
Service Account:      ascend-device-plugin-sa
Node:                 master1/10.17.30.131
Start Time:           Mon, 30 Mar 2026 11:08:32 +0800
Labels:               app.kubernetes.io/managed-by=npu-operator
                      controller-revision-hash=7df5dcb887
                      helm.sh/chart=npu-operator-0.15.0
                      name=ascend-device-plugin-ds
                      pod-template-generation=1
Annotations:          cni.projectcalico.org/containerID: c1f2adcaeaaf2bdcf0a6e09730f68231a293074e31d58f61997f714dfb520878
                      cni.projectcalico.org/podIP: 192.168.137.118/32
                      cni.projectcalico.org/podIPs: 192.168.137.118/32
                      scheduler.alpha.kubernetes.io/critical-pod: 
                      seccomp.security.alpha.kubernetes.io/pod: runtime/default
Status:               Running
IP:                   192.168.137.118
IPs:
  IP:           192.168.137.118
Controlled By:  DaemonSet/ascend-device-plugin
Init Containers:
  init-permission:
    Container ID:  containerd://4406968a522bea48dfefebae81ec53644312762af4781c25de689952ed6c2d27
    Image:         cr.openfuyao.cn/openfuyao/busybox:1.36.1
    Image ID:      cr.openfuyao.cn/openfuyao/busybox@sha256:4b8407fadd8100c61b097d63efe992b2c033e7d371c9117f7a9462fe87e31176
    Port:          
<none>
    Host Port:     
<none>
    Command:
      sh
      -c
      chown 9000:9000 /var/log/mindx-dl /var/log/mindx-dl/devicePlugin
      chmod 750 /var/log/mindx-dl/devicePlugin

    State:          Terminated
      Reason:       Completed
      Exit Code:    0
      Started:      Mon, 30 Mar 2026 15:28:32 +0800
      Finished:     Mon, 30 Mar 2026 15:28:32 +0800
    Ready:          True
    Restart Count:  1
    Environment:    
<none>
    Mounts:
      /var/log/mindx-dl/devicePlugin from log-path (rw)
      /var/run/secrets/kubernetes.io/serviceaccount from kube-api-access-gfldg (ro)
Containers:
  device-plugin-01:
    Container ID:  containerd://fcc0c4742285847e2621a9a9217502307fc7e28644fbf86b32f9c11d67a2c0ab
    Image:         cr.openfuyao.cn/openfuyao/ascend-image/ascend-k8sdeviceplugin:v6.0.0
    Image ID:      cr.openfuyao.cn/openfuyao/ascend-image/ascend-k8sdeviceplugin@sha256:a5b9612b21bcd35384f9f19a05b2d7915b865e7b2be6a30bfd7806a9b8a86f58
    Port:          
<none>
    Host Port:     
<none>
    Command:
      /bin/bash
      -c
      --
    Args:
      device-plugin  -useAscendDocker=true -volcanoType=false -logFile=/var/log/mindx-dl/devicePlugin/devicePlugin.log -logLevel=0
    State:          Waiting
      Reason:       CrashLoopBackOff
    Last State:     Terminated
      Reason:       Completed
      Exit Code:    0
      Started:      Tue, 31 Mar 2026 10:28:58 +0800
      Finished:     Tue, 31 Mar 2026 10:28:58 +0800
    Ready:          False
    Restart Count:  274
    Limits:
      cpu:     500m
      memory:  500Mi
    Requests:
      cpu:     500m
      memory:  500Mi
    Environment:
      NODE_NAME:   (v1:spec.nodeName)
    Mounts:
      /tmp from tmp (rw)
      /usr/local/Ascend/driver from hiai-driver (ro)
      /var/lib/kubelet/device-plugins from device-plugin (rw)
      /var/lib/kubelet/pod-resources from pod-resource (rw)
      /var/log/mindx-dl/devicePlugin from log-path (rw)
      /var/run/secrets/kubernetes.io/serviceaccount from kube-api-access-gfldg (ro)
Conditions:
  Type                        Status
  PodReadyToStartContainers   True 
  Initialized                 True 
  Ready                       False 
  ContainersReady             False 
  PodScheduled                True 
Volumes:
  device-plugin:
    Type:          HostPath (bare host directory volume)
    Path:          /var/lib/kubelet/device-plugins
    HostPathType:  
  pod-resource:
    Type:          HostPath (bare host directory volume)
    Path:          /var/lib/kubelet/pod-resources
    HostPathType:  
  hiai-driver:
    Type:          HostPath (bare host directory volume)
    Path:          /usr/local/Ascend/driver
    HostPathType:  
  log-path:
    Type:          HostPath (bare host directory volume)
    Path:          /var/log/mindx-dl/devicePlugin
    HostPathType:  DirectoryOrCreate
  tmp:
    Type:          HostPath (bare host directory volume)
    Path:          /tmp
    HostPathType:  
  kube-api-access-gfldg:
    Type:                    Projected (a volume that contains injected data from multiple sources)
    TokenExpirationSeconds:  3607
    ConfigMapName:           kube-root-ca.crt
    Optional:                false
    DownwardAPI:             true
QoS Class:                   Burstable
Node-Selectors:              openfuyao.com/npu.present=
Tolerations:                 CriticalAddonsOnly op=Exists
                             device-plugin=v2:NoSchedule
                             huawei.com/Ascend910:NoSchedule op=Exists
                             node-role.kubernetes.io/control-plane:NoSchedule
                             node-role.kubernetes.io/master:NoSchedule
                             node.kubernetes.io/disk-pressure:NoSchedule op=Exists
                             node.kubernetes.io/memory-pressure:NoSchedule op=Exists
                             node.kubernetes.io/not-ready:NoExecute op=Exists
                             node.kubernetes.io/pid-pressure:NoSchedule op=Exists
                             node.kubernetes.io/unreachable:NoExecute op=Exists
                             node.kubernetes.io/unschedulable:NoSchedule op=Exists
Events:
  Type     Reason   Age                     From     Message
  ----     ------   ----                    ----     -------
  Normal   Pulled   16m (x205 over 18h)     kubelet  (combined from similar events): Successfully pulled image "cr.openfuyao.cn/openfuyao/ascend-image/ascend-k8sdeviceplugin:v6.0.0" in 403ms (403ms including waiting). Image size: 48017174 bytes.
  Warning  BackOff  2m47s (x5216 over 18h)  kubelet  Back-off restarting failed container device-plugin-01 in pod ascend-device-plugin-ll46f_kube-system(8edcd384-ab2d-4998-8077-5ac58801c79e)
  Normal   Pulling  66s (x227 over 19h)     kubelet  Pulling image "cr.openfuyao.cn/openfuyao/ascend-image/ascend-k8sdeviceplugin:v6.0.0"

故障 pod /dev 检查

[root@master1 fuyao-26.3-rc3]# kubectl  -n kube-system exec -it daemonsets/ascend-device-plugin -- ls /dev
Defaulted container "device-plugin-01" out of: device-plugin-01, init-permission (init)
autofs           null               tty10  tty34  tty58    vcs5
bsg              ppp                tty11  tty35  tty59    vcs6
btrfs-control    ptmx               tty12  tty36  tty6     vcsa
bus              pts                tty13  tty37  tty60    vcsa1
core             random             tty14  tty38  tty61    vcsa2
cpu_dma_latency  raw                tty15  tty39  tty62    vcsa3
cuse             relationship_ctrl  tty16  tty4   tty63    vcsa4
davinci0         rfkill             tty17  tty40  tty7     vcsa5
davinci_manager  rtc0               tty18  tty41  tty8     vcsa6
devmm_svm        sda                tty19  tty42  tty9     vcsu
dri              sda1               tty2   tty43  ttyAMA0  vcsu1
fb0              sda2               tty20  tty44  ttyS0    vcsu2
fd               sg0                tty21  tty45  ttyS1    vcsu3
full             sg1                tty22  tty46  ttyS2    vcsu4
fuse             sg2                tty23  tty47  ttyS3    vcsu5
hidraw0          shm                tty24  tty48  uhid     vcsu6
hidraw1          snapshot           tty25  tty49  uinput   vfio
hisi_hdc         sr0                tty26  tty5   urandom  vga_arbiter
hwrng            sr1                tty27  tty50  usbmon0  vhost-net
input            stderr             tty28  tty51  usbmon1  vhost-vsock
kmsg             stdin              tty29  tty52  usbmon2  vport2p1
loop-control     stdout             tty3   tty53  vcs      zero
mapper           termination-log    tty30  tty54  vcs1
mem              tty                tty31  tty55  vcs2
mqueue           tty0               tty32  tty56  vcs3
net              tty1               tty33  tty57  vcs4

故障 pod 驱动检查

[root@master1 fuyao-26.3-rc3]# kubectl  -n kube-system exec -it daemonsets/ascend-device-plugin -- ls -lha /usr/local/Ascend/driver
Defaulted container "device-plugin-01" out of: device-plugin-01, init-permission (init)
total 44K
drwxr-xr-x  8 root root 4.0K Mar 27 08:03 .
drwxr-xr-x  3 root root 4.0K Mar 31 02:34 ..
drwxr-xr-x  2 root root 4.0K Mar 27 08:01 bin
-r--r--r--  1 root root   20 Mar 27 08:01 build.info
dr-xr-x---  2 root root 4.0K Mar 27 08:01 device
dr-x------ 41 root root 4.0K Mar 27 08:01 kernel
drwxr-xr-x  6 root root 4.0K Mar 27 08:01 lib64
-r--r-----  1 root root   56 Mar 27 08:01 scene.info
dr-xr-x---  2 root root 4.0K Mar 27 08:01 script
drwxr-xr-x  2 root root 4.0K Mar 27 08:01 tools
-r--r--r--  1 root root  352 Mar 27 08:03 version.info

故障 pod 日志

[root@master1 ~]# kubectl -n kube-system logs daemonsets/ascend-device-plugin --previous
Defaulted container "device-plugin-01" out of: device-plugin-01, init-permission (init)
[INFO]     2026/03/31 06:46:54.593254 1       hwlog/api.go:108    devicePlugin.log's logger init success
[INFO]     2026/03/31 06:46:54.593449 1       main.go:187    ascend device plugin starting and the version is v6.0.0_linux-aarch64
[INFO]     2026/03/31 06:46:54.593494 1       main.go:188    ascend device plugin starting scene is center
[INFO]     2026/03/31 06:46:54.787930 1       devmanager/devmanager.go:104    the dcmi version is 24.1.rc3
[ERROR]    2026/03/31 06:46:54.788019 1       devmanager/devmanager.go:211    get error card quantity: 0
[ERROR]    2026/03/31 06:46:54.788052 1       devmanager/devmanager.go:195    get card list failed for init
[ERROR]    2026/03/31 06:46:54.788101 1       main.go:203    init devmanager failed, err: auto init failed, err: get card list failed for init

故障 pod 驱动检查

[root@master1 ~]# kubectl -n kube-system exec -it daemonsets/ascend-device-plugin -- bash -c 'find /usr/local/Ascend/driver -name libdcmi.so 2>/dev/null; echo $LD_LIBRARY_PATH'
Defaulted container "device-plugin-01" out of: device-plugin-01, init-permission (init)
/usr/local/Ascend/driver/lib64/driver/libdcmi.so
command terminated with exit code 137
[root@master1 ~]# ps -ef | grep -E 'dmp_daemon|slogd' | grep -v grep
root       21578       1  0 Mar30 ?        00:00:19 /usr/sbin/rsyslogd -n -i/var/run/rsyslogd.pid

检查服务状态?

[root@master1 ~]# systemctl status ascend-dmi
Unit ascend-dmi.service could not be found.
[root@master1 ~]# systemctl status ascend-dkms
Unit ascend-dkms.service could not be found.
[root@master1 ~]# systemctl status npu-smi
Unit npu-smi.service could not be found.
[root@master1 ~]# find / -name dmp_daemon 2>/dev/null
[root@master1 ~]# find / -name slogd 2>/dev/null
[root@master1 ~]# ls -l /var/dmp_daemon /var/slogd 2>/dev/null
[root@master1 ~]# 

dcmi 问题,需硬件排查

检查卡获取

#include <stdlib.h>
#include <stdio.h>
#include "dcmi_interface_api.h"

int my_get_card_list();

int main(int argc,char *argv[])
{
    my_get_card_list();
    return 0;
}

int my_get_card_list()
{
    printf("\n==================================card id info list=========================\n");
    dcmi_init();
    int card_num = 0;
    int card_list[16] = {0};
    int ret = dcmi_get_card_list(&card_num, card_list, 16);
    if (ret != DCMI_OK) {
        printf("dcmi get card list failed ret=%d\n", ret);
    }
    printf("card_num=%d, card_list:[",card_num);
    for (int i = 0; i < card_num; i++) {
        printf("%d ", card_list[i]);
    }
}
cc ./test1.c -o test1 -I /usr/local/dcmi -L /usr/local/dcmi -ldcmi

-I头文件(.h)搜索路径
-L库文件(.so/.a)搜索路径
-l链接的库名(去掉 lib 前缀)
nerdctl run --rm \
  -v /usr/local/Ascend:/usr/local/Ascend \
  -v /usr/local/dcmi:/usr/local/dcmi \
  -v $(pwd):/build \
  ubuntu:18.04 bash -c "
    sed -i -e 's@http*://ports.ubuntu.com/\? @http://10.17.31.217:8081/repository/mirror-ubuntu-ports/@g' \
           -e 's@http*://ports.ubuntu.com@http://10.17.31.217:8081/repository/mirror-ubuntu-ports@g' \
           /etc/apt/sources.list
    apt update && apt install -y gcc
    cd /build
    cc ./test1.c -o test1 \
      -I /usr/local/dcmi \
      -L /usr/local/dcmi \
      -L /usr/local/Ascend/driver/lib64/common \
      -L /usr/local/Ascend/driver/lib64/driver \
      -ldcmi \
      -Wl,-rpath,/usr/local/Ascend/driver/lib64/common \
      -Wl,-rpath,/usr/local/Ascend/driver/lib64/driver \
      -Wl,-rpath,/usr/local/dcmi
  "

分析二进制:

[root@master1 ascend_debug]# ldd ./test1 | grep -i dcmi
        libdcmi.so => /usr/local/Ascend/driver/lib64/driver/libdcmi.so (0x0000ffffa6dd0000)
[root@master1 ascend_debug]# LD_DEBUG=libs ./test1 2>&1 | grep -i dcmi
    284830:     find library=libdcmi.so [0]; searching
    284830:      search path=/usr/local/Ascend/driver/lib64/common/tls/aarch64/atomics:/usr/local/Ascend/driver/lib64/common/tls/aarch64:/usr/local/Ascend/driver/lib64/common/tls/atomics:/usr/local/Ascend/driver/lib64/common/tls:/usr/local/Ascend/driver/lib64/common/aarch64/atomics:/usr/local/Ascend/driver/lib64/common/aarch64:/usr/local/Ascend/driver/lib64/common/atomics:/usr/local/Ascend/driver/lib64/common:/usr/local/Ascend/driver/lib64/driver/tls/aarch64/atomics:/usr/local/Ascend/driver/lib64/driver/tls/aarch64:/usr/local/Ascend/driver/lib64/driver/tls/atomics:/usr/local/Ascend/driver/lib64/driver/tls:/usr/local/Ascend/driver/lib64/driver/aarch64/atomics:/usr/local/Ascend/driver/lib64/driver/aarch64:/usr/local/Ascend/driver/lib64/driver/atomics:/usr/local/Ascend/driver/lib64/driver:/usr/local/dcmi/tls/aarch64/atomics:/usr/local/dcmi/tls/aarch64:/usr/local/dcmi/tls/atomics:/usr/local/dcmi/tls:/usr/local/dcmi/aarch64/atomics:/usr/local/dcmi/aarch64:/usr/local/dcmi/atomics:/usr/local/dcmi            (RUNPATH from file ./test1)
    284830:       trying file=/usr/local/Ascend/driver/lib64/common/tls/aarch64/atomics/libdcmi.so
    284830:       trying file=/usr/local/Ascend/driver/lib64/common/tls/aarch64/libdcmi.so
    284830:       trying file=/usr/local/Ascend/driver/lib64/common/tls/atomics/libdcmi.so
    284830:       trying file=/usr/local/Ascend/driver/lib64/common/tls/libdcmi.so
    284830:       trying file=/usr/local/Ascend/driver/lib64/common/aarch64/atomics/libdcmi.so
    284830:       trying file=/usr/local/Ascend/driver/lib64/common/aarch64/libdcmi.so
    284830:       trying file=/usr/local/Ascend/driver/lib64/common/atomics/libdcmi.so
    284830:       trying file=/usr/local/Ascend/driver/lib64/common/libdcmi.so
    284830:       trying file=/usr/local/Ascend/driver/lib64/driver/tls/aarch64/atomics/libdcmi.so
    284830:       trying file=/usr/local/Ascend/driver/lib64/driver/tls/aarch64/libdcmi.so
    284830:       trying file=/usr/local/Ascend/driver/lib64/driver/tls/atomics/libdcmi.so
    284830:       trying file=/usr/local/Ascend/driver/lib64/driver/tls/libdcmi.so
    284830:       trying file=/usr/local/Ascend/driver/lib64/driver/aarch64/atomics/libdcmi.so
    284830:       trying file=/usr/local/Ascend/driver/lib64/driver/aarch64/libdcmi.so
    284830:       trying file=/usr/local/Ascend/driver/lib64/driver/atomics/libdcmi.so
    284830:       trying file=/usr/local/Ascend/driver/lib64/driver/libdcmi.so
    284830:      search path=/usr/local/Ascend/driver/lib64/common:/usr/local/Ascend/driver/lib64/driver:/usr/local/dcmi/tls/aarch64/atomics:/usr/local/dcmi/tls/aarch64:/usr/local/dcmi/tls/atomics:/usr/local/dcmi/tls:/usr/local/dcmi/aarch64/atomics:/usr/local/dcmi/aarch64:/usr/local/dcmi/atomics:/usr/local/dcmi          (RUNPATH from file ./test1)
    284830:       trying file=/usr/local/dcmi/tls/aarch64/atomics/libc.so.6
    284830:       trying file=/usr/local/dcmi/tls/aarch64/libc.so.6
    284830:       trying file=/usr/local/dcmi/tls/atomics/libc.so.6
    284830:       trying file=/usr/local/dcmi/tls/libc.so.6
    284830:       trying file=/usr/local/dcmi/aarch64/atomics/libc.so.6
    284830:       trying file=/usr/local/dcmi/aarch64/libc.so.6
    284830:       trying file=/usr/local/dcmi/atomics/libc.so.6
    284830:       trying file=/usr/local/dcmi/libc.so.6
    284830:     calling init: /usr/local/Ascend/driver/lib64/driver/libdcmi.so
    284830:     calling fini: /usr/local/Ascend/driver/lib64/driver/libdcmi.so [0]
[root@master1 ascend_debug]# readlink -f /usr/local/dcmi/libdcmi.so
/usr/local/dcmi/libdcmi.so
[root@master1 ascend_debug]# readlink -f /usr/local/Ascend/driver/lib64/driver/libdcmi.so
/usr/local/Ascend/driver/lib64/driver/libdcmi.so
[root@master1 ascend_debug]# sha256sum /usr/local/dcmi/libdcmi.so /usr/local/Ascend/driver/lib64/driver/libdcmi.so
13a38cae84bad0f06367ff9280016e372c0608ca16465b5ae5f000d3844ee401  /usr/local/dcmi/libdcmi.so
13a38cae84bad0f06367ff9280016e372c0608ca16465b5ae5f000d3844ee401  /usr/local/Ascend/driver/lib64/driver/libdcmi.so

跟踪 strace

宿主机跑
strace -f -o /tmp/host.strace -e trace=file,ioctl ./test1
容器里跑
strace -f -o /tmp/container.strace -e trace=file,ioctl ./test1

新增挂载继续跟踪

volumeMounts:
        - name: hdc-basic
          mountPath: /etc/hdcBasic.cfg
          readOnly: true
        - name: localtime
          mountPath: /etc/localtime
          readOnly: true
      volumes:
      - name: hdc-basic
        hostPath:
          path: /etc/hdcBasic.cfg
          type: File
      - name: localtime
        hostPath:
          path: /etc/localtime
          type: File

跟踪并查看日志

kubectl -n kube-system exec -it ascend-device-plugin-69q5t -c device-plugin-01 -- bash

strace -f -o /tmp/container.strace -e trace=file,ioctl ./test1

root@ascend-device-plugin-69q5t:/tmp# strace -f -o /tmp/container.strace -e trace=file,ioctl ./test1

==================================card id info list=========================
card_num=0, card_list:[

root@ascend-device-plugin-69q5t:/tmp# cat /var/log/nputools_LOG_INFO.log > /tmp/nputools_LOG_INFO.log
root@ascend-device-plugin-69q5t:/tmp# cat /var/log/nputools_LOG_ERR.log > /tmp/nputools_LOG_ERR.log
cat: /var/log/nputools_LOG_ERR.log: No such file or directory
root@ascend-device-plugin-69q5t:/tmp# cat /tmp/nputools_LOG_INFO.log 
[2026/04/01 11:18:12][0583][root][127.0.0.1][dcmi_api.c,dcmi_board_init,86]:dcmi board init success. device_count=1.
[2026/04/01 11:18:12][0583][root][127.0.0.1][dcmi_api.c,dcmi_init,119]:dcmi init all success.

检查代码2

#include <stdio.h>
#include <stdlib.h>
#include "dcmi_interface_api.h"

#ifndef DCMI_OK
#define DCMI_OK 0
#endif

/* 头文件里没看到这个声明,手动补一个 */
extern int dcmi_get_card_num_list(int *card_num, int *card_list, int list_length);

static void print_list(const char *name, int ret, int num, int *list) {
    printf("%s ret=%d num=%d list=[", name, ret, num);
    for (int i = 0; i < num; ++i) {
        printf("%d ", list[i]);
    }
    printf("]\n");
}

int main(void) {
    int ret = dcmi_init();
    printf("dcmi_init ret=%d\n", ret);
    if (ret != DCMI_OK) {
        return 1;
    }

    int card_num = 0;
    int card_list[16] = {0};

    ret = dcmi_get_card_list(&card_num, card_list, 16);
    print_list("dcmi_get_card_list", ret, card_num, card_list);

    int card_num2 = 0;
    int card_list2[16] = {0};
    ret = dcmi_get_card_num_list(&card_num2, card_list2, 16);
    print_list("dcmi_get_card_num_list", ret, card_num2, card_list2);

    for (int i = 0; i < card_num && i < 16; ++i) {
        int dev_num = -1;
        ret = dcmi_get_device_num_in_card(card_list[i], &dev_num);
        printf("dcmi_get_device_num_in_card card=%d ret=%d dev_num=%d\n",
               card_list[i], ret, dev_num);
    }

    return 0;
}

主机编译

cc ./test2.c -o test2 -I /usr/local/dcmi -L /usr/local/dcmi -ldcmi

容器编译

nerdctl run --rm \
  -v /usr/local/Ascend:/usr/local/Ascend \
  -v /usr/local/dcmi:/usr/local/dcmi \
  -v $(pwd):/build \
  ubuntu:18.04 bash -c "
    sed -i -e 's@http*://ports.ubuntu.com/\? @http://10.17.31.217:8081/repository/mirror-ubuntu-ports/@g' \
           -e 's@http*://ports.ubuntu.com@http://10.17.31.217:8081/repository/mirror-ubuntu-ports@g' \
           /etc/apt/sources.list
    apt update && apt install -y gcc
    cd /build
    cc ./test2.c -o test2 \
      -I /usr/local/dcmi \
      -L /usr/local/dcmi \
      -L /usr/local/Ascend/driver/lib64/common \
      -L /usr/local/Ascend/driver/lib64/driver \
      -ldcmi \
      -Wl,-rpath,/usr/local/Ascend/driver/lib64/common \
      -Wl,-rpath,/usr/local/Ascend/driver/lib64/driver \
      -Wl,-rpath,/usr/local/dcmi
  "

拷入容器运行

kubectl -n kube-system cp ./test2 ascend-device-plugin-69q5t:/tmp/
# 主机运行
[root@master1 ascend_debug]# ./test2
dcmi_init ret=0
dcmi_get_card_list ret=0 num=1 list=[176 ]
dcmi_get_card_num_list ret=0 num=1 list=[176 ]
dcmi_get_device_num_in_card card=176 ret=0 dev_num=1

# 容器运行
root@ascend-device-plugin-69q5t:/tmp# ./test2 
dcmi_init ret=0
dcmi_get_card_list ret=0 num=0 list=[]
dcmi_get_card_num_list ret=0 num=0 list=[]

虚拟机场景

经过许老师认真定位,最终发现是因为非裸金属环境。虚拟机场景需要定制镜像。

根据官网文档

如果在虚拟机场景下部署Ascend Device Plugin,需要在Ascend Device Plugin的镜像中安装systemd,推荐在Dockerfile中加入RUN apt-get update && apt-get install -y systemd命令进行安装。

为了使用 nerdctl 构建镜像首先安装 buildkit

wegt https://github.com/moby/buildkit/releases/download/v0.29.0/buildkit-v0.29.0.linux-arm64.tar.gz
tar zxvf buildkit-v0.29.0.linux-arm64.tar.gz
cp bin/* /usr/local/bin/

之后找一个新终端启动 buildkit ,这里是为了 nerdctl 构建 image, 如果不需要则不用启动。

buildkitd --oci-worker=false --containerd-worker=true --containerd-worker-namespace=k8s.io 

Dockerfile 如下:

镜像源部分按需修改


FROM hub.oepkgs.net/openfuyao/ascendhub/ascend-k8sdeviceplugin:v6.0.0

替换 apt 镜像源

RUN sed -i \ -e ‘s@http://ports.ubuntu.com/\? @http://10.17.31.217:8081/repository/mirror-ubuntu-ports/@g‘ \ -e ‘s@http://ports.ubuntu.com@http://10.17.31.217:8081/repository/mirror-ubuntu-ports@g‘ \ /etc/apt/sources.list

安装 systemd

RUN apt-get update && \ apt-get install -y –no-install-recommends systemd systemd-sysv && \ apt-get clean && \ rm -rf /var/lib/apt/lists/*

设置 systemd 为 init

STOPSIGNAL SIGRTMIN+3


> STOPSIGNAL SIGRTMIN+3 是告诉容器运行时(containerd/docker)停止这个容器时应该发送哪个信号。
> 如果你的容器里 不跑 systemd 作为主进程(比如 entrypoint 是业务程序),这行可以删掉,没有任何作用。
> 如果确实用 systemd 管理容器内服务,保留它能避免 kubectl delete pod 时等待 30 秒超时再强杀的问题。

构建命令如下:

nerdctl build \ –namespace k8s.io \ -t hub.oepkgs.net/openfuyao/ascendhub/ascend-k8sdeviceplugin:v6.0.0-systemd \ -f Dockerfile \ .


之后将出问题的镜像替换为新构建的镜像即可。

npu-operator 有同样的问题,一样修改即可。

## 修复确认
> 最终在 node 中能看到 npu 资源即成功。

[root@master1 ~]# kubectl describe node master1 Name: master1 Roles: control-plane,master,node,worker Labels: accelerator=huawei-Ascend310P beta.kubernetes.io/arch=arm64 beta.kubernetes.io/os=linux … servertype=Ascend310P-8 workerselector=dls-worker-node Annotations: baseDeviceInfos: {“Ascend310P-0”:{“IP”:””,”SuperDeviceID”:0}} … Capacity: cpu: 16 ephemeral-storage: 129724184Ki huawei.com/Ascend310P: 1 hugepages-1Gi: 0 hugepages-2Mi: 0 hugepages-32Mi: 0 hugepages-64Ki: 0 memory: 32595632Ki pods: 110 Allocatable: cpu: 16 ephemeral-storage: 119553807777 huawei.com/Ascend310P: 1 hugepages-1Gi: 0 hugepages-2Mi: 0 hugepages-32Mi: 0 hugepages-64Ki: 0 memory: 32493232Ki pods: 110 … Allocated resources: (Total limits may be over 100 percent, i.e., overcommitted.) Resource Requests Limits


cpu 15565m (97%) 16910m (105%) memory 17492Mi (55%) 30900Mi (97%) ephemeral-storage 0 (0%) 0 (0%) hugepages-1Gi 0 (0%) 0 (0%) hugepages-2Mi 0 (0%) 0 (0%) hugepages-32Mi 0 (0%) 0 (0%) hugepages-64Ki 0 (0%) 0 (0%) huawei.com/Ascend310P 0 0 …
KDE Plasma6 禁用全局菜单,恢复正常应用菜单

前情提要

不知道从什么时候开始,KDE Plasma 默认启用类似 macOS 的全局应用菜单。

即应用窗口标题栏下方不显示菜单,而是移动到顶部菜单栏中“全局菜单”小组件中。

但问题是,Linux 桌面生态生态复杂,X11 Wayland Qt GTK 等等技术太过复杂,很难保证常用软件都能够正常显示全局菜单。

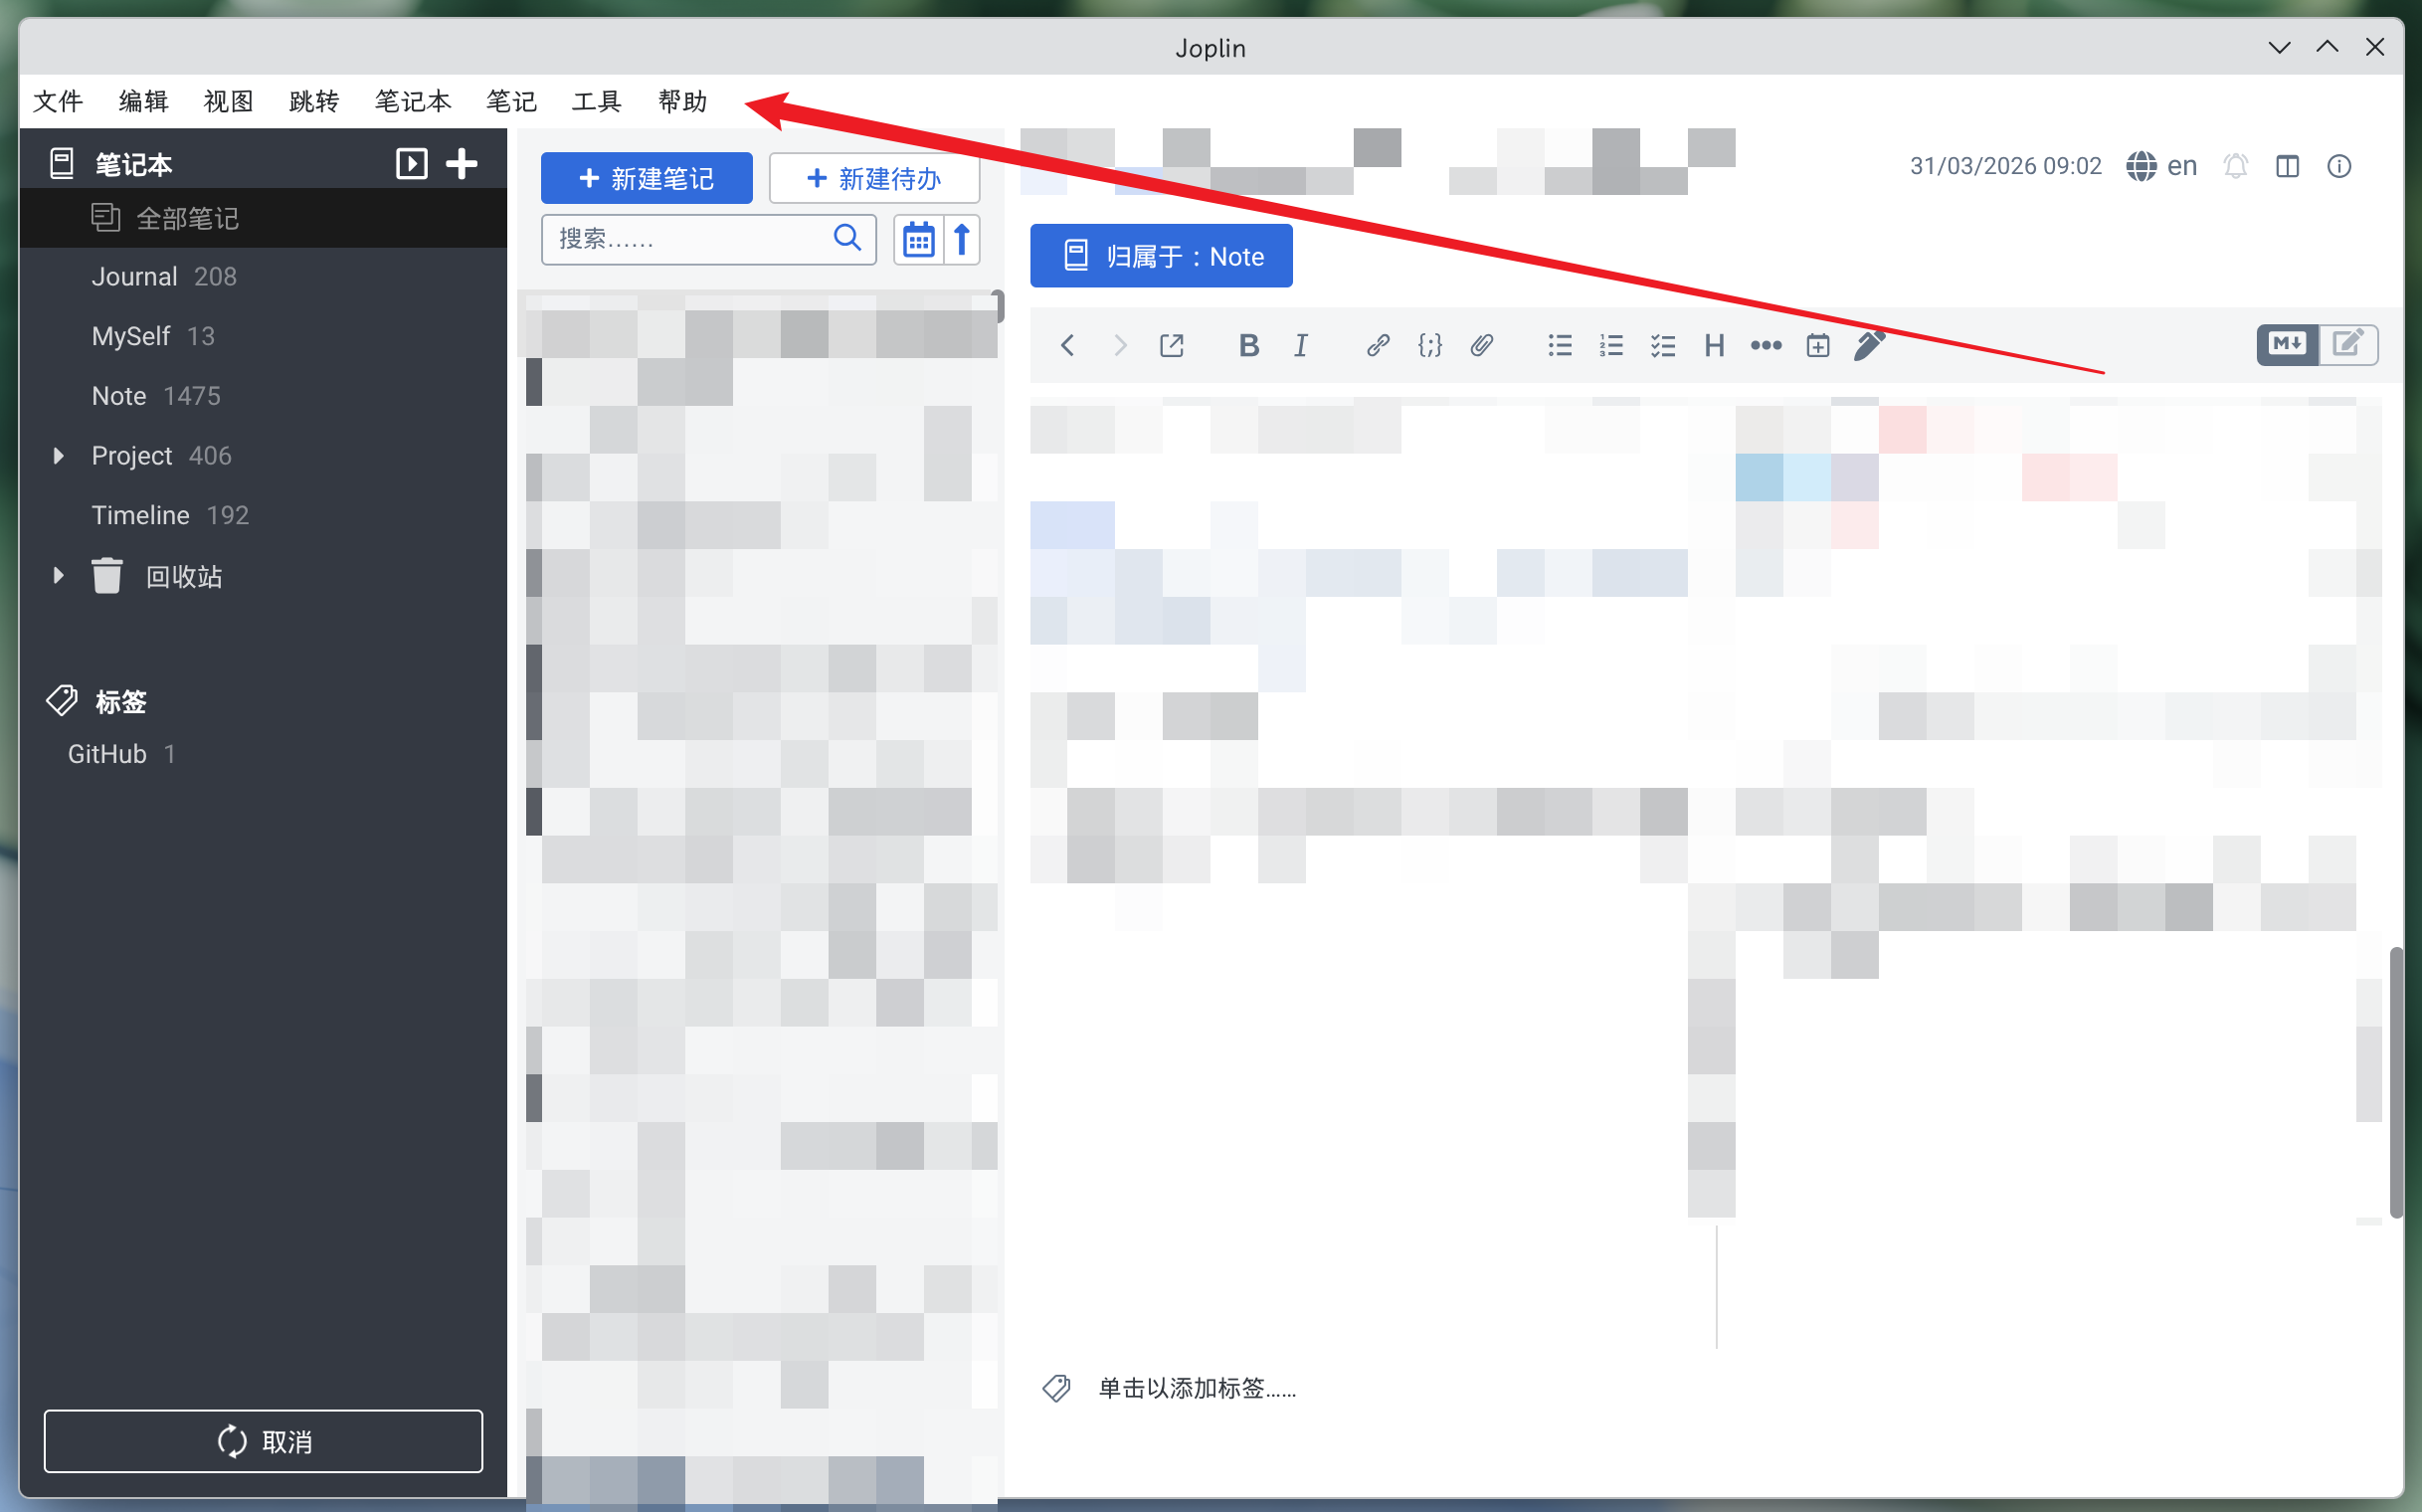
比如我最近在使用 Joplin ,就发现除了菜单栏根本找不到任何入口。

于是搜索了一番后,终于找到了关闭全局菜单,恢复正常的应用菜单的方法。

恢复方法

第一步:移除“全局菜单组件”

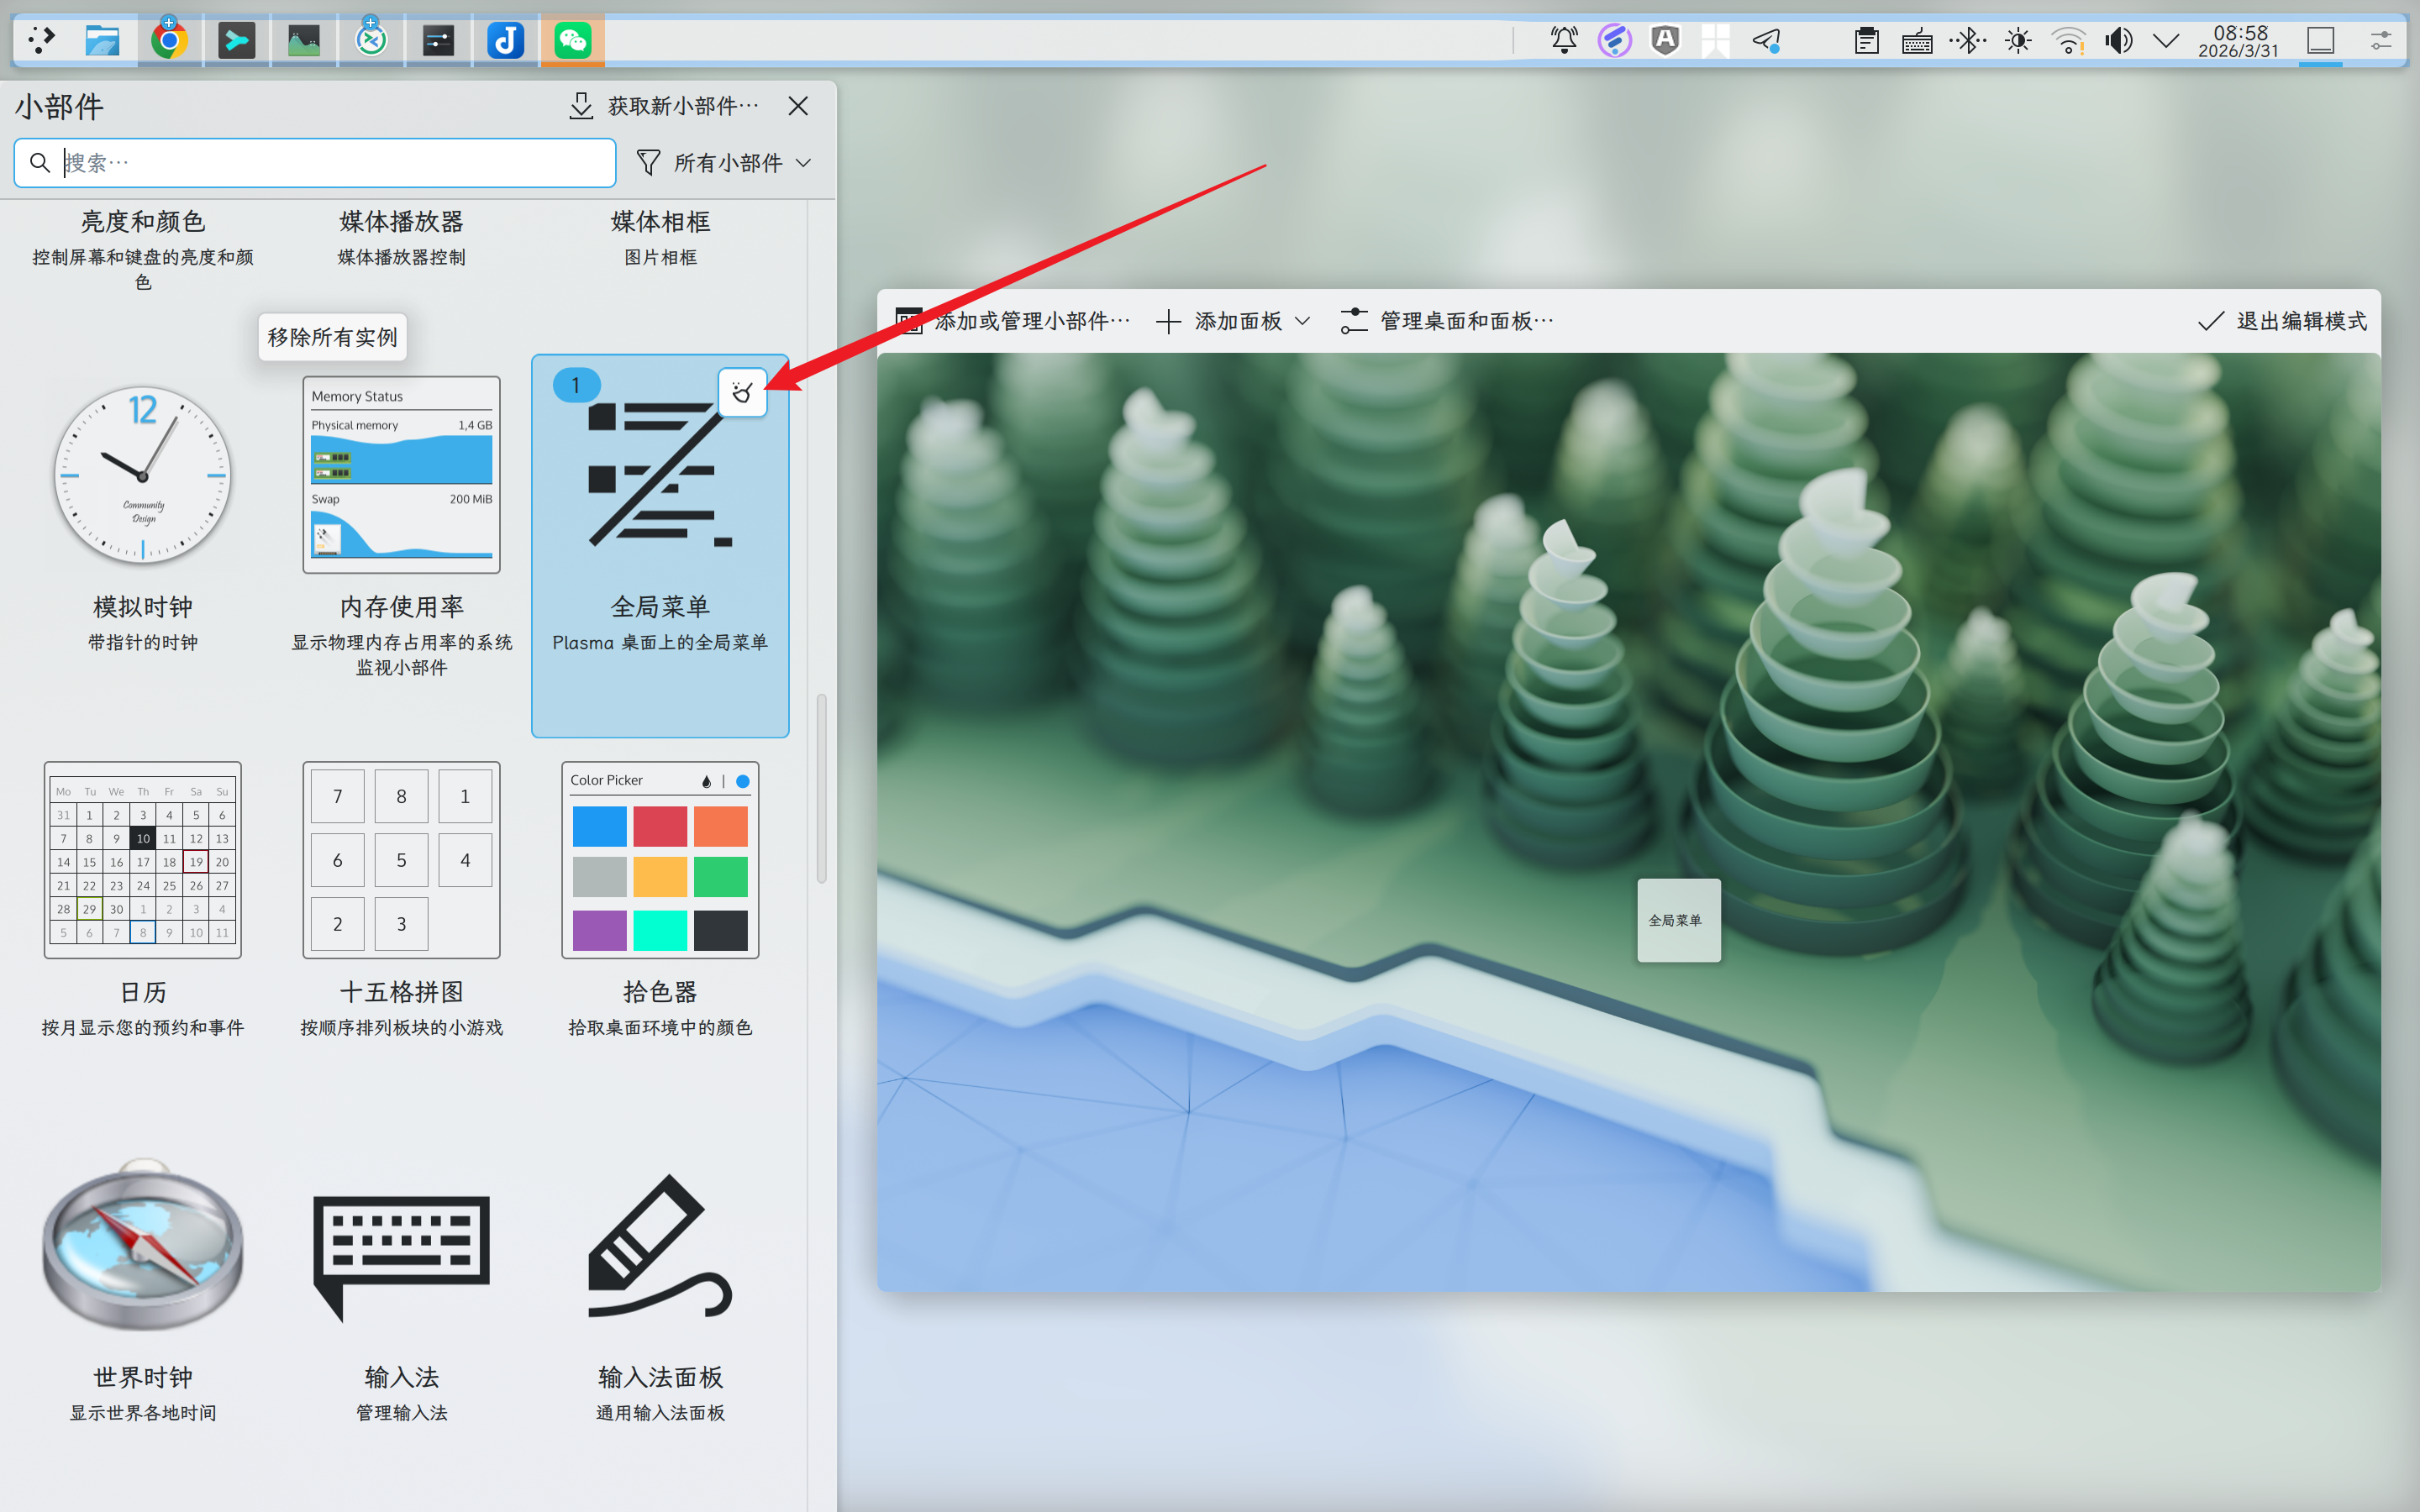
Edit Mode > Add or Manage Widgets > Global Menu > Remove all instances (button in the top right corner of the widget)

进入编辑模式,添加或管理组件,删除“全局菜单”小组间

image

第二步:移除应用菜单

实测完成第一步即可,第二步按照自己实际情况决定是否要做。

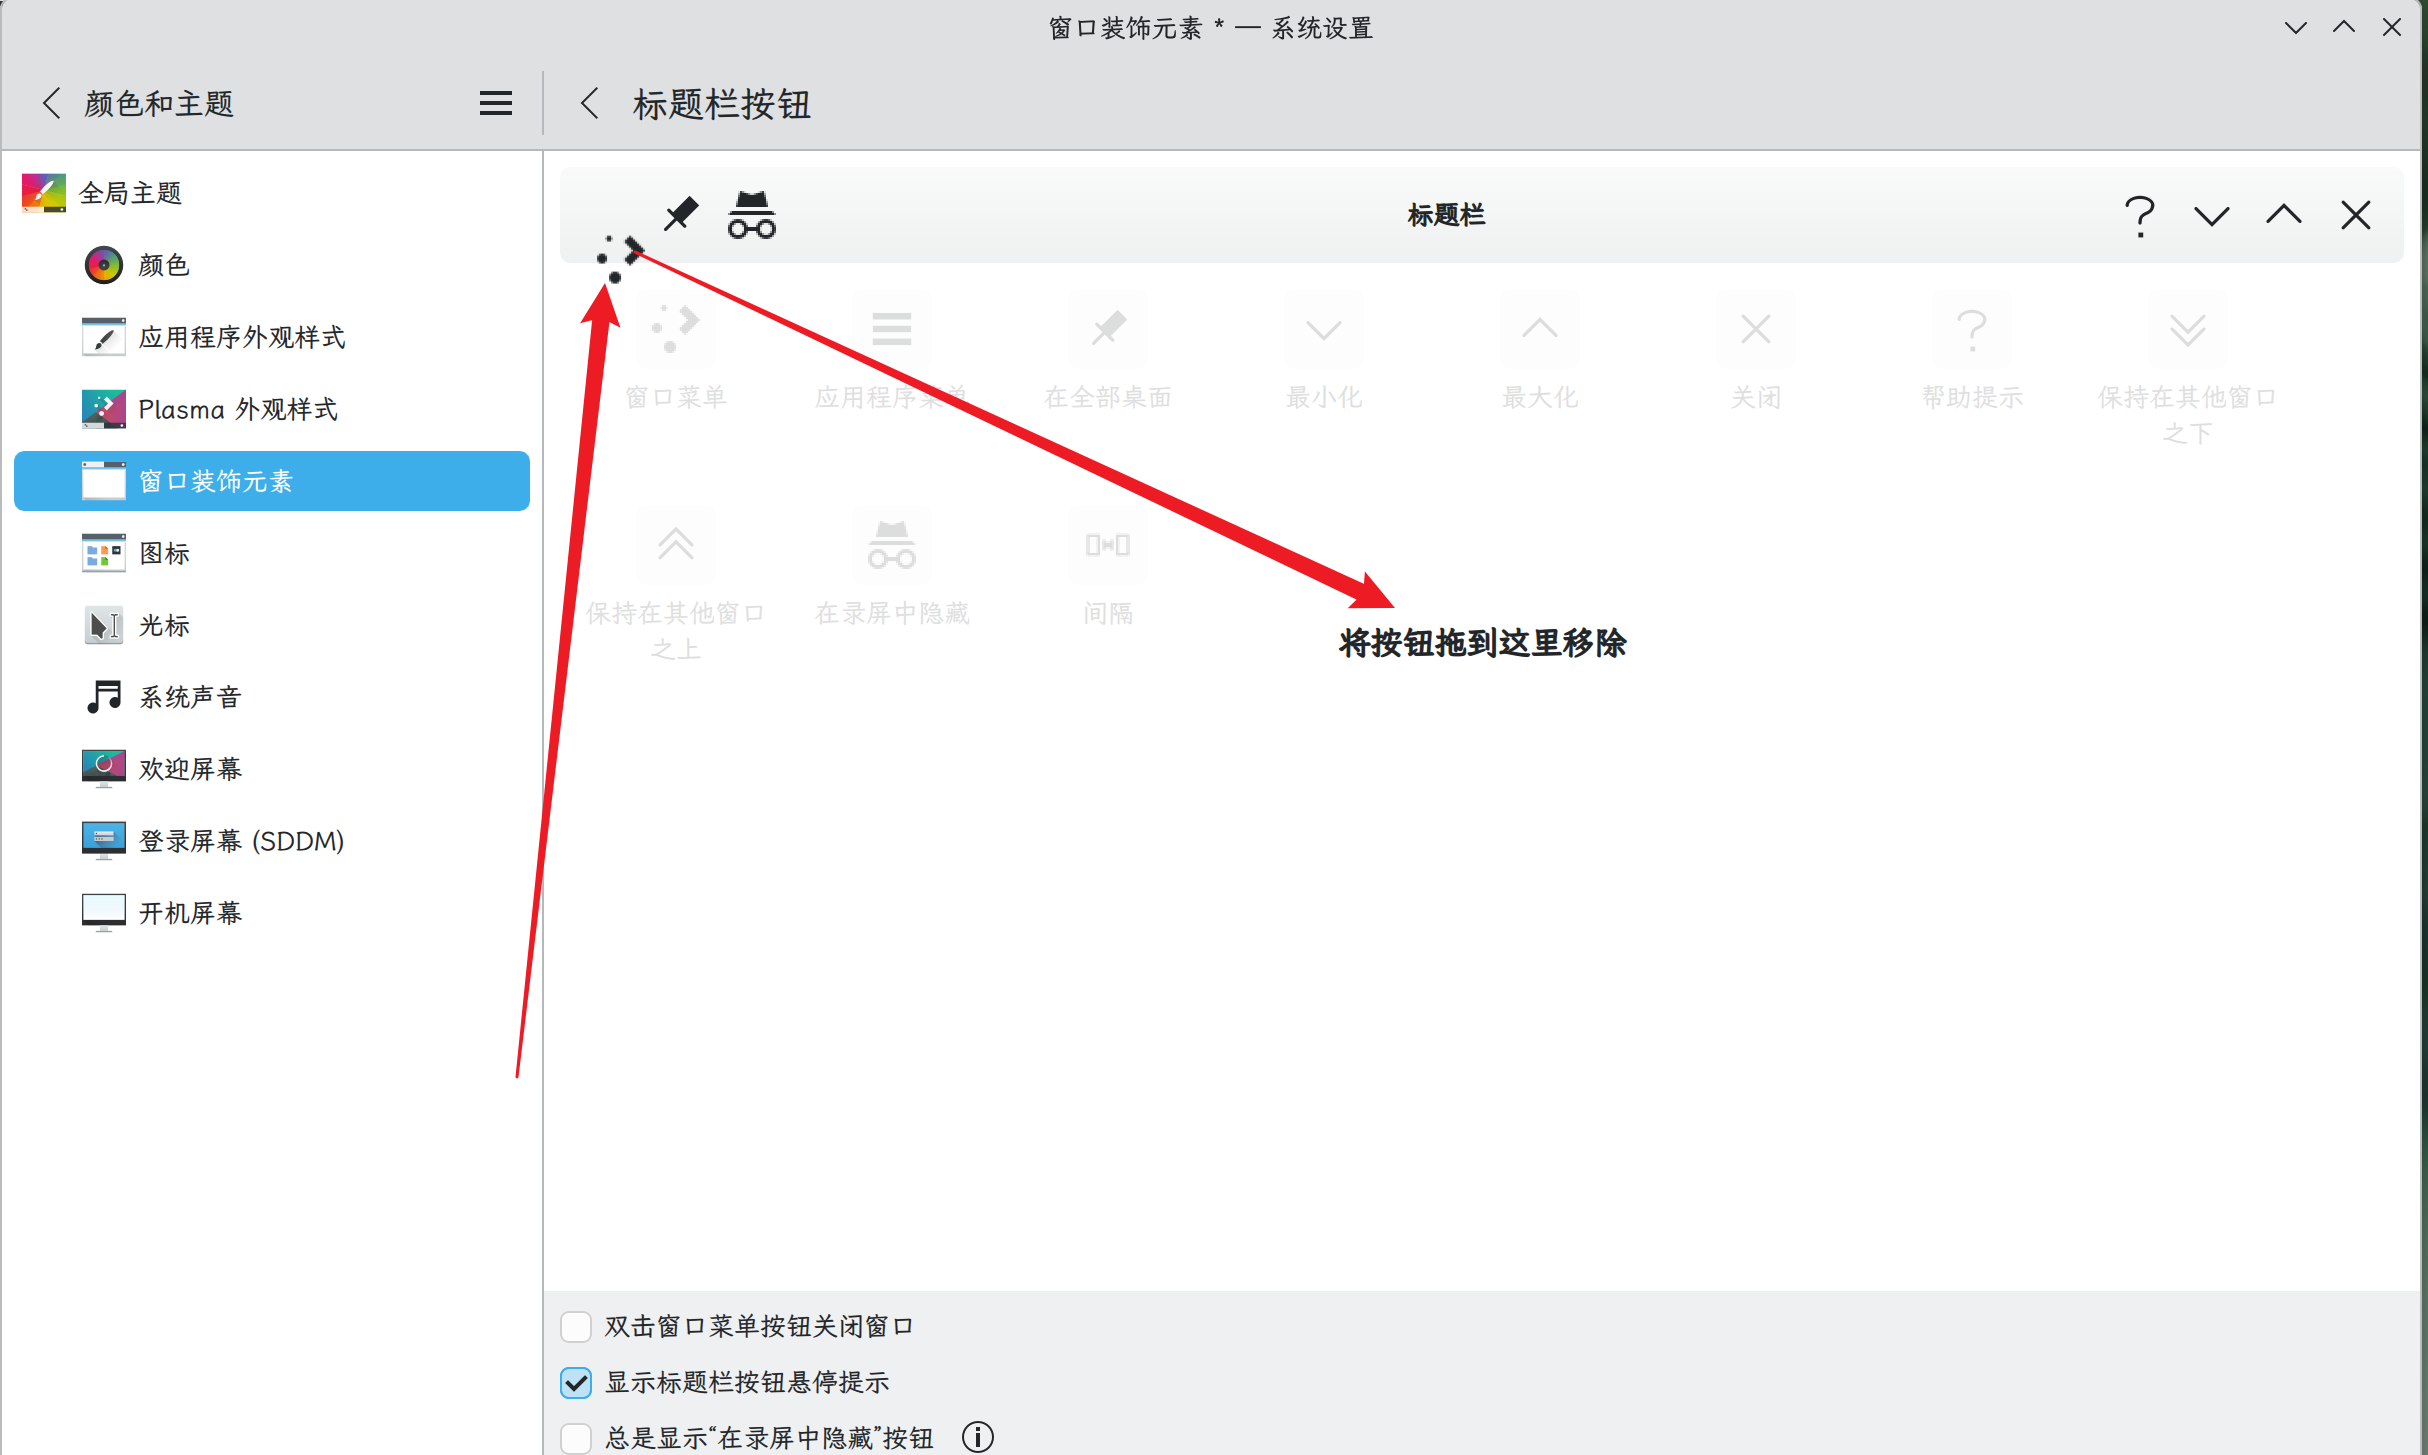
Settings > Colors & Themes > Window Decorations > Configure Titlebar Buttons…

There remove the Application Menu (“Hamburger”) button from your titlebars.

进入设置,颜色与主题,窗口装饰元素,配置菜单栏按钮,将“应用菜单”按钮移除,点击应用,即可。

image

第三步:重启应用

此时应该就能看到应用菜单了,如果看不到再重启一下即可。

image

Refs

终极指南:在 Linux 裸机服务器上快速部署 Moltbot (原 Clawbot) 并集成飞书

引言

2026 年初,一个名为 Moltbot(前身为 Clawbot)的开源 AI 代理(Agent)框架席卷了开发者社区。该框架允许用户将强大的 AI 模型(例如 OpenAI 的 GPT 系列、Anthropic 的 Claude 等)与 WhatsApp、Telegram、Discord 等日常通讯工具集成,从而通过聊天即可操控电脑、执行任务、获取信息。特斯拉前 AI 主管 Andrej Karpathy 的推荐更是使其迅速走红,其 GitHub 项目在短时间内获得了超过 60,000 个星标。

本指南将提供一份以安全为核心的详尽教程,旨在引导您逐步在 Linux 裸机服务器上安全地完成 Moltbot 的部署。

准备工作

在开始之前,请确保你已具备以下条件:

项目 要求 说明
Linux 服务器 Ubuntu 22.04+ 或其他现代发行版 推荐至少 2GB RAM 和 2 核 CPU。
基础 Linux 知识 熟悉 SSH、命令行操作 本教程将提供所有需要的命令。

第一步:准备服务器环境

基于安全最佳实践,我们强烈建议不要直接使用 root 用户运行任何应用程序。因此,第一步是创建一个专用的非特权用户,并为其授予 sudo 权限。

  1. root 用户 SSH 登录你的服务器
ssh root@your_server_ip
  1. 创建一个新用户(我们称之为 moltbot):
adduser moltbot

系统会提示你为新用户设置密码和其他信息。

  1. 将新用户添加到 sudo,以便执行需要管理员权限的操作:
usermod -aG sudo moltbot
  1. 切换到新用户
su - moltbot
  1. 更新系统软件包
sudo apt update && sudo apt upgrade -y

此后,所有操作都应在该 moltbot 用户下进行。

第二步:安装 Moltbot

Moltbot 的核心依赖是 Node.js (版本 ≥ 22)。官方提供了一个便捷的一键安装脚本,可自动处理相关依赖并完成 Moltbot 的安装。

  1. 执行官方安装脚本
curl -fsSL https://molt.bot/install.sh | bash

该脚本会自动检测您的操作系统,安装适配的 Node.js 版本,并部署 Moltbot 命令行工具(CLI)。

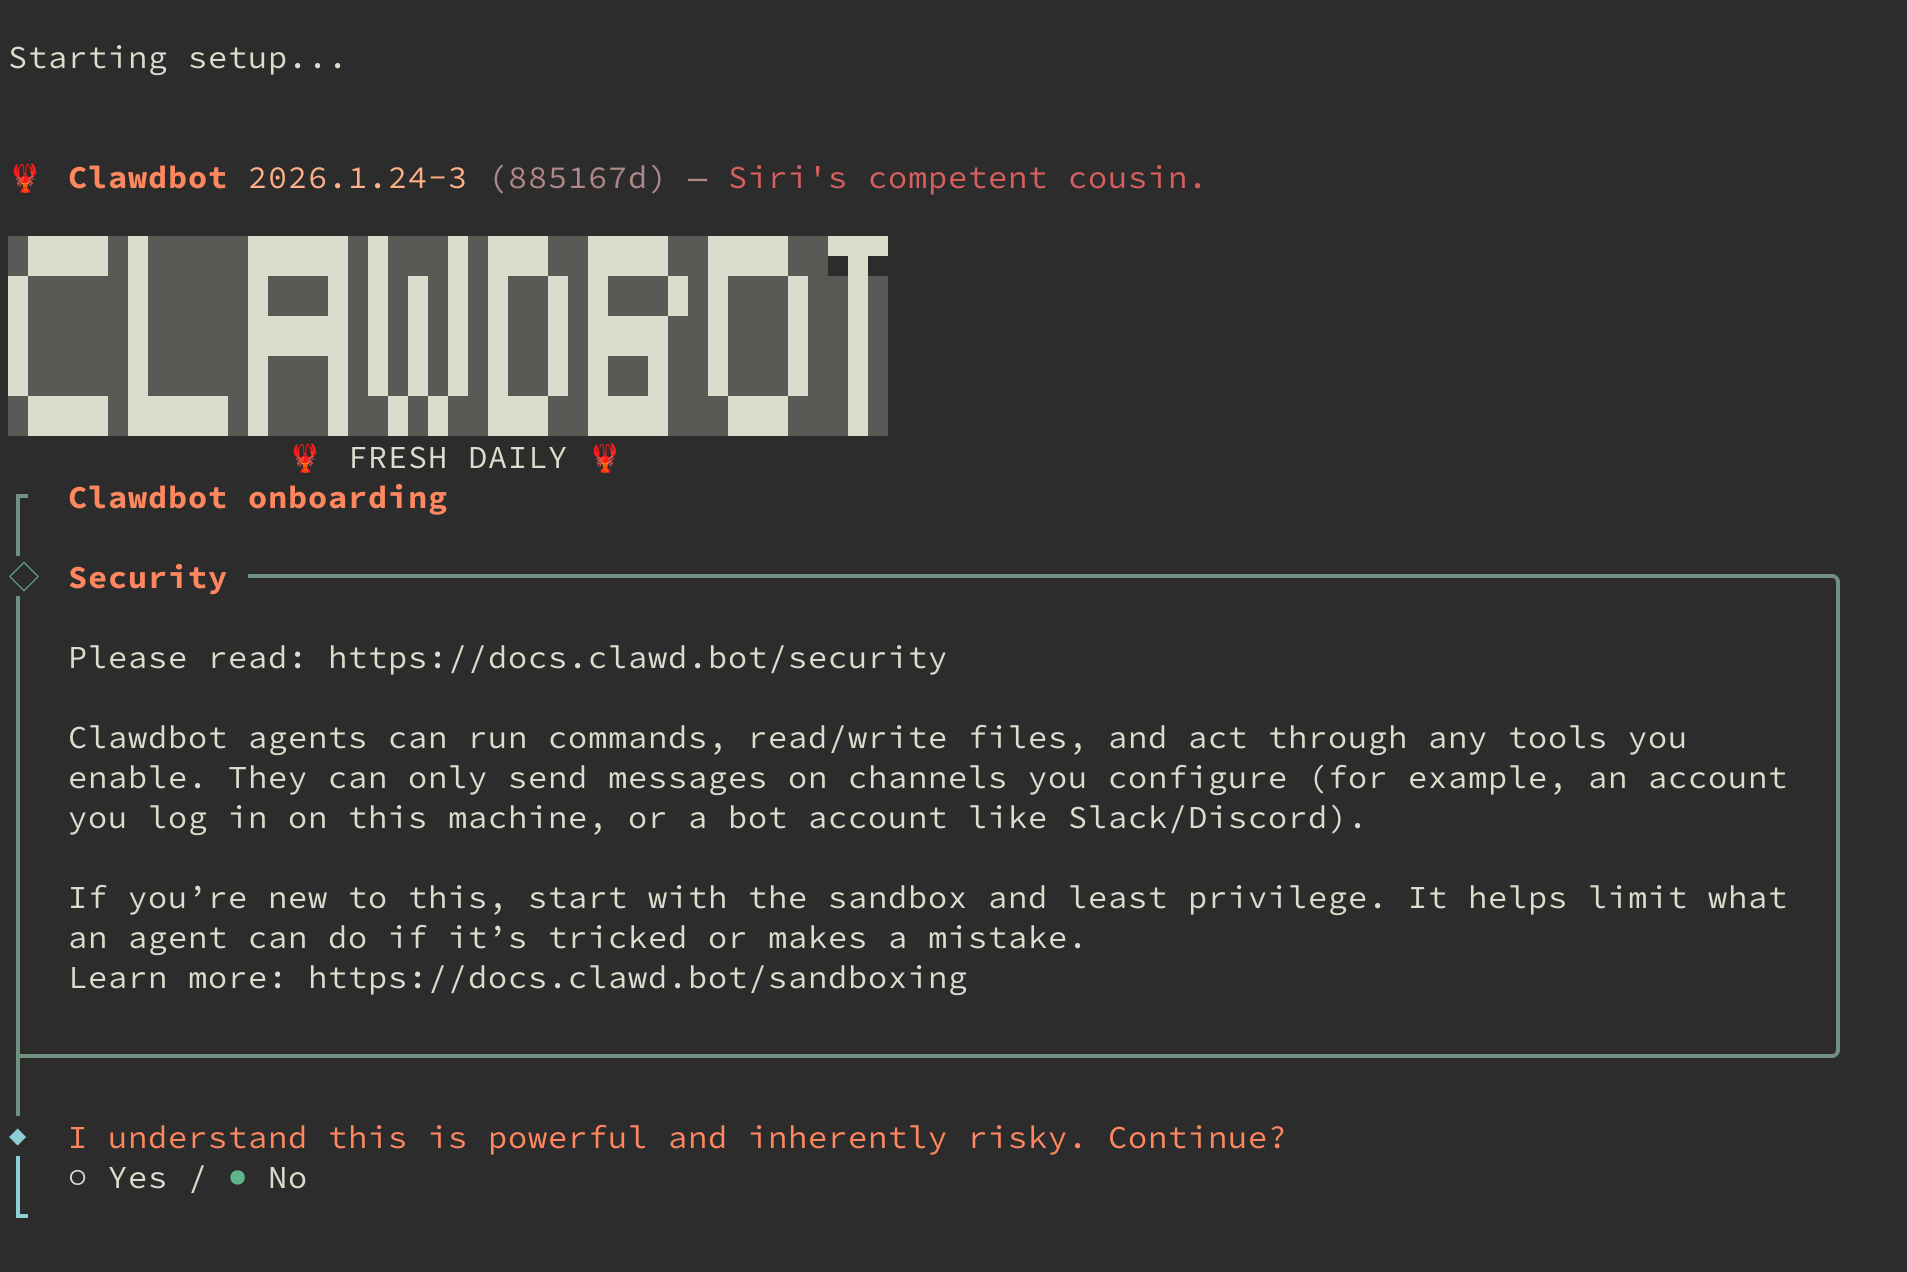
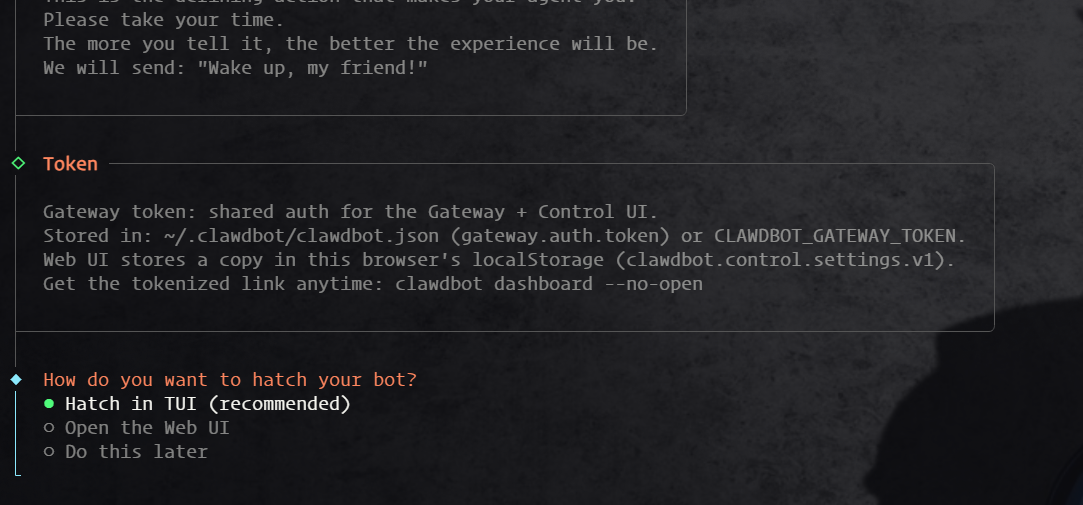
安装成功后,将自动进入交互式配置流程,如下图所示:

图片

第一个选项是风险提示,输入 yes 确认已知晓。

第二步在模式选择中,建议选择 QuickStart 以进行快速配置。

第三步:配置使用 Qwen

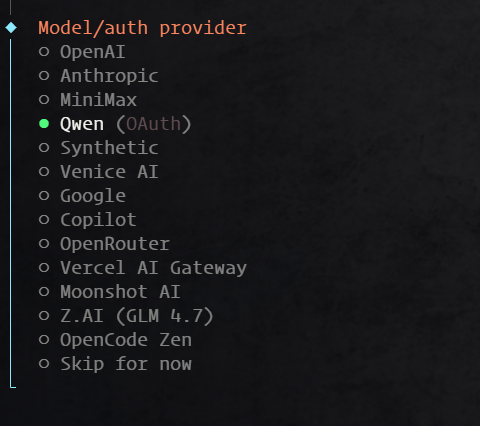
在选择模型服务商时,本教程以阿里云的 Qwen(通义千问)为例,其提供充足的免费额度,非常适合初学者入门。待您熟悉系统后,可根据需求更换为其他模型。

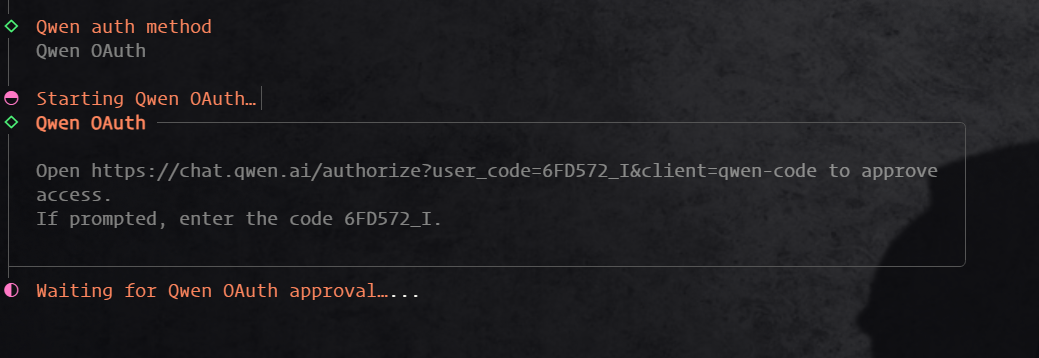
选择 Qwen 模型后,终端会提供一个授权链接,请复制并在浏览器中打开。

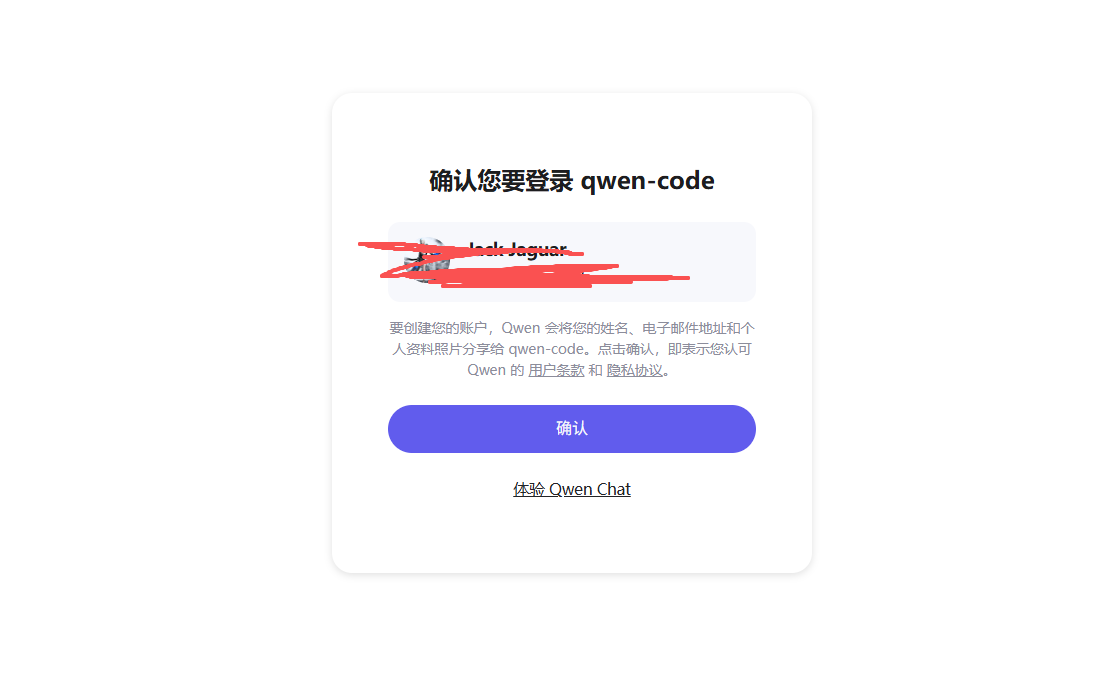
打开链接后,您会看到授权页面。如果您尚未登录阿里云账户,请根据提示完成登录。

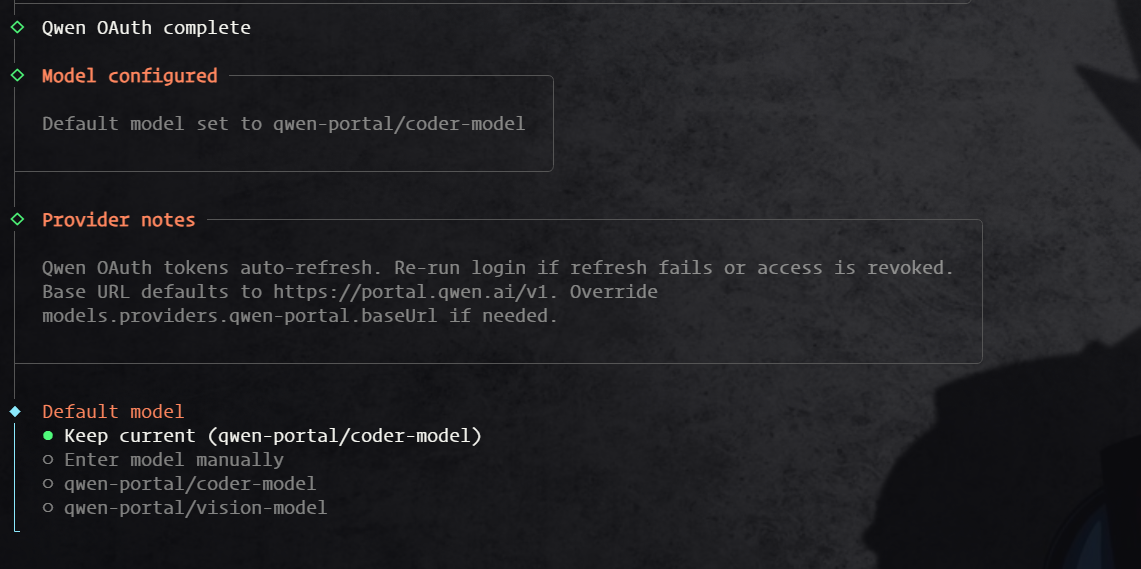
登录成功后,系统会提示您选择具体的 Qwen 模型版本。

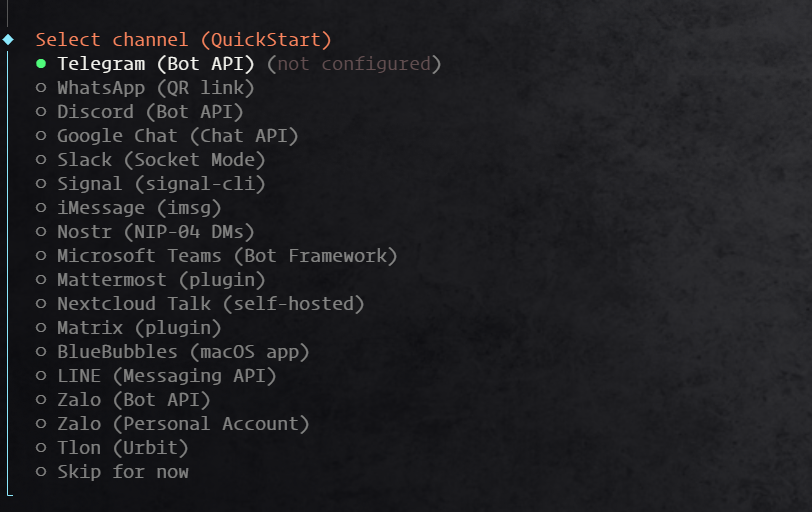
此处选择默认模型即可。随后,安装向导会询问是否配置频道(Channel),建议暂时跳过,后续再进行配置。

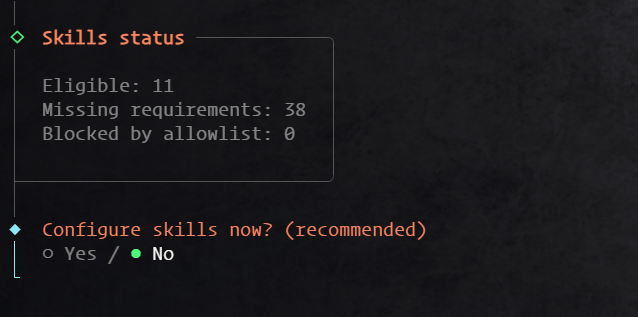
接着,在技能(Skills)配置步骤中,同样选择 No。

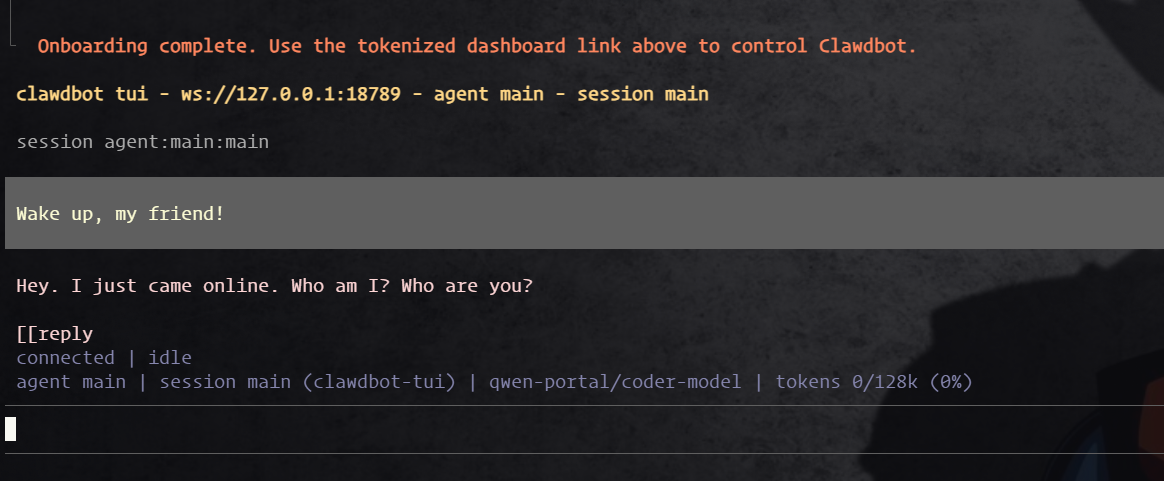
等待安装流程结束,在最后的启动方式选择中,选择 TUI(文本用户界面)。

如果成功进入 TUI 聊天界面,说明 Moltbot 已正确安装。您可以输入 Hello 进行初步测试。

测试无误后,使用 Ctrl+C 组合键退出 TUI 界面,以便进行后续的后台服务配置。

第四步:配置 Moltbot 并启动 Gateway

  1. 检查 Gateway 服务状态

安装向导会自动将 Gateway 配置为系统服务并在后台启动。

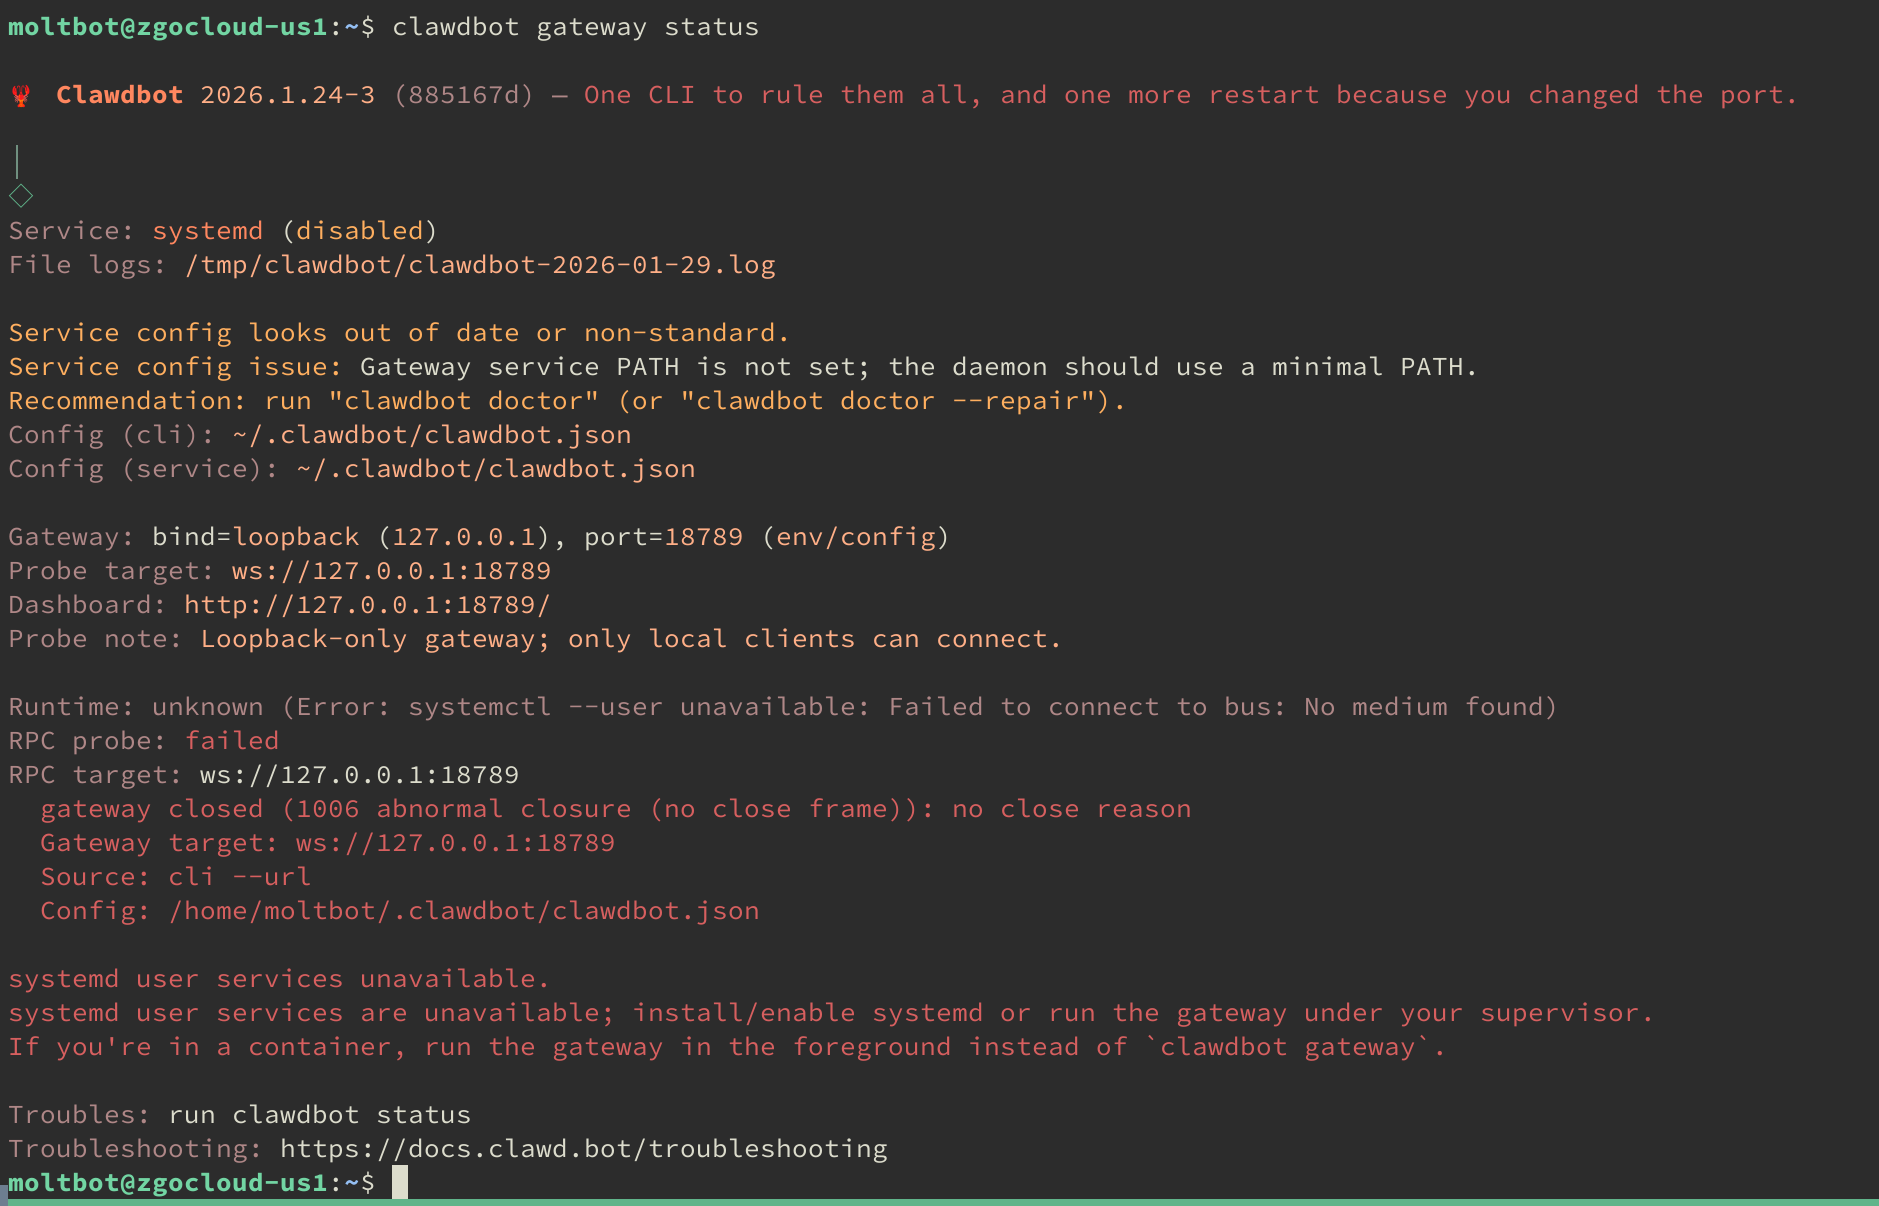
clawdbot gateway status

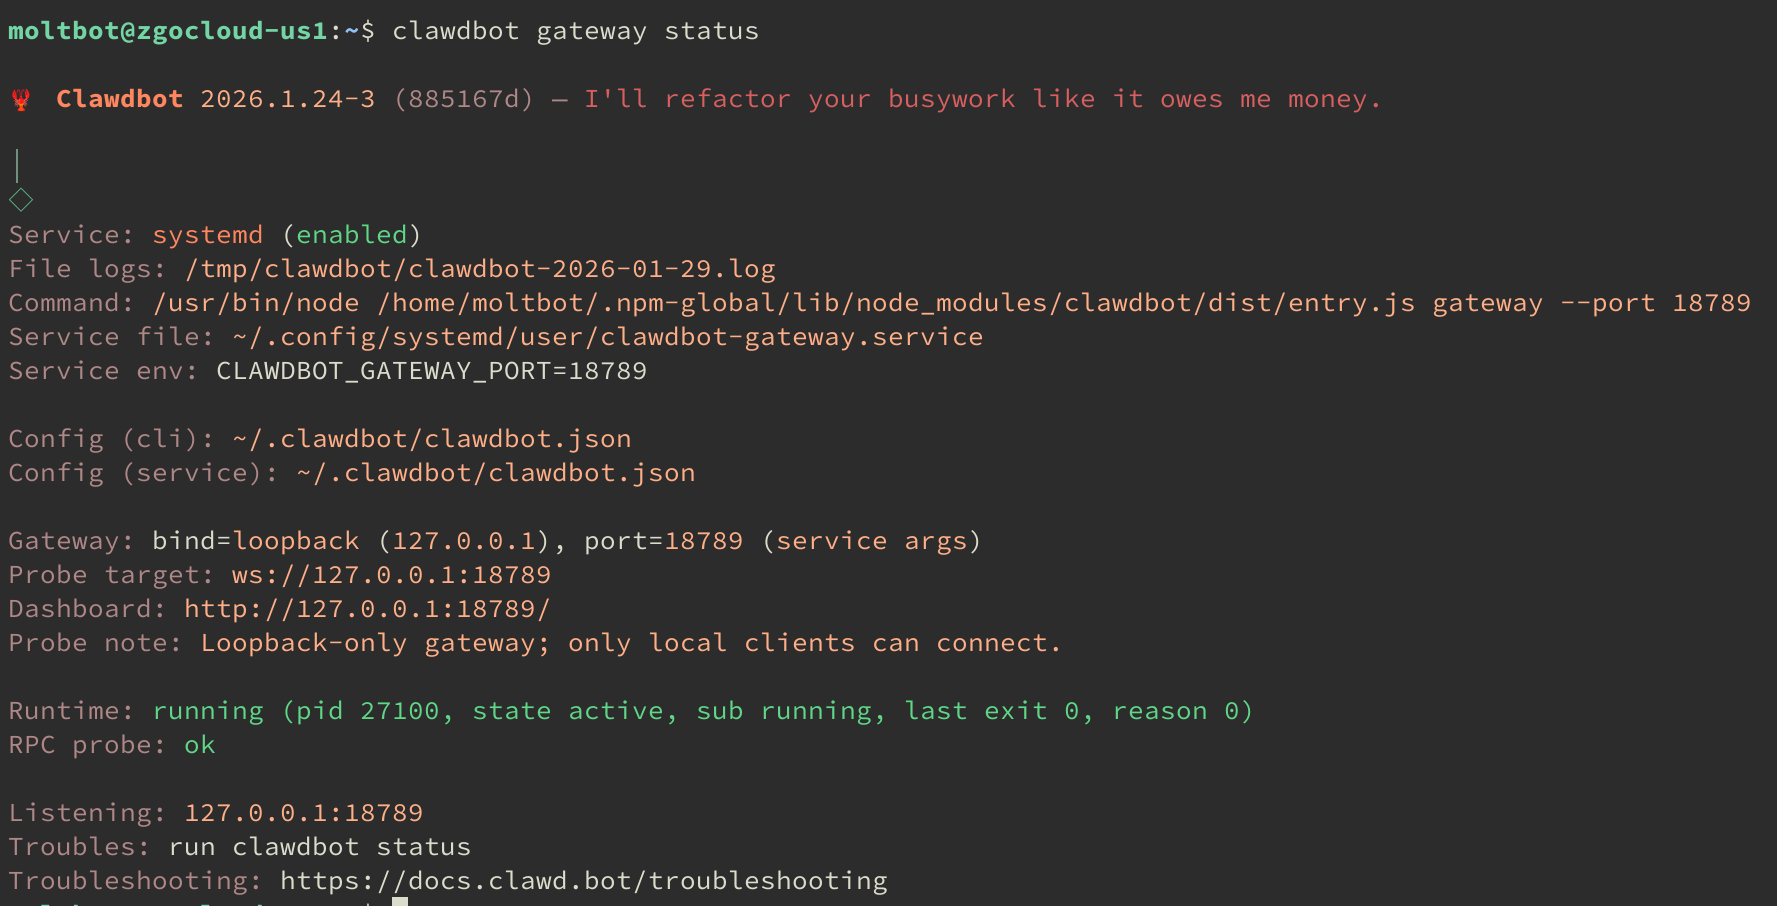
如果服务正常运行,您将看到 active (running) 的状态提示。

服务状态

如果检查状态时发现服务异常(例如 inactivefailed),可以尝试使用内置的诊断工具进行修复:

clawdbot doctor --repair

修复后,再次检查状态,应可看到服务已恢复正常。

服务状态

  1. 配置选项

您可以根据需要编辑 Moltbot 的主配置文件。

使用文本编辑器(如 vimnano)打开配置文件:

sudo vim ~/.clawdbot/clawdbot.json
  1. 重载并重启服务

每次修改配置文件后,需要重载服务以使更改生效。虽然某些版本的 Moltbot 支持自动重载,但手动重启是更可靠的方式。

systemctl --user daemon-reload
clawdbot gateway restart

至此,Moltbot Gateway 已在后台稳定运行,并监听本地端口,等待连接。

第五步:访问后台

Moltbot 自带一个 Web UI 用于管理和测试。运行以下命令可获取访问方式:

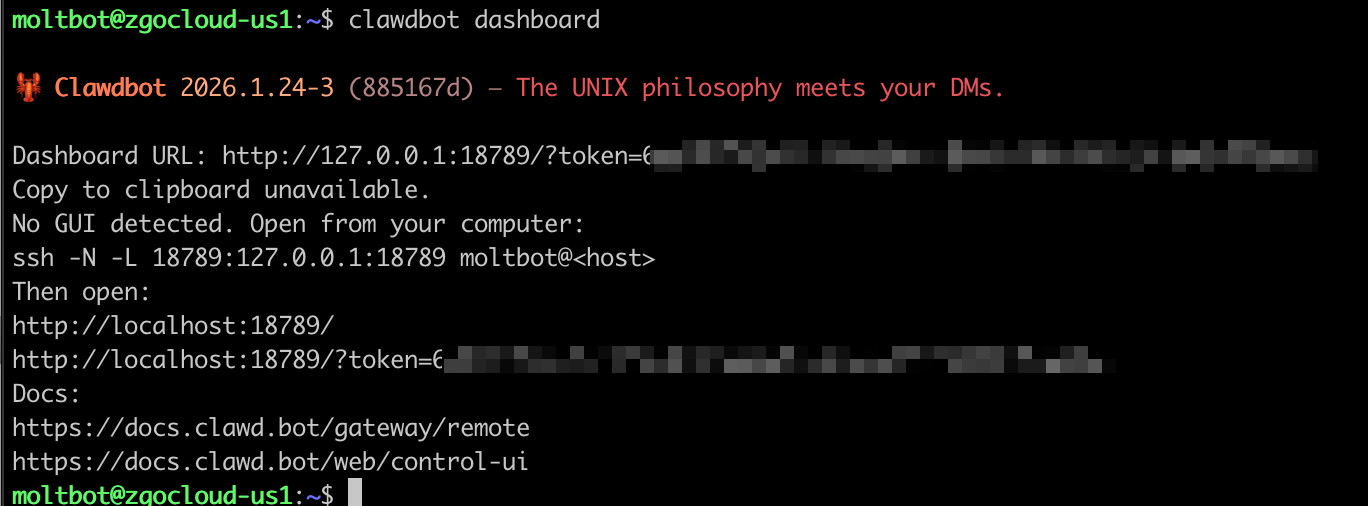
clawdbot dashboard

命令会输出一段 SSH 端口转发指令,格式如下:

后台访问方法

在您的本地电脑(而非服务器)上打开一个终端,并执行上述 SSH 命令。该命令会将服务器的 Web UI 端口 18789 映射到您本地的同名端口。

ssh -N -L 18789:127.0.0.1:18789 xxx@xxx.xxx.xxx.xxx -p xxx

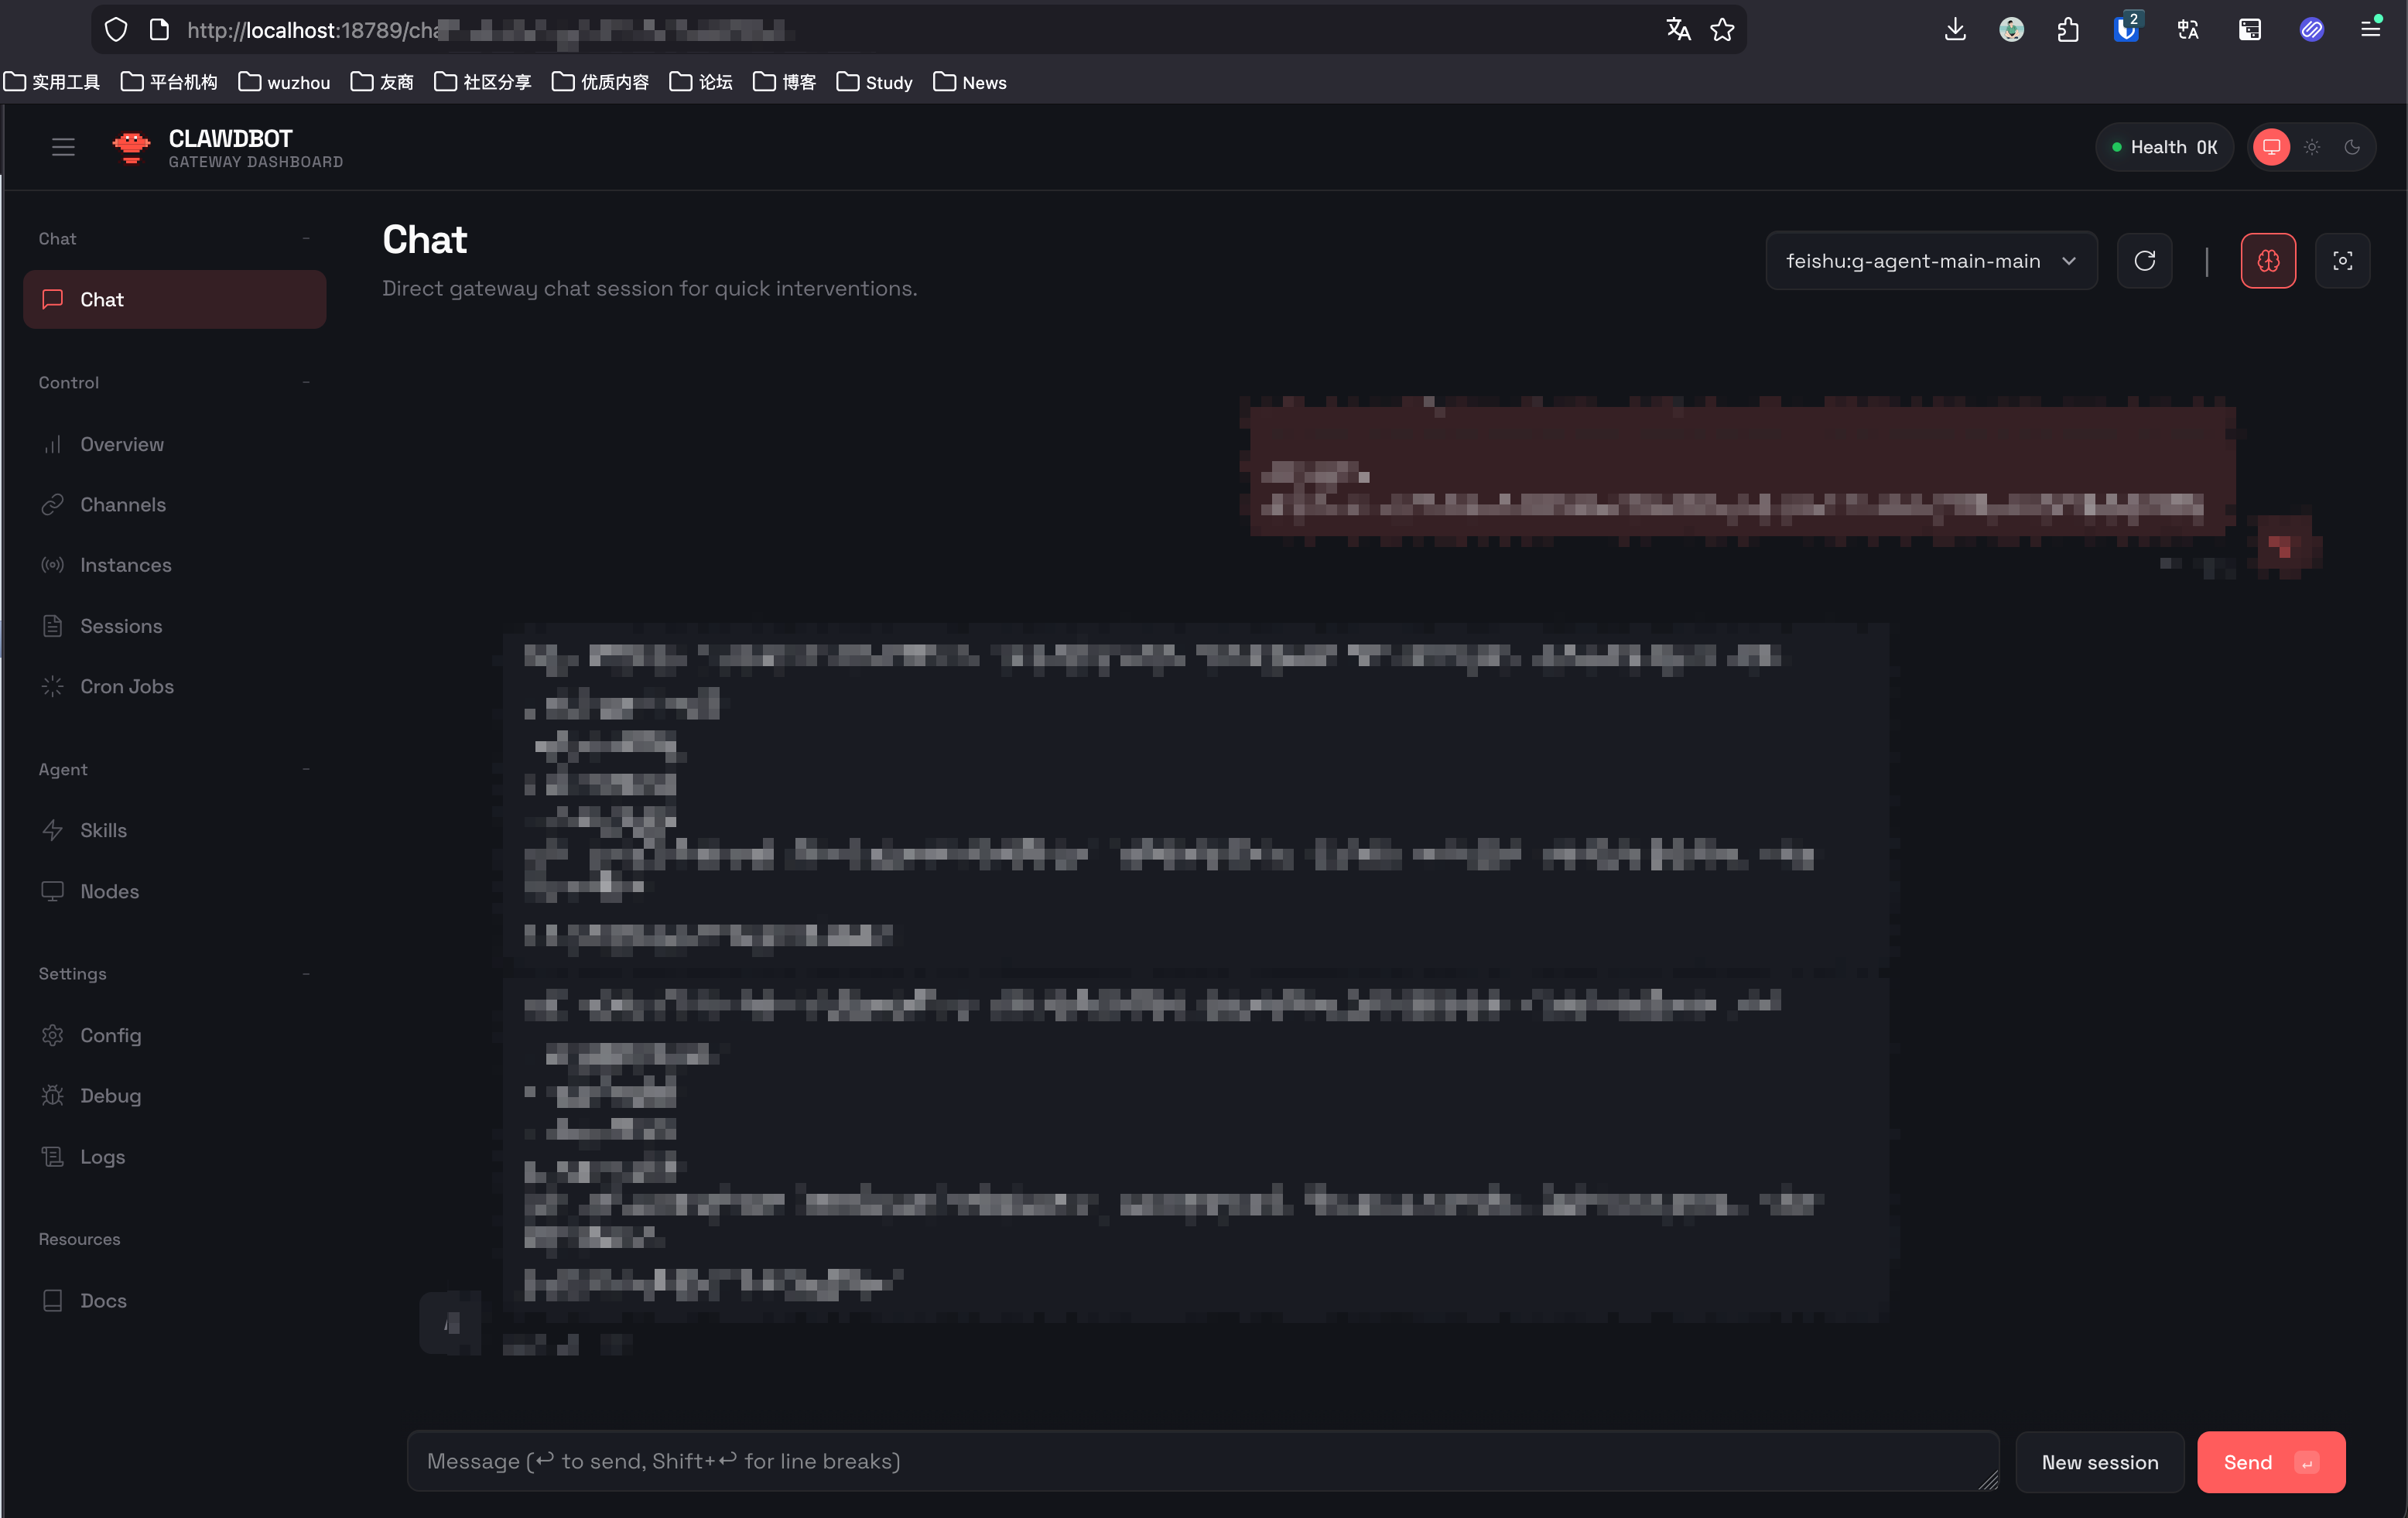
命令运行后,在本地浏览器访问 http://127.0.0.1:18789 即可打开 Web UI 。

您可以发送一条 Hello 消息进行测试,如果收到回复,则说明一切正常。

后台界面

第六步:接入飞书

首先,在服务器上为 Moltbot 安装飞书插件:

clawdbot plugins install @m1heng-clawd/feishu

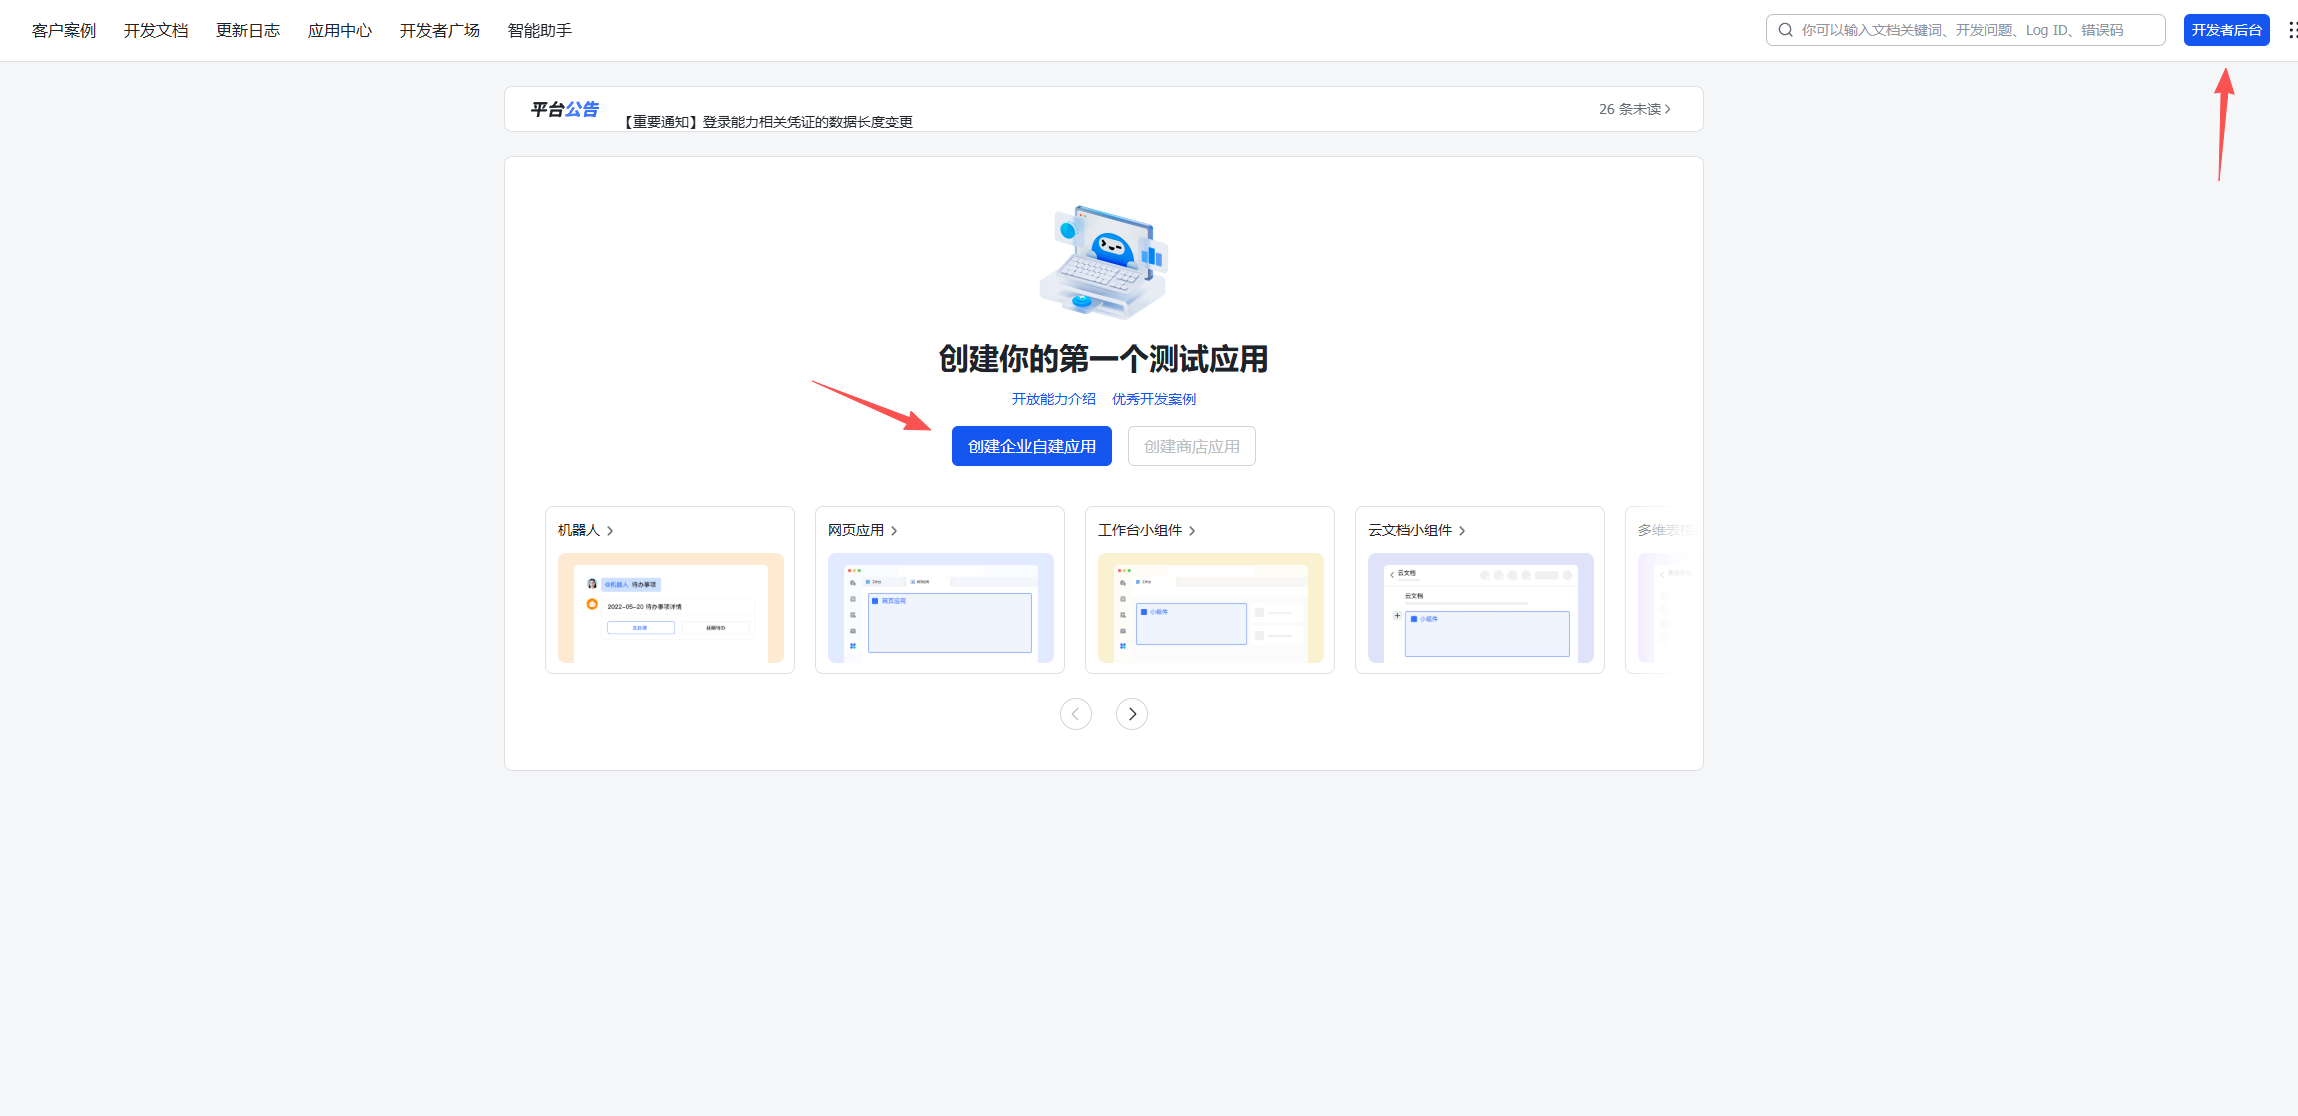
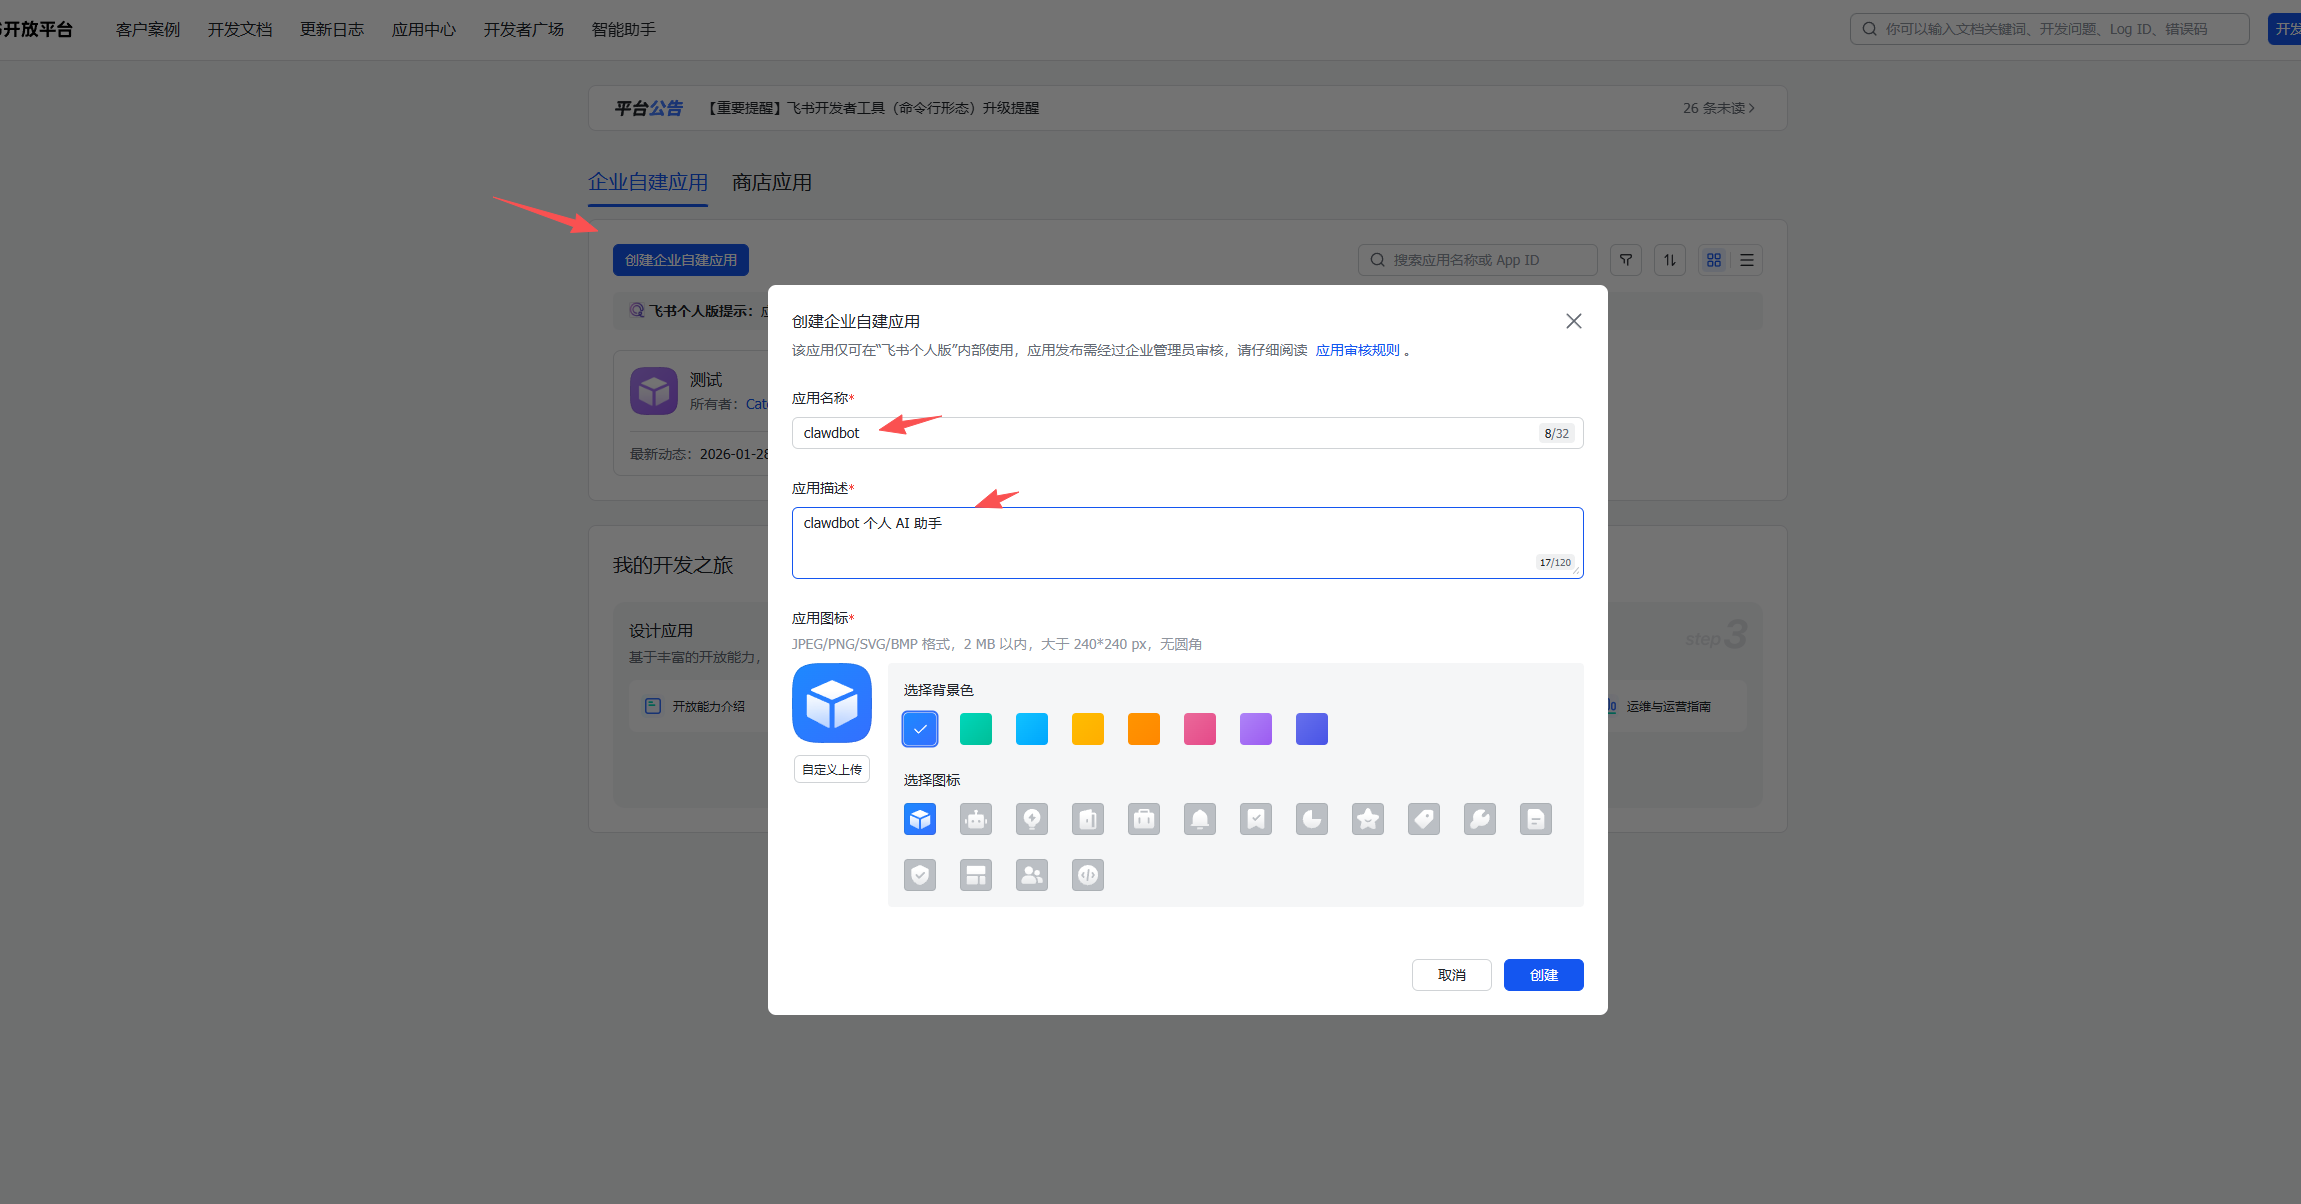
接下来,登录飞书开放平台,进入「开发者后台」,点击「创建企业自建应用」。

填写应用名称和描述后,完成创建。

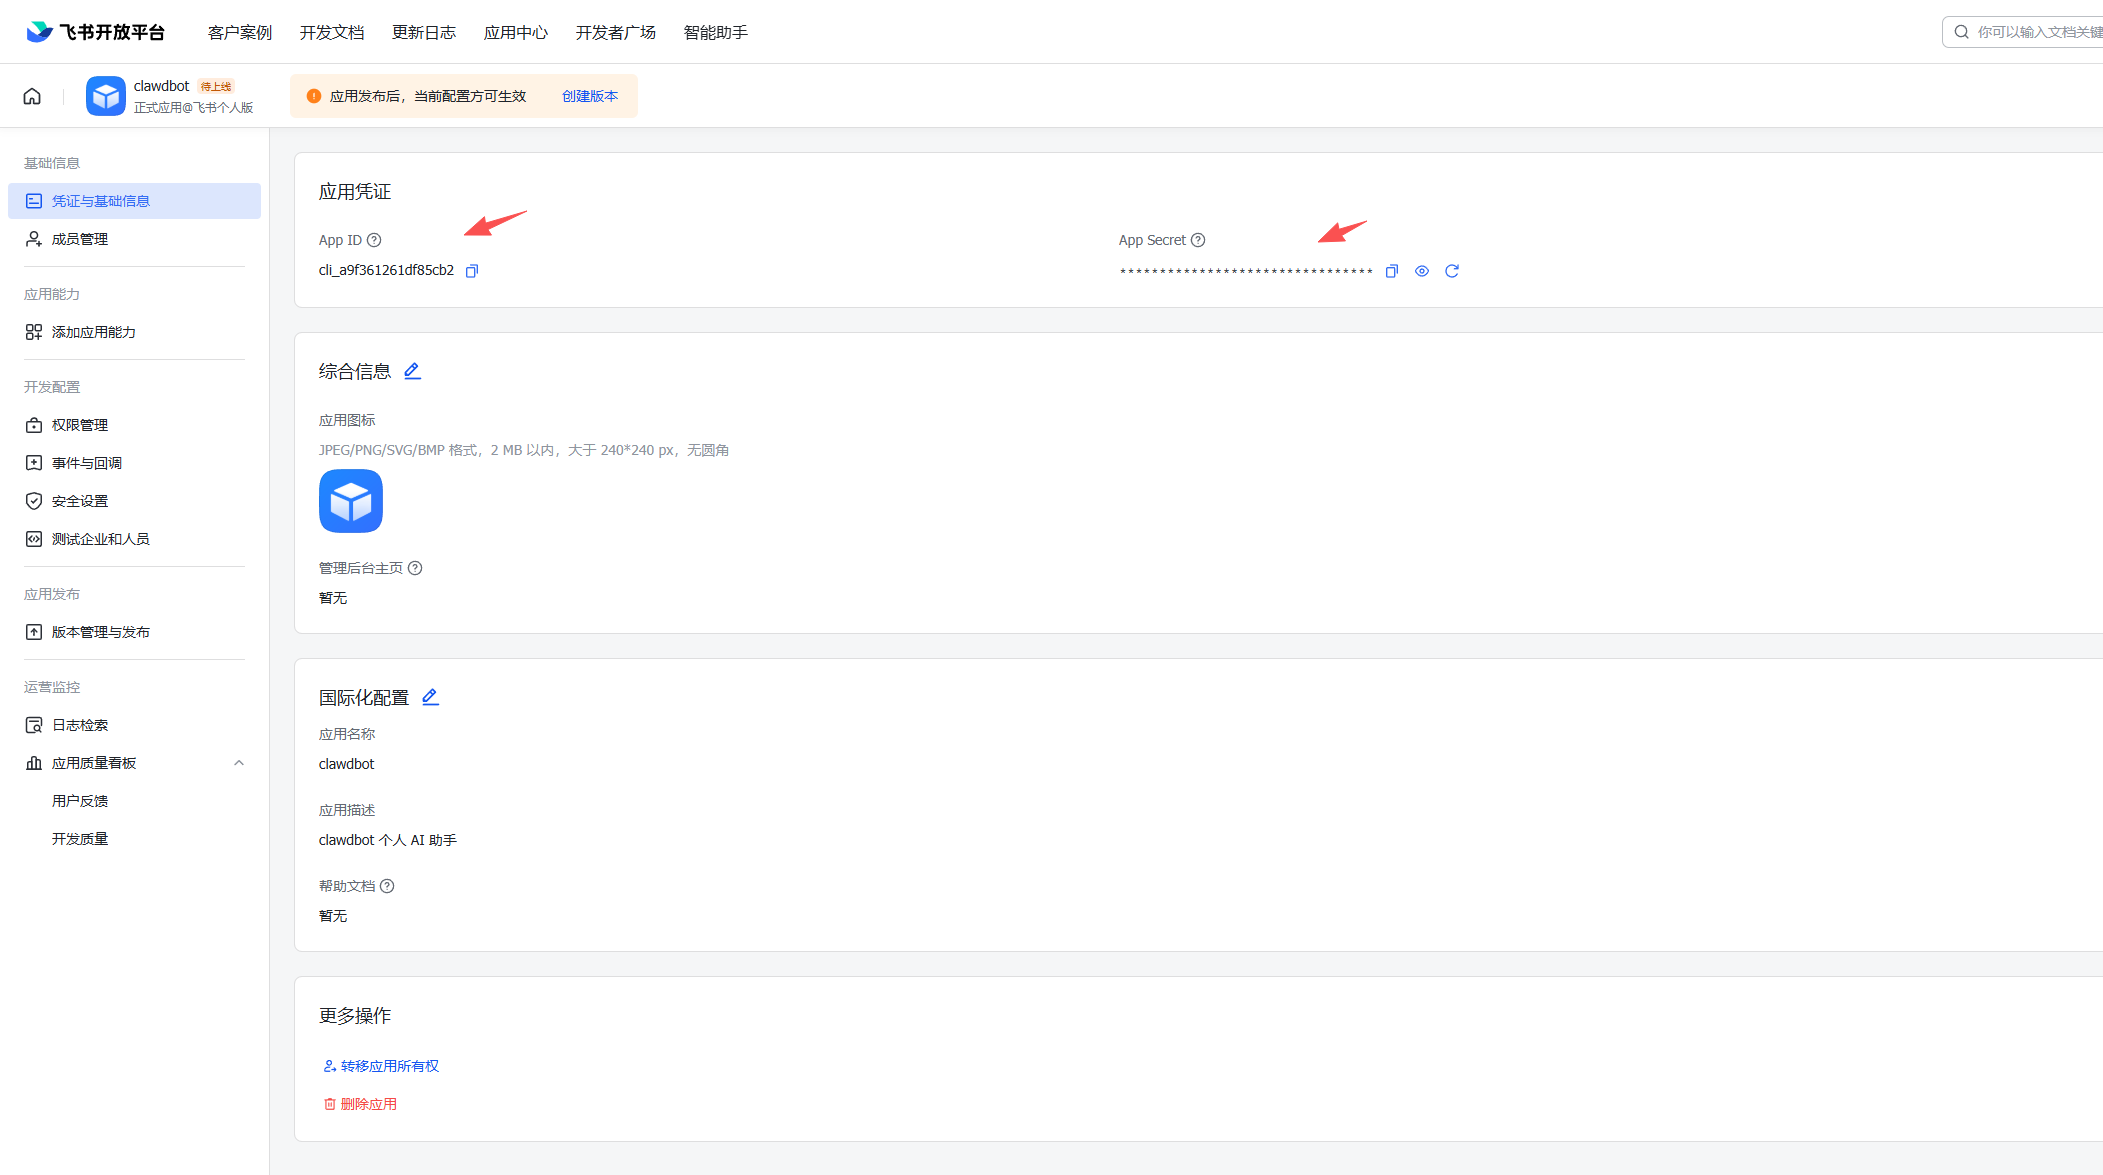
创建成功后,进入应用的「凭据与基础信息」页面,复制并妥善保存 App ID 和 App Secret,它们将在后续配置中用到。

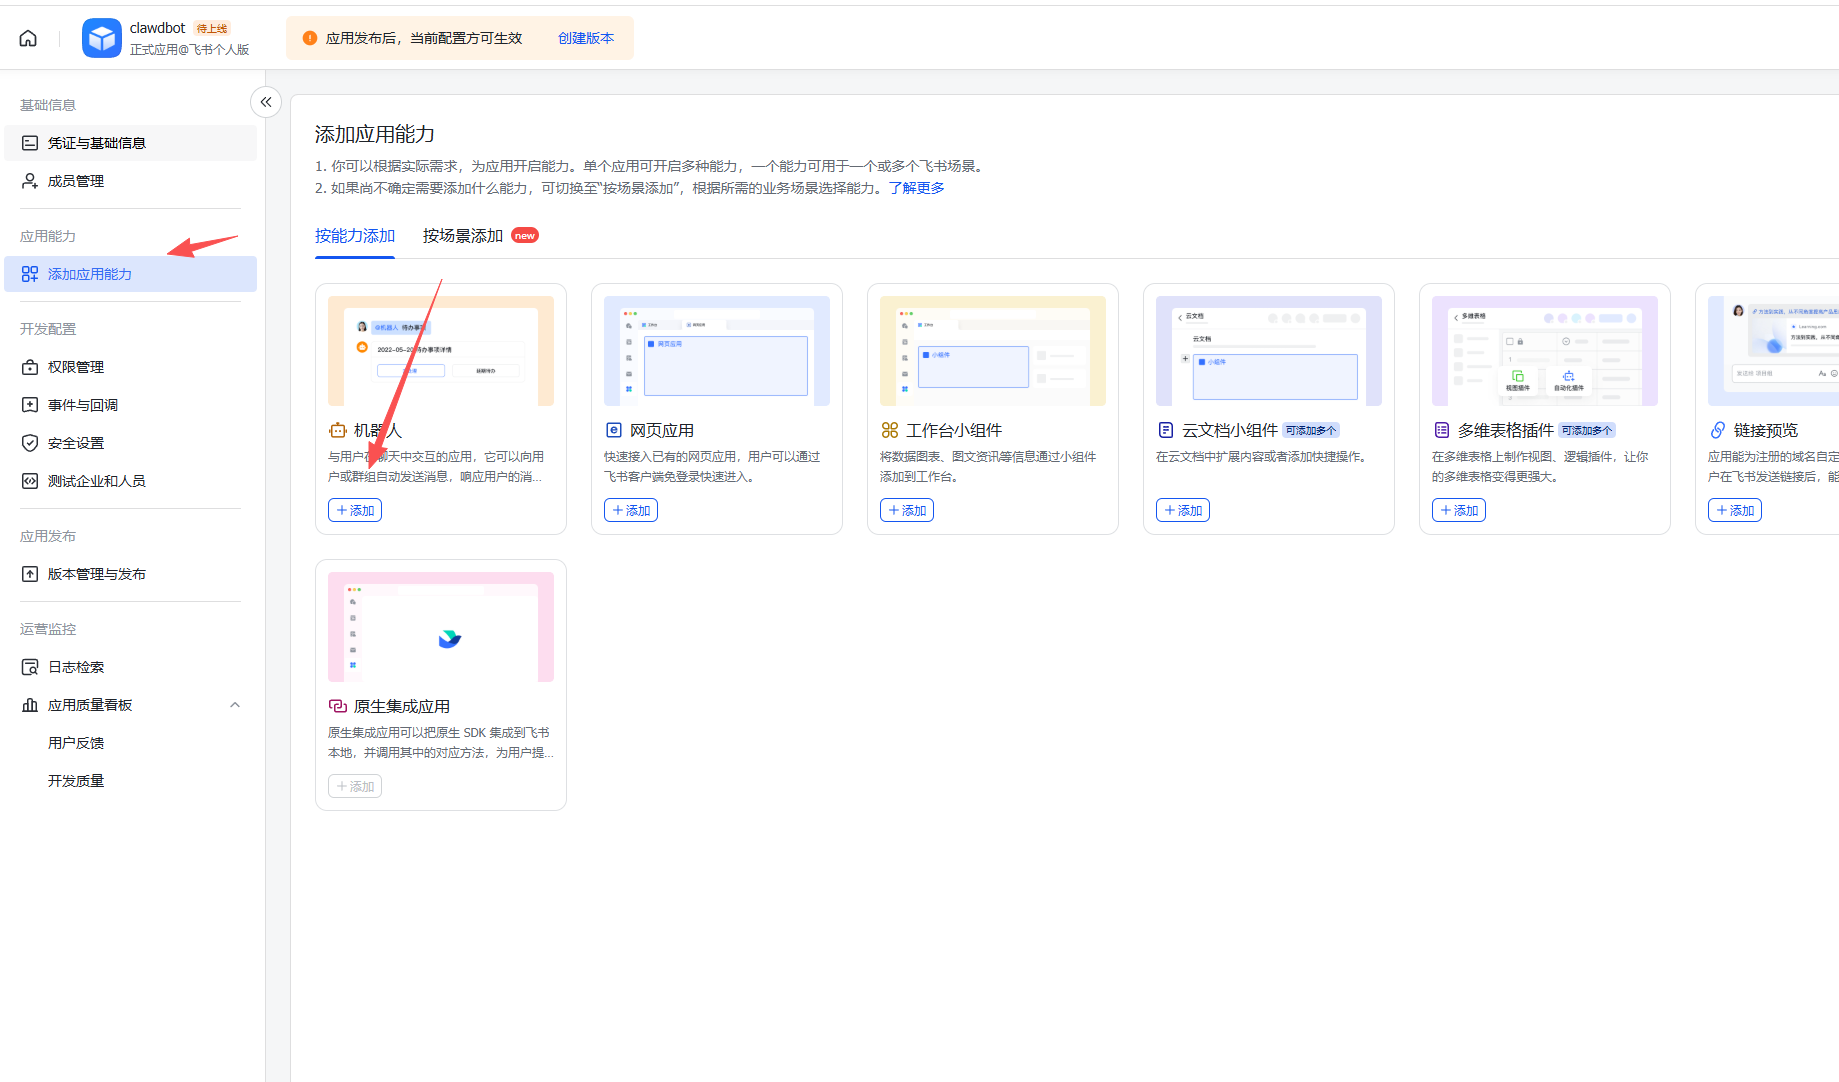
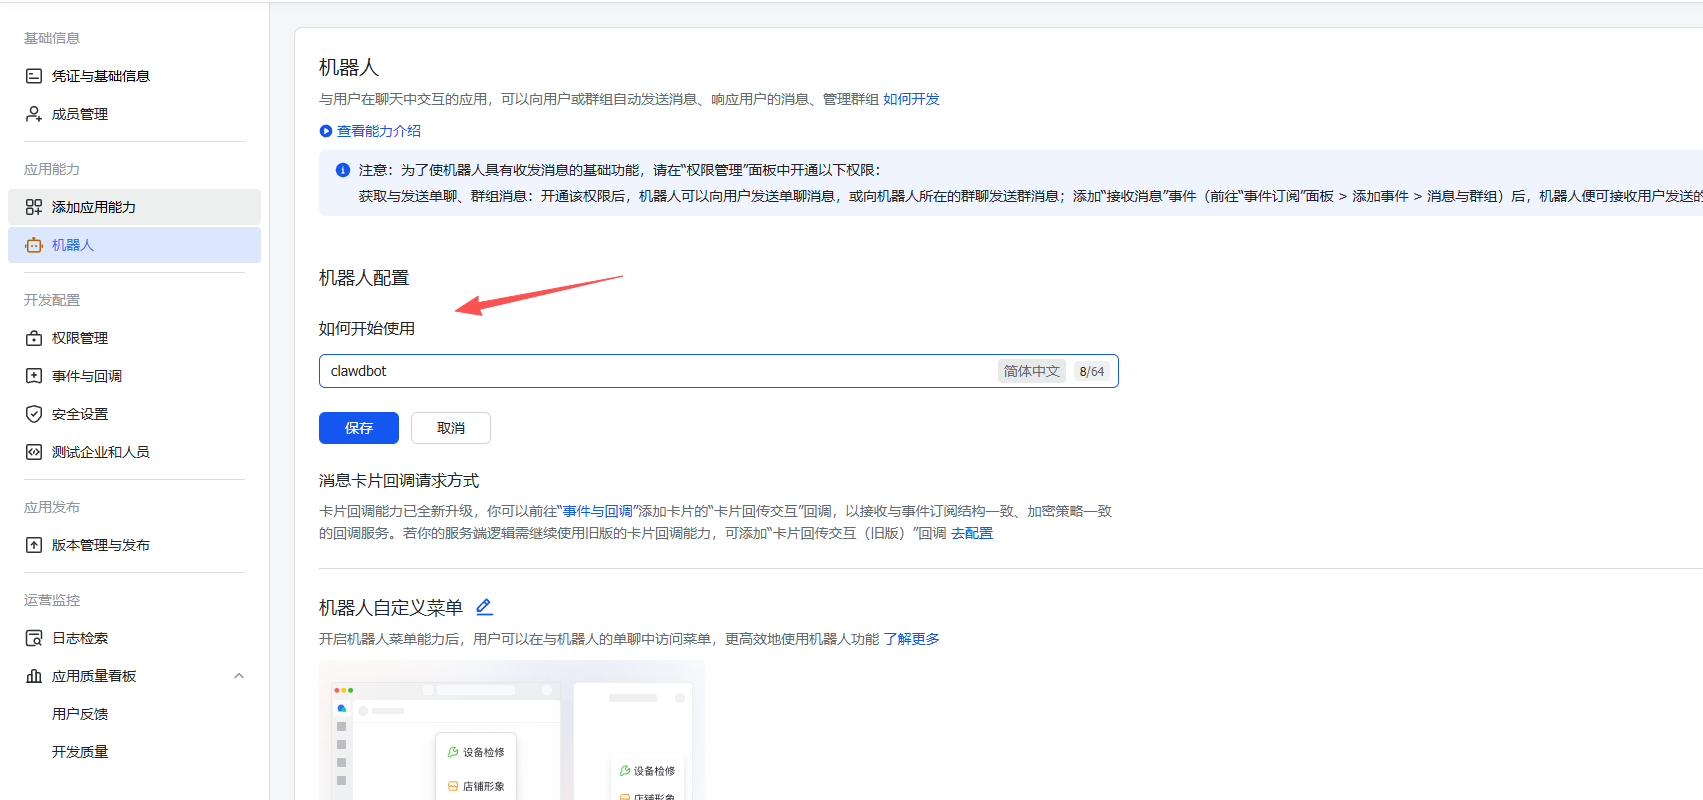
然后添加机器人,如下操作

暂时停留在飞书后台,我们先返回服务器终端,完成 Moltbot 的飞书相关配置。

飞书的其他配置先暂停,回到服务器配置 Clawdbot 的飞书参数

添加飞书配置

clawdbot config set channels.feishu.appId "飞书 app id"

clawdbot config set channels.feishu.appSecret "飞书 app secret"

clawdbot config set channels.feishu.enabled true

# 推荐使用 websocket
clawdbot config set channels.feishu.connectionMode websocket

clawdbot config set channels.feishu.dmPolicy pairing

clawdbot config set channels.feishu.groupPolicy allowlist

clawdbot config set channels.feishu.requireMention true

配置完成之后,重启

clawdbot gateway restart

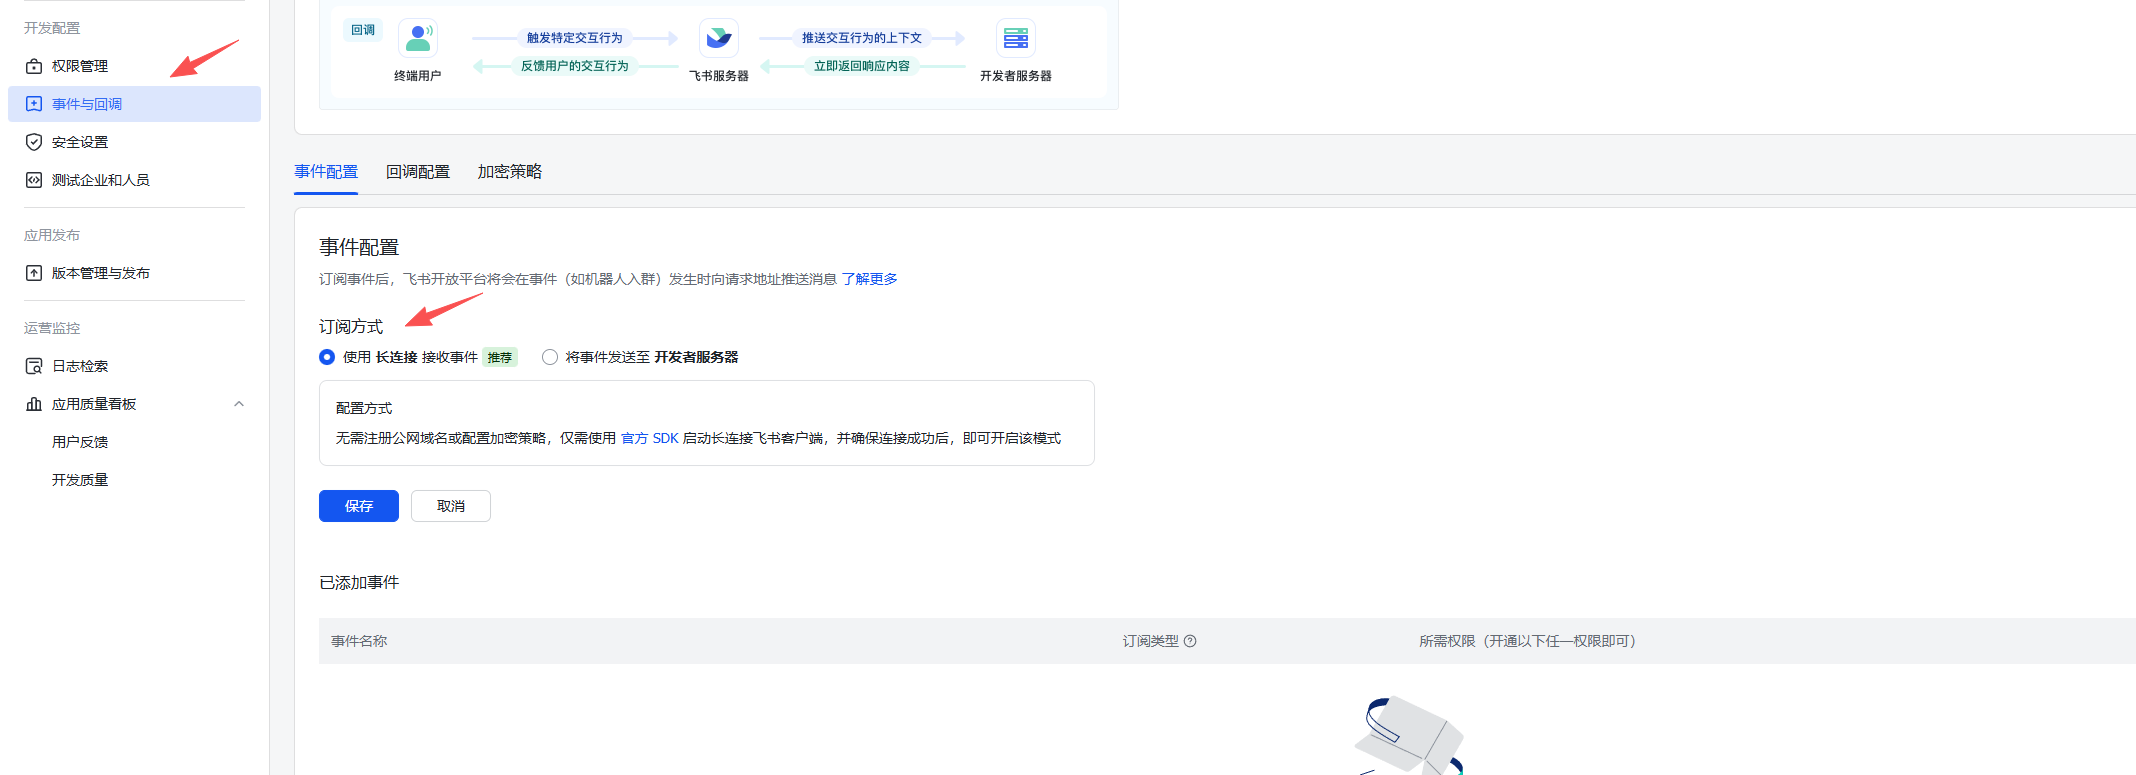
重启完成后回到飞书,找到「事件和回调」,选择长连接模式,如下图

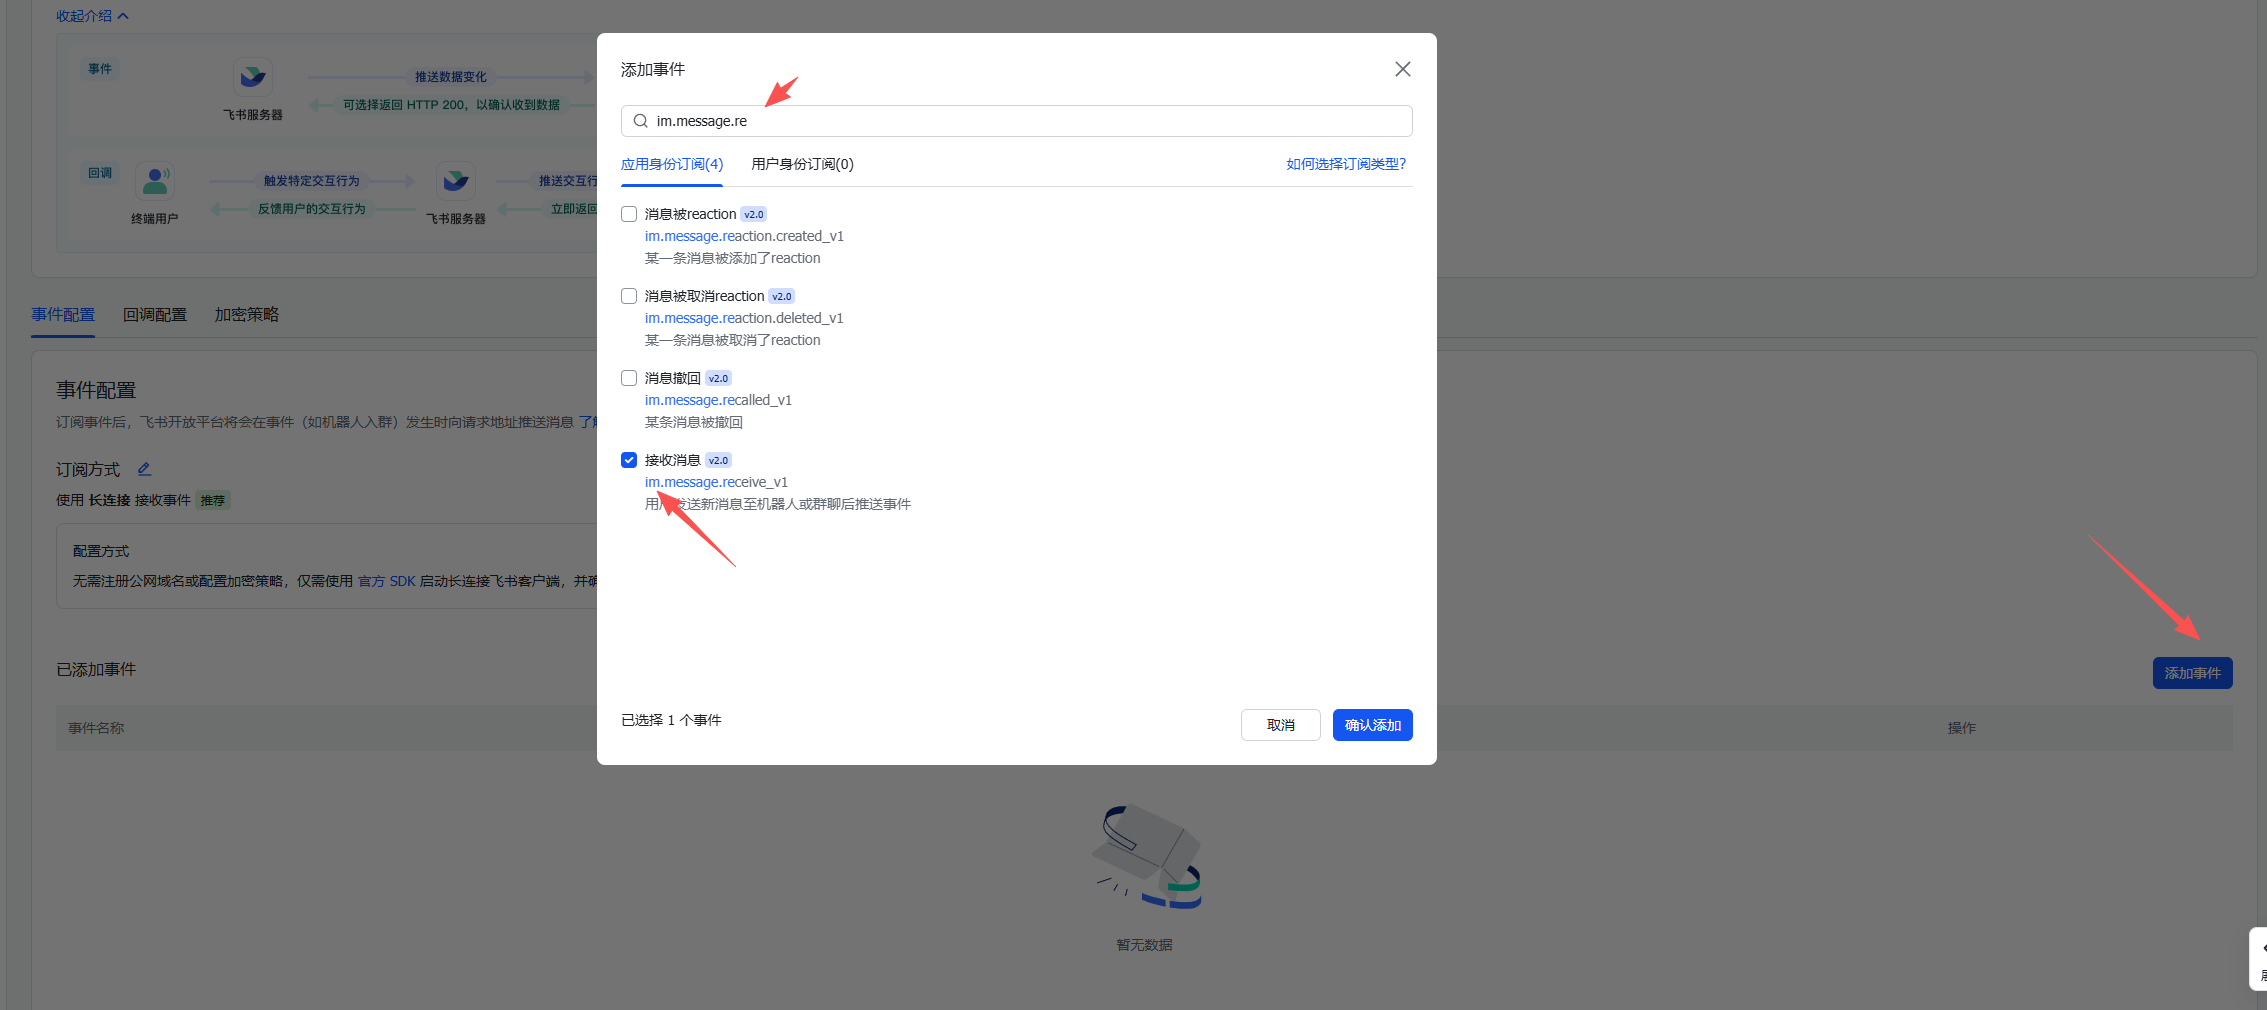
如果配置成功,说明连接已建立。继续下面的配置,添加事件,选择「接收消息」事件

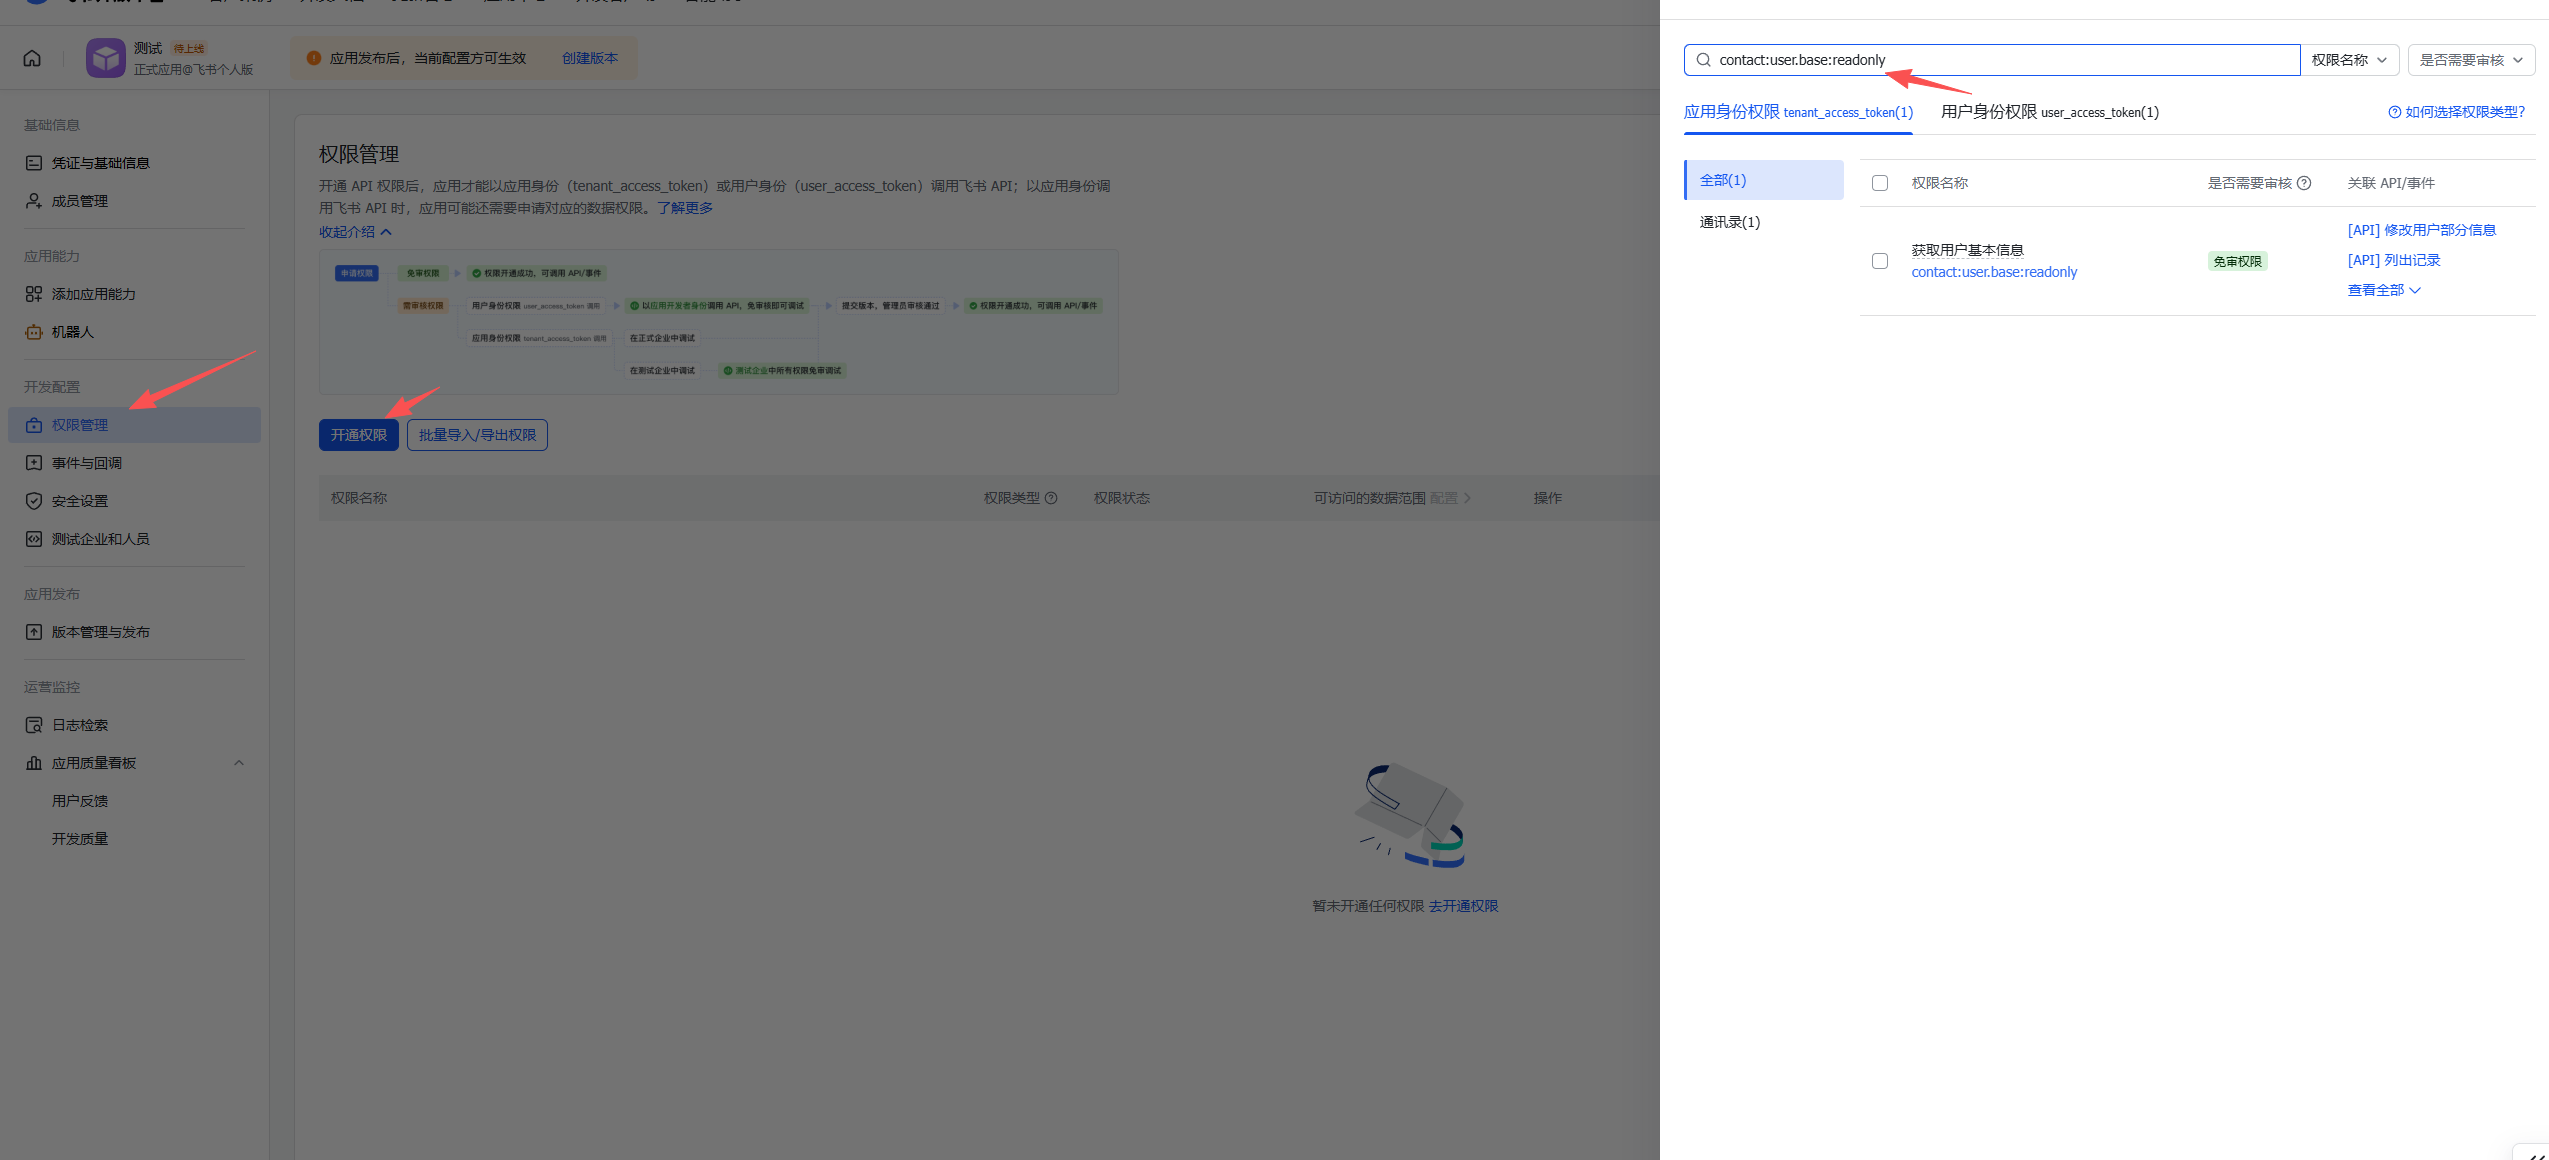
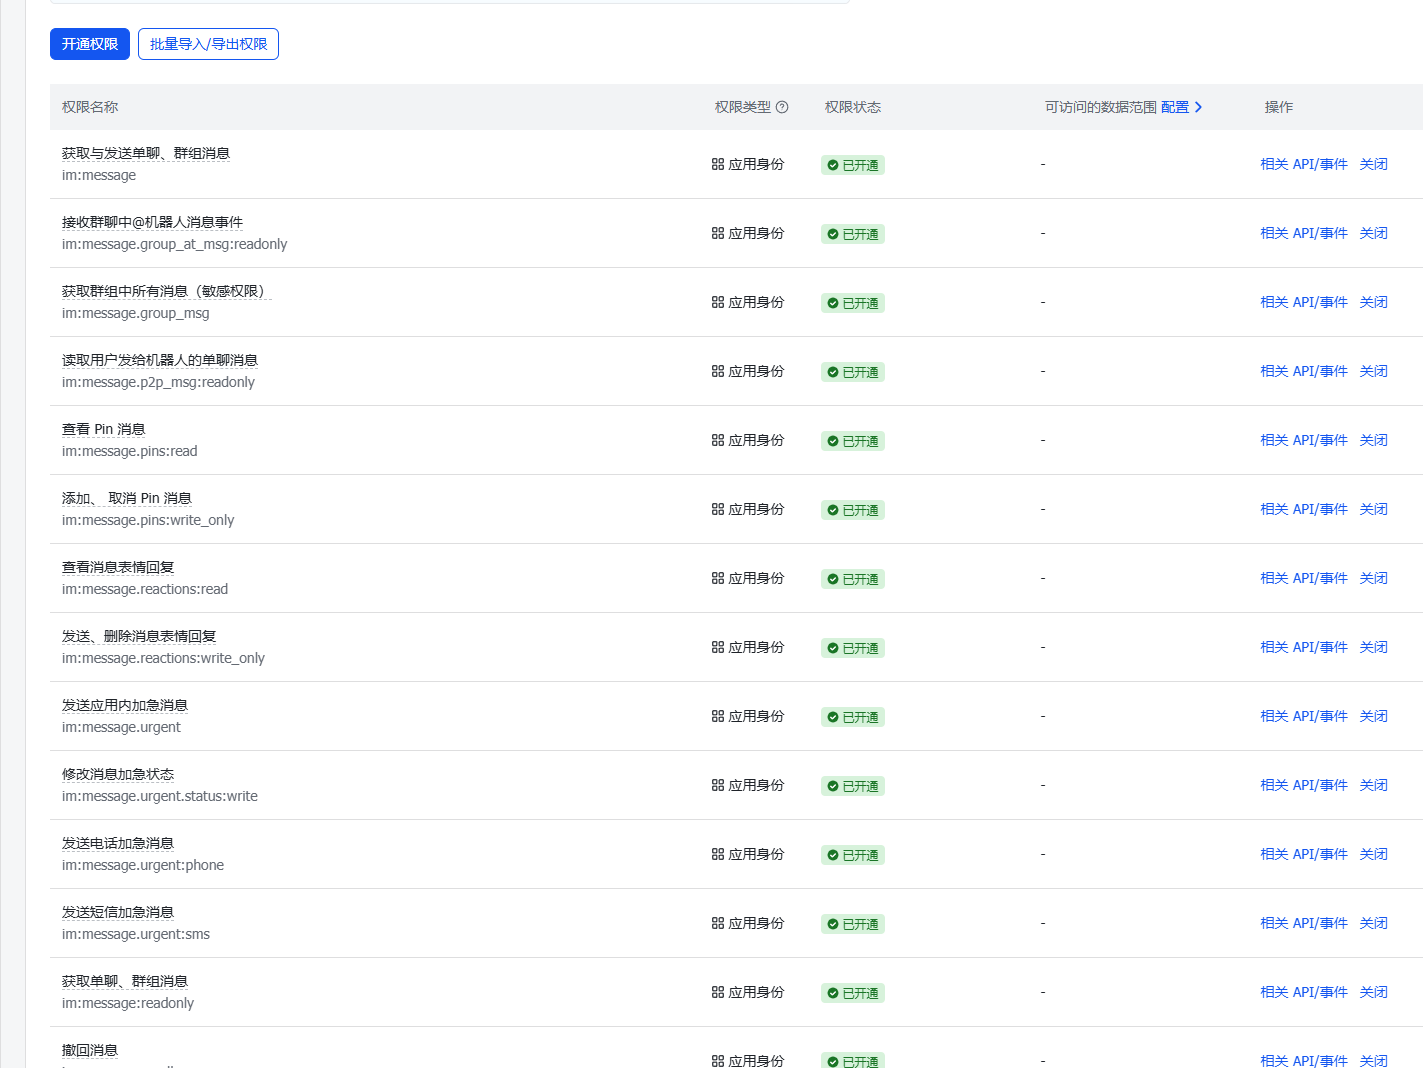
事件添加完成之后,还需要开通权限,有以下权限全部勾选

权限 Scope(范围) Description(说明)
contact:user.base:readonly 用户信息 获取基础用户信息
im:message 消息 全部勾选 发送和接收消息

如下图

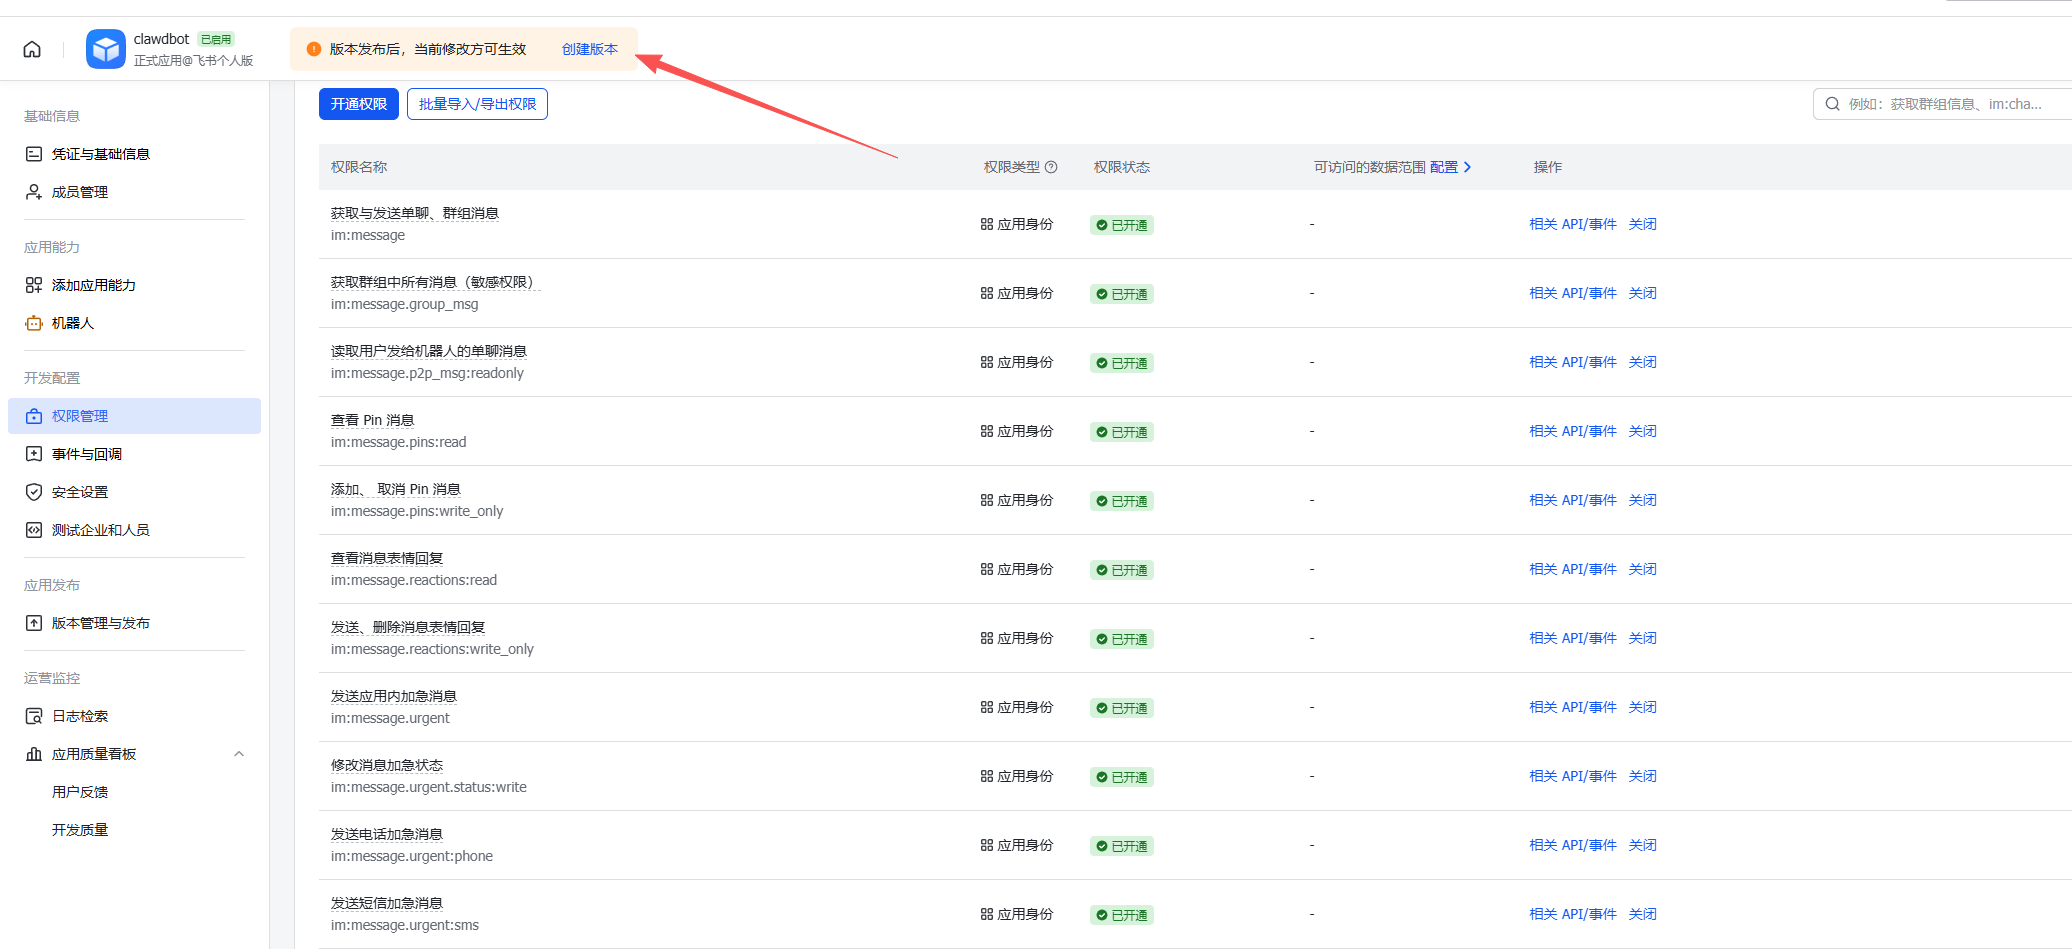
以上步骤全部完成后,即可与机器人对话。但在此之前需要先创建一个版本

注意:每次修改配置后都需要重新发布版本,建议全部配置完成后再统一发布。

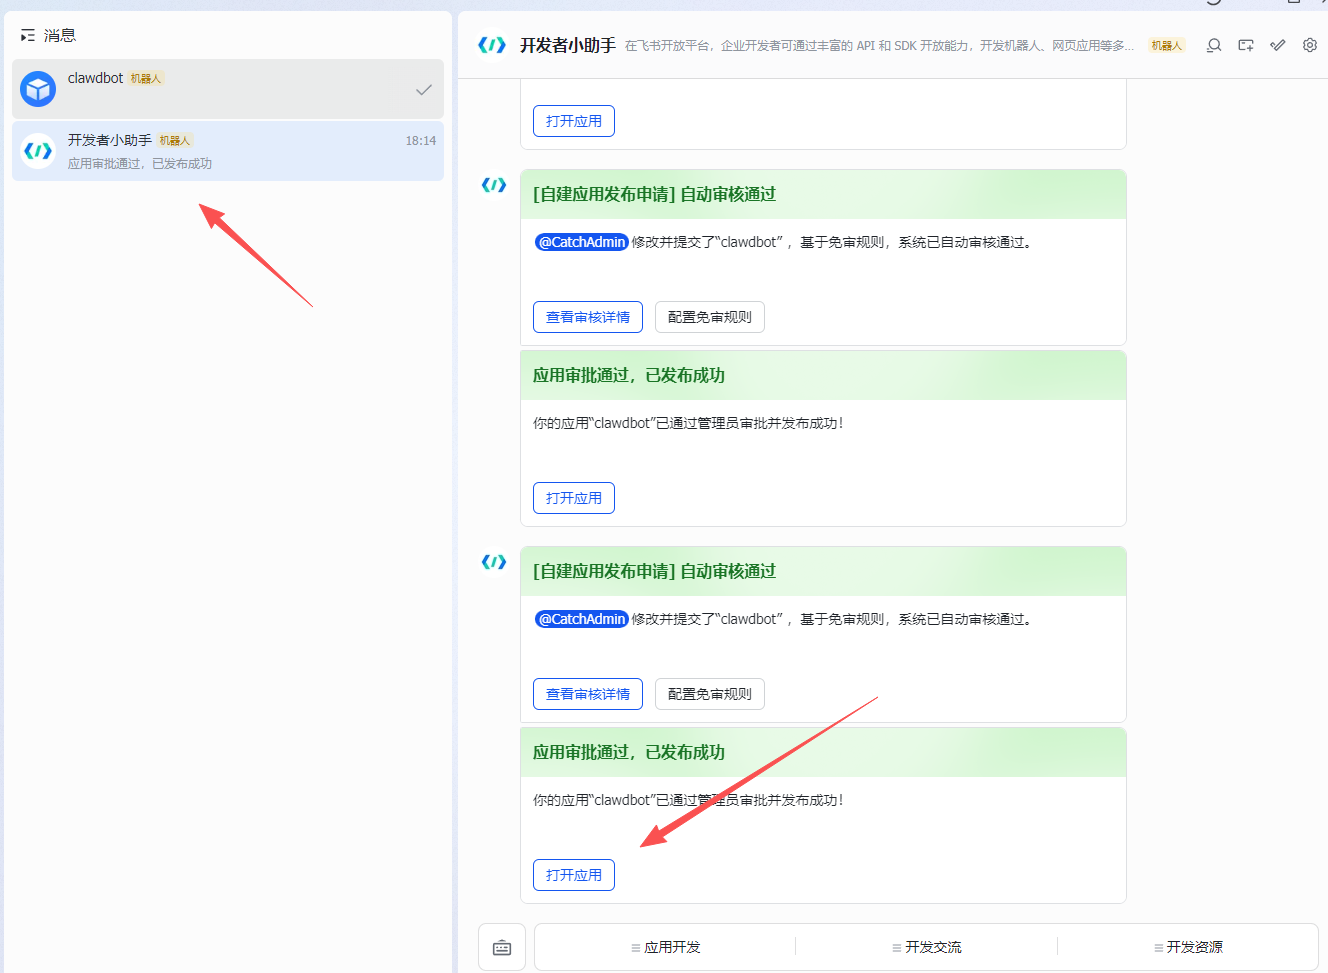
发布完成后,回到飞书客户端,可以看到应用已上线,点击打开应用

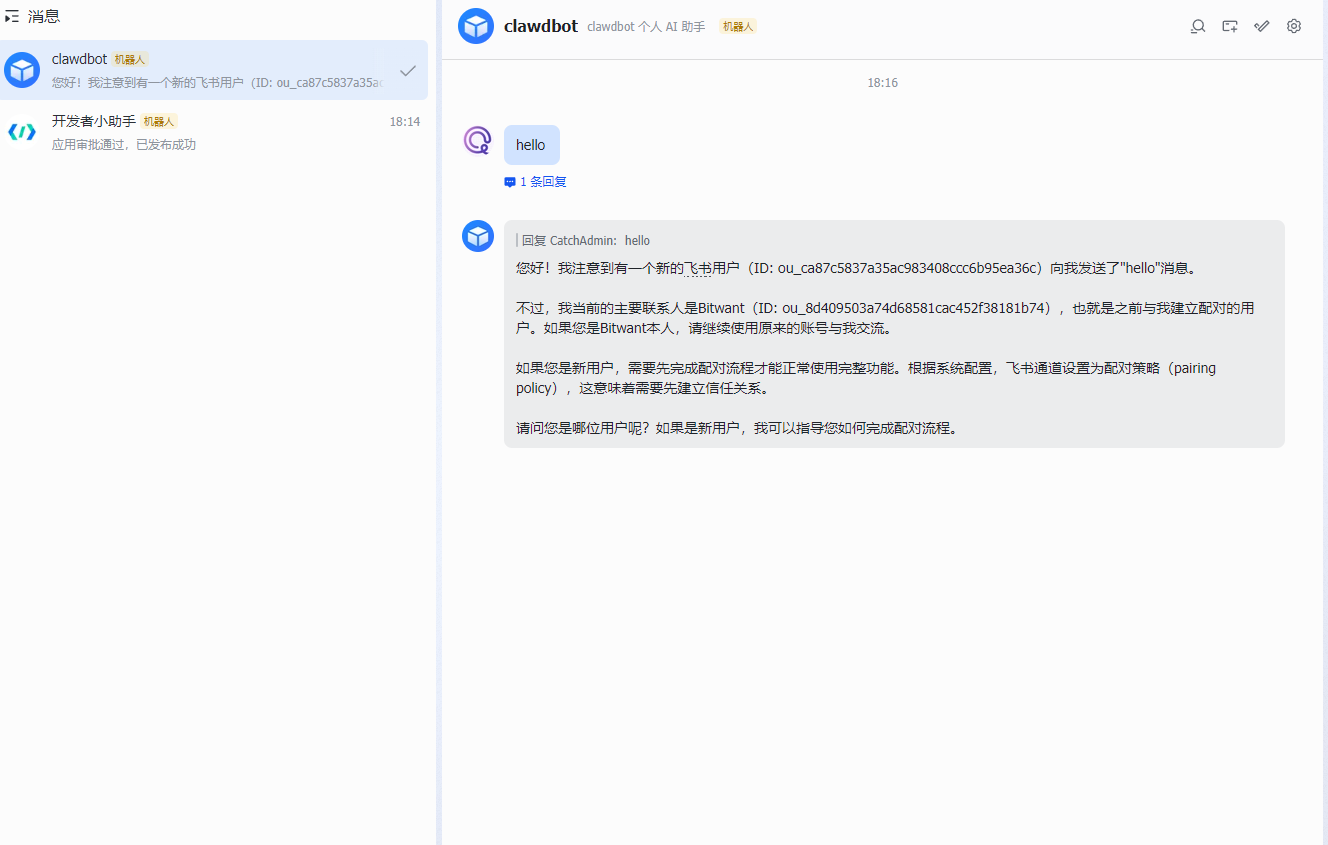
向机器人发送 Hello,即可收到 Moltbot 的回复

恭喜您!至此,您已成功在 Linux 服务器上部署了 Moltbot,并将其与飞书集成。现在您可以开始探索其强大的功能,或根据官方文档进行更深度的定制。如果在部署过程中遇到任何问题,欢迎留言交流。

常用命令

# 检查常见安全问题
clawdbot security audit

# 自动修复文件权限等问题
clawdbot security audit --fix

# 查看 Moltbot 日志
clawdbot logs --follow

参考文献

Windows 配置 Claude Code 解决 settings.json 不生效

TL;DR

默认情况下 Windows 安装的 Claude Code 会从这个位置读取配置:

C:\Users\
<YOUR_NAME>\.claude

其他系统则类似的找到 ~/.claude 路径。

官方流程在安装结束后就完成了,可以直接登录使用。如果需要修改配置将 Claude Code 接入第三方 API,就需要修改这里的 settings.json 配置文件,可以使用 CC-Switch 或是手动编写,但是修改后会发现不生效。

经过调研,发现是最新版的 Claude Code 修改了一个参数,导致启动时一定要登录,这里可以手动修改一下 `C:\Users\

\.claude.json` 中的这个参数,即可正常使用: “` hasCompletedOnboarding: true “` 将配置中的 `false` 改为 `true` ,再重新运行 `Claude Code` 即可。 > 这个问题卡了我两天,一度打算放弃回到其他 OS,最后终于在 [这里](https://github.com/farion1231/cc-switch/issues/404#issuecomment-3677768452) 找到了答案,因此特别记录一下。 # Refs – [《 Claude Code 终极版 FAQ 指南 》](https://linux.do/t/topic/803265) – [Windows 用 Claude Code 的最优解是 WSL 吗?](https://linux.do/t/topic/1422264) – [请问一下claude code windows版本claude.exe是否settings.json不生效?](https://linux.do/t/topic/1327596) – [配置好 setting.json 文件之后,Claude任然要求登录?怎么办? #404](https://github.com/farion1231/cc-switch/issues/404#issuecomment-3677768452)

Windows 配置 Claude Code 全流程

今天终于跑通了 Windows 下运行 Claoude Code 的全流程,不借助 WSL ,原生运行。起因是自己需要一个可以长期运行任务的云桌面,这方面还是 Windows 最好用。不得不说相比于 Linux/macOSWindows 下运行 Claude Code 实在太多坑了。

感谢 LD 巨佬 哈雷彗星《 Claude Code 终极版 FAQ 指南 》 ,在这份指南的指导下,还有开源社区朋友的帮助下,终于跑通了全流程,在这里记录一下,避免更多的朋友踩坑。

ClaudeCode

环境说明

先说一下我的环境:

  • OS: Windows 10 Enterprise LTSC 2021
  • Shell: PowerShell 5 -> PowerShell 7

我是在全新安装的 Windows 10 Enterprise LTSC 2021 系统中进行,使用系统自带的 PowerShell 5 开始 ,流程中会安装最新的 PoserShell 7 并使用 PS7 完成后续。根据论坛大佬的说法,PS7 很好用,自带的 PS5 不好用,因此下面的流程包含了安装 PS7 的流程,大家可以自己体验一下。

主要流程

以下内容主要来自 《 Claude Code 终极版 FAQ 指南 》 和实践补充。

打开 PowerShell 5 并安装 WinGet:

$progressPreference = 'silentlyContinue'
Install-PackageProvider -Name NuGet -Force | Out-Null
Install-Module -Name Microsoft.WinGet.Client -Force -Repository PSGallery | Out-Null
Write-Host "Using Repair-WinGetPackageManager cmdlet to bootstrap WinGet..."
Repair-WinGetPackageManager -AllUsers

PoserShell 5 中使用 WinGet 安装 PoserShell 7

winget install Microsoft.PowerShell

打开 PoserShell 7 并使用 winget 安装其他依赖,后续全部在 PS7 中进行:


# 必须,安装 fnm 用于管理 node 环境,或使用现有环境
winget install Schniz.fnm
# 可选,安装 Git
winget install --id Git.Git -e --source winget
# 可选,安装 notepad4
winget install zufuliu.notepad4
# 可选,安装 Windows Terminal
winget install -e --id Microsoft.WindowsTerminal
# 可选,安装 Notepad++
winget install -e --id Notepad++.Notepad++

下面使用 fnm 安装特定版本的 node 运行环境,首先需要对 FNM 给予一个环境启动,否则安装的 node 无法使用,因此首先预配置环境:

New-Item –Path $Profile –Type File –Force
notepad $profile

之后将以下内容写入该文件并保存:

fnm env --use-on-cd --shell powershell | Out-String | Invoke-Expression

下面开始正式安装 nodejs:

fnm install lts/krypton
fnm use lts/krypton

全局安装 Claude Code:

npm install -g @anthropic-ai/claude-code

之后就可以愉快的使用 Claude Code 了。

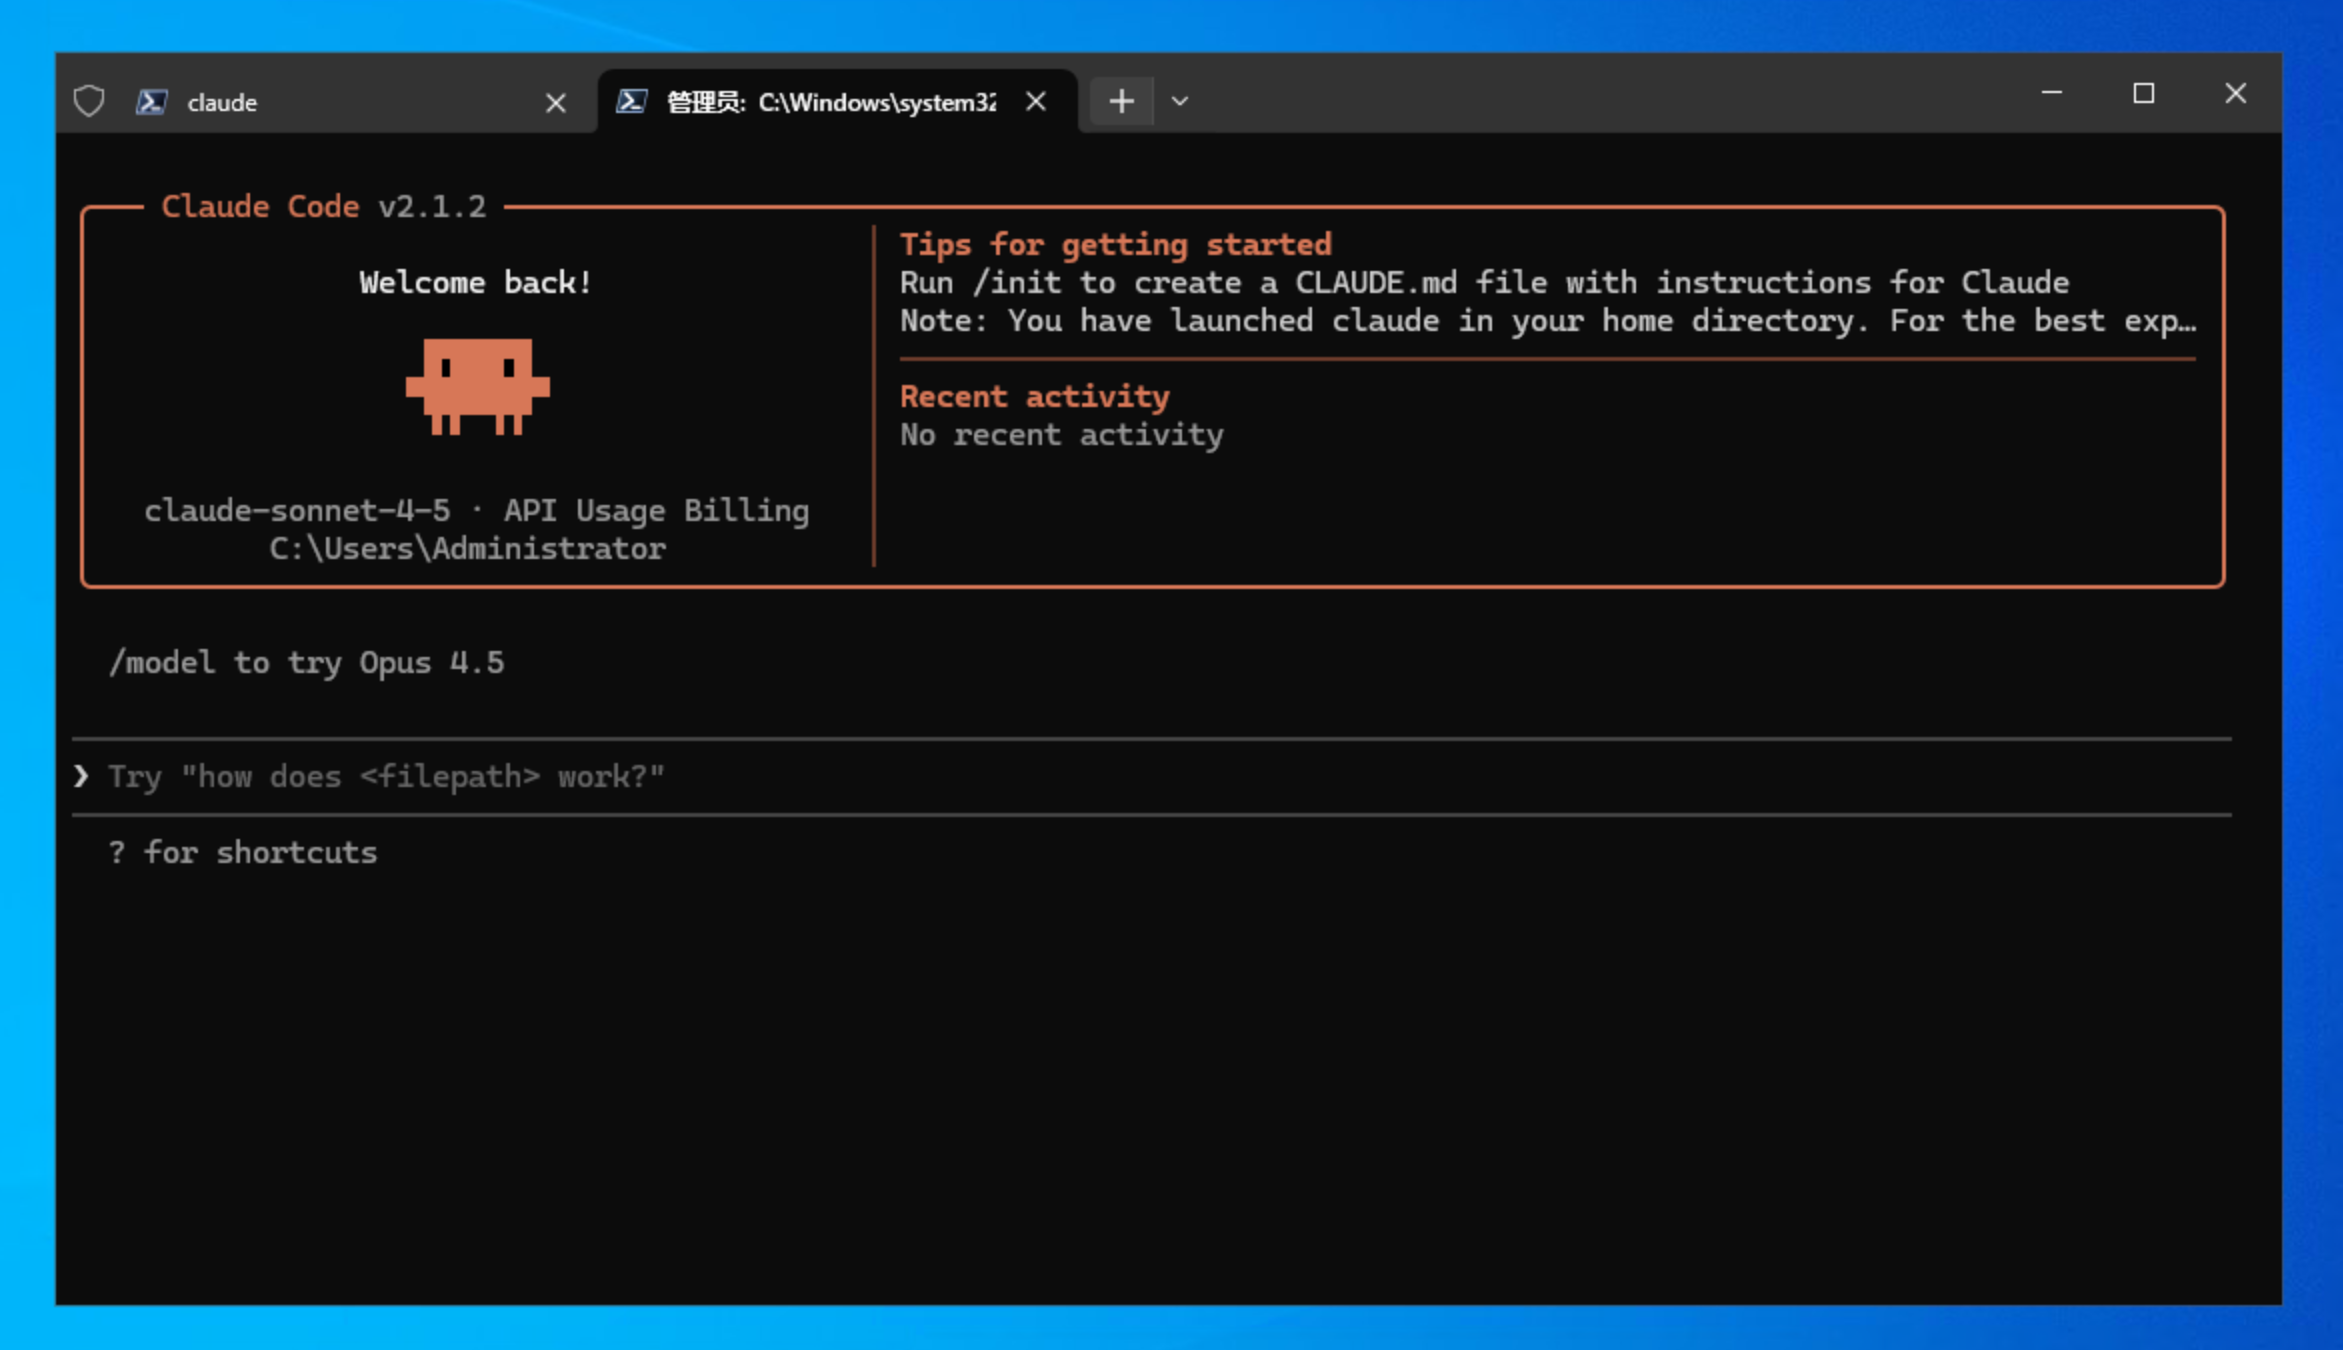
Claude Code  在 Windows PowerShell7 运行

常见问题

配置 settings.json 不生效

默认情况下这样安装的 Claude Code 会从这个位置读取配置:

C:\Users\
<YOUR_NAME>\.claude

官方流程在安装结束后就完成了,可以直接登录使用。如果你需要修改配置将 Claude Code 接入第三方 API,就需要修改这里的 settings.json 配置文件,可以使用 CC-Switch 或是手动编写,但是修改后会发现不生效。

经过调研,发现是最新版的 Claude Code 修改了一个参数,导致启动时一定要登录,这里可以手动修改一下 `C:\Users\

\.claude.json` 中的这个参数,即可正常使用: “` hasCompletedOnboarding: true “` 将配置中的 `false` 改为 `true` ,再重新运行 `Claude Code` 即可。 > 这个问题卡了我两天,一度打算放弃回到其他 OS,最后终于在 [这里](https://github.com/farion1231/cc-switch/issues/404#issuecomment-3677768452) 找到了答案,因此特别记录一下。 # Refs – [《 Claude Code 终极版 FAQ 指南 》](https://linux.do/t/topic/803265) – [Windows 用 Claude Code 的最优解是 WSL 吗?](https://linux.do/t/topic/1422264) – [请问一下claude code windows版本claude.exe是否settings.json不生效?](https://linux.do/t/topic/1327596) – [配置好 setting.json 文件之后,Claude任然要求登录?怎么办? #404](https://github.com/farion1231/cc-switch/issues/404#issuecomment-3677768452)

AI 生图精品提示词|第二期:城市星球

若没有特别说明,默认使用 AiLoft 提供的 Nano Banana Pro 模型生成。

城市星球系列封面图

本次带来《城市星球》系列,先看效果图:

Refs: https://x.com/TechieBySA/status/1999577563295826208

广州城市星球

北京城市星球

厦门城市星球

香港城市星球

芝加哥城市星球

澳门城市星球

提示词如下:

Create a hyperrealistic miniature planet showcasing [GuangZhou] with famous landmarks seamlessly curving around the spherical surface. Position bold 3D white text ”[CITY]” naturally integrated across the lush green central parkland with realistic shadows and dimensional depth. Capture from a top-down orbiting angle that emphasizes the dramatic planet curvature. Use soft golden hour daylight filtering through partly cloudy skies, casting gentle shadows on emerald grass and surrounding trees. The background should blend into a swirling atmospheric sky. Apply vibrant greens, warm earth tones, and soft blues. Render in polished photorealistic style with fine architectural detail.

可以讲示例中的 GuangZhou 换成其他城市,例如:

[GuangZhou]
[BeiJing]
[XiaMen]
[ZhengZhou]
[HongKong]
[Chicago]
[Macau]

效果都很不错,快用 AiLoft 试试吧。

AI 生图精品提示词|第一期

若没有特别说明,默认使用 AiLoft 提供的 Nano Banana Pro 模型生成。

本期封面图:

英文封面图

中文封面图

3D Q 版迷你概念商店

Refs: https://x.com/dotey/status/1995190286775881780

说明:

🍌 nano banana prompt
3D chibi-style miniature concept store of {Brand Name}

提示词:

3D chibi-style miniature concept store of {Brand Name}, creatively designed with an exterior inspired by the brand's most iconic product or packaging (such as a giant {brand's core product, e.g., chicken bucket/hamburger/donut/roast duck}). The store features two floors with large glass windows clearly showcasing the cozy and finely decorated interior: {brand's primary color}-themed decor, warm lighting, and busy staff dressed in outfits matching the brand. Adorable tiny figures stroll or sit along the street, surrounded by benches, street lamps, and potted plants, creating a charming urban scene. Rendered in a miniature cityscape style using Cinema 4D, with a blind-box toy aesthetic, rich in details and realism, and bathed in soft lighting that evokes a relaxing afternoon atmosphere. --ar 2:3

Brand name: Starbucks

效果图: Starbucks 3D chibi-style miniature concept store of Starbucks

麦当劳 3D chibi-style miniature concept store of 麦当劳

McDonald 3D chibi-style miniature concept store of McDonald

和明星自拍

refs: https://x.com/canghecode/status/1996593241421181403

提示词:

“我在[电影名称]的片场和[电影角色]自拍。

保持人物与参考图像完全一致,面部特征、骨骼结构、肤色、表情、姿势和外貌 100%相同。1:1 宽高比,4K 细节。”

实例:

参考图片:

哈利波特

我在[疯狂动物城]的片场和[Judy Hopps]、[Nick Wilde]自拍。

保持人物与参考图像完全一致,面部特征、骨骼结构、肤色、表情、姿势和外貌 100%相同。1:1 宽高比,4K 细节。

效果图:

哈利波特在疯狂动物城拍摄现场与主演合影

3D 微缩电影场景

refs: https://x.com/tsubame_99/status/1997181713546727621

Present an exquisite, miniature 3D cartoon-style scene of the user-specified subject, clearly viewed from a 45° top-down perspective.

Place the subject’s most iconic representation, character, or landmark prominently at the center, complemented by proportionally-sized icons of key elements, symbolic items, charming figures, props, and other details illustrating the subject’s core theme or narrative. The scene should be detailed, finely crafted, and playful.

Rendered with Cinema 4D, the modeling should be refined, smoothly rounded, and rich in texture, accurately capturing realistic PBR materials. Gentle, lifelike lighting and soft shadows should create a warm, comfortable ambiance.

Maintain a clean, minimalist layout and a solid-color background to highlight the primary content.

At the top-center of the scene, prominently display the subject name in a large font size.

All texts should be displayed in the language specified or entered by the user, without any background, and may subtly overlap with the scene elements to enhance overall design integration.

**Parameters:**
Aspect ratio: {User input, default 1:1}
Subject Name / Topic: {User input}

实例

Subject Name / Topic: Squid Game
Subject Name / Topic: 名侦探柯南

效果图:

名侦探柯南 3D 微缩电影场景

3D 动态城市天气场景

refs: https://x.com/dotey/status/1993729800922341810?s=46

说明:

🍌 nano banana pro prompt (with gemini)

Dynamically generate a current weather card based on a given city name.

提示词:

Present a clear, 45° top-down view of a vertical (9:16) isometric miniature 3D cartoon scene, highlighting iconic landmarks centered in the composition to showcase precise and delicate modeling.

The scene features soft, refined textures with realistic PBR materials and gentle, lifelike lighting and shadow effects. Weather elements are creatively integrated into the urban architecture, establishing a dynamic interaction between the city's landscape and atmospheric conditions, creating an immersive weather ambiance.

Use a clean, unified composition with minimalistic aesthetics and a soft, solid-colored background that highlights the main content. The overall visual style is fresh and soothing.

Display a prominent weather icon at the top-center, with the date (x-small text) and temperature range (medium text) beneath it. The city name (large text) is positioned directly above the weather icon. The weather information has no background and can subtly overlap with the buildings.

The text should match the input city's native language.
Please retrieve current weather conditions for the specified city before rendering.

City name:【广州】

效果图

广州动态城市天气场景

3D 诗词场景

Refs: https://x.com/ykszs017/status/1997268159800434783

A vertical (9:16), intricately detailed 45° top-down isometric miniature 3D cartoon scene. The central composition is a richly composed and densely modeled visualization of an ancient Chinese poem's imagery. The scene features soft but highly tactile PBR textures with matte materials (like hand-sculpted clay with visible tool marks, aged wood grain, rough ceramic, and textured fabrics). Layered, lyrical lighting with soft shadows and ambient occlusion emphasizes the depth of every small feature. Key visual elements derived from the verses are creatively integrated into the landscape. The scene must be densely filled with micro-details to create a lived-in, immersive poetic ambiance: add scattered pebbles, moss in cracks, fallen leaves, dew drops on plants, intricate architectural carvings, tiny wildlife (like birds or fish), and environmental clutter relevant to the poem. Use a clean, unified composition that balances richness with aesthetics, set against a soft, solid-colored background that complements the scene's color palette. The overall visual style is fresh, soothing, yet elaborate and full of life. Text layout: At the top-center, display the poem title in large, elegant Chinese font. Directly beneath it, display the Dynasty and Author in medium font. The core verses of the poem are arranged below the main scene or subtly floating near relevant objects within the composition, with no background plate. Poem Title: 【天净沙·秋思】 Dynasty/Author: 【元·马致远】 Core Verses Context: 枯藤老树昏鸦,小桥流水人家,古道西风瘦马。夕阳西下,断肠人在天涯 。(Visual Focus: An old tree, tightly entwined with withered vines, has cracked branches, and a few crows are perched or flapping their wings. A small stone bridge spanning a cold and clear stream, with mist and moisture clinging to the water surface; Two or three compact houses by the stream, with very faint smoke from their chimneys, were torn apart by the cold wind. An ancient path, dusty by the autumn wind, extends deeper into the picture. A bony and thin horse, with dull fur, had its mane flapped sideways by the wind. A solitary traveler, wearing an old cloak, with a slender figure, strolled slowly in the wind. The withered and yellow grass lay on the ground, and the cracked dirt road had ruts. The setting sun was close to the horizon, its golden-red rays shattered by the wind, casting long shadows on the travelers, horses and ancient paths. The overall scene presents a desolate, dry and cold, and spacious atmosphere of late autumn.)

效果图:

天净沙·秋思

Kubernetes kubectl –raw 使用指南

什么是 kubectl –raw?

kubectl --raw 是一个强大的底层工具,允许你直接访问 Kubernetes API Server 的 REST API,绕过 kubectl 的客户端逻辑、准入控制器(Admission Controllers)和 Webhook。

为什么需要 –raw?

标准 kubectl 的请求流程

kubectl 命令
    ↓
客户端验证和处理
    ↓
Admission Controllers
    ↓
Mutating Webhooks (修改请求)
    ↓
Validating Webhooks (验证请求)
    ↓
API Server 存储到 etcd

kubectl –raw 的请求流程

kubectl --raw
    ↓
直接 HTTP 请求到 API Server
    ↓
绕过大部分中间件
    ↓
直接操作 etcd

适用场景

  1. 绕过 Webhook 干扰 – 当 Mutating/Validating Webhook 阻止正常操作时
  2. 调试 API Server – 排查 kubectl 客户端与 API Server 的交互问题
  3. 访问特殊端点 – 访问 metrics、healthz 等非资源端点
  4. 绕过客户端限制 – kubectl 版本不支持某些新特性时
  5. 性能测试 – 直接测试 API Server 响应时间
  6. 修复僵尸资源 – 清理被控制器锁定的资源状态

基本语法

# 基本格式
kubectl get --raw <API-PATH>

# 或在某些版本中
kubectl --raw <API-PATH>

常用操作示例

1. GET 请求 – 查询资源

查看集群级别资源

# 获取所有节点
kubectl get --raw /api/v1/nodes | jq .

# 获取特定节点
kubectl get --raw /api/v1/nodes/node-name | jq .

# 获取节点状态
kubectl get --raw /api/v1/nodes/node-name/status | jq .

# 获取所有命名空间
kubectl get --raw /api/v1/namespaces | jq .

查看命名空间级别资源

# 获取 default 命名空间的所有 Pod
kubectl get --raw /api/v1/namespaces/default/pods | jq .

# 获取特定 Pod
kubectl get --raw /api/v1/namespaces/default/pods/pod-name | jq .

# 获取 Deployment
kubectl get --raw /apis/apps/v1/namespaces/default/deployments/deploy-name | jq .

# 获取 Service
kubectl get --raw /api/v1/namespaces/default/services/svc-name | jq .

查看子资源

# Pod 日志
kubectl get --raw /api/v1/namespaces/default/pods/pod-name/log

# Pod 状态
kubectl get --raw /api/v1/namespaces/default/pods/pod-name/status | jq .

# Service 的 Endpoint
kubectl get --raw /api/v1/namespaces/default/endpoints/service-name | jq .

2. PUT 请求 – 完整更新资源

# 更新节点(先获取,修改,再替换)
kubectl get --raw /api/v1/nodes/node-name > node.json

# 编辑 node.json 文件
vim node.json

# 替换(注意:不同版本语法可能不同)
kubectl replace --raw /api/v1/nodes/node-name -f node.json

# 或使用 kubectl proxy 方式
kubectl proxy --port=8001 &
curl -X PUT \
  -H "Content-Type: application/json" \
  -d @node.json \
  http://localhost:8001/api/v1/nodes/node-name

实战案例:清除节点僵尸条件

# 获取节点当前状态
kubectl get --raw /api/v1/nodes/node-name > /tmp/node.json

# 使用 jq 删除特定条件
jq 'del(.status.conditions[] | select(.type == "EtcdIsVoter"))' \
  /tmp/node.json > /tmp/node-fixed.json

# 更新节点状态
kubectl replace --raw /api/v1/nodes/node-name/status -f /tmp/node-fixed.json

3. POST 请求 – 创建资源

# 创建 Pod
cat > pod.json <<EOF
{
  "apiVersion": "v1",
  "kind": "Pod",
  "metadata": {
    "name": "test-pod",
    "namespace": "default"
  },
  "spec": {
    "containers": [{
      "name": "nginx",
      "image": "nginx:latest"
    }]
  }
}
EOF

kubectl create --raw /api/v1/namespaces/default/pods -f pod.json

4. DELETE 请求 – 删除资源

# 删除 Pod
kubectl delete --raw /api/v1/namespaces/default/pods/pod-name

# 使用 kubectl proxy 方式
kubectl proxy --port=8001 &
curl -X DELETE http://localhost:8001/api/v1/namespaces/default/pods/pod-name

5. PATCH 请求 – 部分更新

# JSON Patch (精确的操作指令)
kubectl patch --raw /api/v1/nodes/node-name \
  --type='json' \
  -p='[
    {"op": "add", "path": "/metadata/labels/new-label", "value": "new-value"},
    {"op": "remove", "path": "/status/conditions/0"}
  ]'

# Strategic Merge Patch (合并式更新)
kubectl patch --raw /api/v1/nodes/node-name \
  --type='merge' \
  -p '{
    "metadata": {
      "labels": {
        "environment": "production"
      }
    }
  }'

# Merge Patch (简单合并)
kubectl patch --raw /api/v1/nodes/node-name \
  --type='merge' \
  -p '{"spec":{"unschedulable":true}}'

API 路径规则

核心 API 组 (Core API Group)

# 格式
/api/v1/<resource-type>                        # 集群级别
/api/v1/namespaces/
<namespace>/<resource-type> # 命名空间级别

# 示例
/api/v1/nodes
/api/v1/nodes/node-name
/api/v1/nodes/node-name/status
/api/v1/namespaces/default/pods
/api/v1/namespaces/default/pods/pod-name
/api/v1/namespaces/default/services

命名 API 组 (Named API Groups)

# 格式
/apis/
<group>/<version>/<resource-type>
/apis/
<group>/<version>/namespaces/<ns>/<resource-type>

# 常用 API 组示例
/apis/apps/v1/deployments                           # Deployment
/apis/apps/v1/namespaces/default/deployments
/apis/batch/v1/cronjobs                             # CronJob
/apis/networking.k8s.io/v1/ingresses                # Ingress
/apis/rbac.authorization.k8s.io/v1/clusterroles     # ClusterRole
/apis/storage.k8s.io/v1/storageclasses              # StorageClass

子资源 (Subresources)

# 状态子资源
/api/v1/nodes/
<name>/status
/apis/apps/v1/namespaces/
<ns>/deployments/<name>/status

# 日志
/api/v1/namespaces/
<ns>/pods/<name>/log
/api/v1/namespaces/
<ns>/pods/<name>/log?container=container-name

# 执行命令
/api/v1/namespaces/
<ns>/pods/<name>/exec

# 端口转发
/api/v1/namespaces/
<ns>/pods/<name>/portforward

# 代理
/api/v1/nodes/
<name>/proxy
/api/v1/namespaces/
<ns>/pods/<name>/proxy
/api/v1/namespaces/
<ns>/services/<name>/proxy

特殊端点

查看 API 资源

# 列出所有 API 版本
kubectl get --raw /apis | jq '.groups[].name'

# 查看特定 API 组
kubectl get --raw /apis/apps/v1 | jq .

# 列出所有可用资源
kubectl get --raw /api/v1 | jq '.resources[].name'

# OpenAPI 规范
kubectl get --raw /openapi/v2 | jq . > openapi.json

集群信息

# 版本信息
kubectl get --raw /version | jq .

# 健康检查
kubectl get --raw /healthz
kubectl get --raw /livez
kubectl get --raw /readyz

# API Server 标志
kubectl get --raw /debug/flags/v

# Metrics
kubectl get --raw /metrics

认证和授权

# 检查当前用户权限
kubectl get --raw /apis/authorization.k8s.io/v1/selfsubjectaccessreviews \
  -X POST \
  -d '{
    "apiVersion": "authorization.k8s.io/v1",
    "kind": "SelfSubjectAccessReview",
    "spec": {
      "resourceAttributes": {
        "namespace": "default",
        "verb": "get",
        "resource": "pods"
      }
    }
  }'

使用 kubectl proxy 的方式

kubectl --raw 不可用或语法复杂时,可以使用 proxy 方式:

# 启动代理
kubectl proxy --port=8001 &

# 使用 curl 访问
curl http://localhost:8001/api/v1/nodes | jq .

# GET 请求
curl http://localhost:8001/api/v1/namespaces/default/pods

# POST 请求
curl -X POST \
  -H "Content-Type: application/json" \
  -d @pod.json \
  http://localhost:8001/api/v1/namespaces/default/pods

# PUT 请求
curl -X PUT \
  -H "Content-Type: application/json" \
  -d @node.json \
  http://localhost:8001/api/v1/nodes/node-name/status

# DELETE 请求
curl -X DELETE \
  http://localhost:8001/api/v1/namespaces/default/pods/pod-name

# 停止代理
pkill -f "kubectl proxy"

实战案例

案例 1: 绕过 Webhook 修改节点标签

# 问题:Mutating Webhook 拦截标签修改
# 解决:直接通过 API 修改

# 1. 获取节点
kubectl get --raw /api/v1/nodes/node-name > node.json

# 2. 使用 jq 添加标签
jq '.metadata.labels["custom-label"] = "custom-value"' node.json > node-updated.json

# 3. 替换节点
kubectl replace --raw /api/v1/nodes/node-name -f node-updated.json

案例 2: 清理僵尸 Finalizer

# 问题:资源因 finalizer 无法删除
# 解决:直接清空 finalizers

# 1. 获取资源
kubectl get --raw /api/v1/namespaces/stuck-namespace > ns.json

# 2. 清空 finalizers
jq '.spec.finalizers = []' ns.json > ns-clean.json

# 3. 更新
kubectl replace --raw /api/v1/namespaces/stuck-namespace/finalize -f ns-clean.json

案例 3: 批量查询资源状态

#!/bin/bash
# 批量检查节点状态

for node in $(kubectl get nodes -o name | cut -d/ -f2); do
  echo "=== Node: $node ==="
  kubectl get --raw /api/v1/nodes/$node/status | \
    jq -r '.status.conditions[] | select(.type=="Ready") | 
    "Status: \(.status), Reason: \(.reason)"'
done

案例 4: 性能测试

#!/bin/bash
# 测试 API Server 响应时间

echo "Testing API Server performance..."
for i in {1..10}; do
  time kubectl get --raw /api/v1/nodes > /dev/null 2>&1
done

案例 5: 导出所有资源

#!/bin/bash
# 导出命名空间的所有资源

NAMESPACE="default"
OUTPUT_DIR="./k8s-backup"
mkdir -p $OUTPUT_DIR

# 导出 Pods
kubectl get --raw /api/v1/namespaces/$NAMESPACE/pods | \
  jq . > $OUTPUT_DIR/pods.json

# 导出 Services
kubectl get --raw /api/v1/namespaces/$NAMESPACE/services | \
  jq . > $OUTPUT_DIR/services.json

# 导出 Deployments
kubectl get --raw /apis/apps/v1/namespaces/$NAMESPACE/deployments | \
  jq . > $OUTPUT_DIR/deployments.json

echo "Backup completed in $OUTPUT_DIR"

注意事项

1. 权限要求

# 需要相应的 RBAC 权限
# 检查权限
kubectl auth can-i get nodes
kubectl auth can-i update nodes

2. resourceVersion 冲突

# 更新时可能遇到冲突
# Error: the object has been modified; please apply your changes to the latest version

# 解决:重新获取最新版本
kubectl get --raw /api/v1/nodes/node-name > node-latest.json
# 重新修改并更新

3. 数据格式验证

# 使用 jq 验证 JSON 格式
cat resource.json | jq . > /dev/null

# 如果有错误会提示

4. 备份重要资源

# 在修改前务必备份
kubectl get --raw /api/v1/nodes/node-name > node-backup-$(date +%Y%m%d).json

5. 只读操作优先

# 先用 GET 查看,确认无误后再 PUT/PATCH
kubectl get --raw /api/v1/nodes/node-name | jq .

版本兼容性

Kubernetes 1.18+

kubectl get --raw /api/v1/nodes
kubectl create --raw /api/v1/namespaces/default/pods -f pod.json
kubectl replace --raw /api/v1/nodes/node-name -f node.json
kubectl patch --raw /api/v1/nodes/node-name --type=merge -p '{...}'
kubectl delete --raw /api/v1/namespaces/default/pods/pod-name

早期版本或不支持时

# 使用 kubectl proxy
kubectl proxy --port=8001 &
curl http://localhost:8001/api/v1/nodes

调试技巧

1. 查看完整请求

# 增加日志级别
kubectl get --raw /api/v1/nodes -v=8

2. 使用 jq 过滤输出

# 只查看节点名称
kubectl get --raw /api/v1/nodes | jq '.items[].metadata.name'

# 查看 Pod 状态
kubectl get --raw /api/v1/namespaces/default/pods | \
  jq '.items[] | {name: .metadata.name, status: .status.phase}'

3. 格式化时间戳

# 转换时间格式
kubectl get --raw /api/v1/nodes/node-name | \
  jq '.metadata.creationTimestamp | fromdate | strftime("%Y-%m-%d %H:%M:%S")'

总结

kubectl --raw 是 Kubernetes 的”瑞士军刀”,提供了:

直接访问 API – 绕过客户端限制
调试工具 – 排查 kubectl 和 API Server 问题
应急修复 – 处理 Webhook 和控制器导致的问题
性能测试 – 直接测试 API Server
学习工具 – 理解 Kubernetes API 结构

⚠️ 使用场景: 作为最后的调试和修复手段
⚠️ 不推荐: 日常操作应使用标准 kubectl 命令
⚠️ 需谨慎: 直接操作可能破坏资源状态

参考资源

磁盘使用分析工具对比:du vs ncdu vs gdu vs dust

Claude Sonnet 4.5 协助编写。

在日常的系统管理和磁盘空间清理工作中,我们经常需要分析磁盘使用情况。本文将对比四个常用的磁盘使用分析工具:传统的 du、经典的交互式工具 ncdu、现代化的 gdudust

工具简介

du (Disk Usage)

du 是 Unix/Linux 系统自带的经典磁盘使用分析工具,已经存在了几十年。它是最基础、最通用的选择。

ncdu (NCurses Disk Usage)

ncdu 是基于 ncurses 库的磁盘使用分析工具,提供了简洁的交互式文本界面。它是最早流行的交互式磁盘分析工具之一。

gdu (Go Disk Usage)

gdu 是用 Go 语言编写的现代化磁盘分析工具,提供了交互式界面和更快的扫描速度。

dust (du + rust = dust)

dust 是用 Rust 编写的磁盘使用分析工具,以更直观的可视化输出为特色。

功能对比

特性 du ncdu gdu dust
交互式界面
扫描速度 中等 中等
可视化输出 基础 中等 强大 优秀
系统自带
内存占用
删除文件功能
编程语言 C C Go Rust
易用性

使用示例

du 基本用法

# 显示当前目录大小
du -sh

# 显示所有子目录大小并排序
du -h --max-depth=1 | sort -hr

# 显示最大的10个目录
du -h | sort -rh | head -10

优点:

  • 系统自带,无需安装
  • 稳定可靠,脚本友好
  • 广泛的兼容性

缺点:

  • 速度较慢
  • 输出不够直观
  • 缺少交互功能

ncdu 基本用法

# 安装
# Debian/Ubuntu
sudo apt install ncdu

# macOS
brew install ncdu

# RHEL/CentOS
sudo yum install ncdu

# 分析当前目录
ncdu

# 分析指定目录
ncdu /path/to/directory

# 扫描时排除某些目录
ncdu --exclude /path/to/exclude

# 导出结果到文件(可在其他机器上查看)
ncdu -o result.json
ncdu -f result.json  # 读取导出的文件

交互式操作:

  • ↑↓j/k: 上下移动
  • Enter: 进入目录
  • : 返回上级目录
  • d: 删除选中的文件/目录
  • g: 显示百分比/图形条
  • n: 按名称排序
  • s: 按大小排序
  • q: 退出

优点:

  • 成熟稳定,广泛使用
  • 交互式界面简洁清晰
  • 可以直接删除文件
  • 支持导出和导入扫描结果
  • 内存占用合理
  • 在大多数发行版仓库中可用

缺点:

  • 扫描速度比 gdu 慢
  • 界面相对传统,不如 gdu 美观
  • 大型目录扫描时需要等待

gdu 基本用法

# 安装
# macOS
brew install gdu

# Linux
curl -L https://github.com/dundee/gdu/releases/latest/download/gdu_linux_amd64.tgz | tar xz
sudo mv gdu /usr/local/bin/

# 分析当前目录
gdu

# 分析指定目录
gdu /path/to/directory

# 非交互模式
gdu -n /path/to/directory

优点:

  • 扫描速度极快
  • 交互式 TUI 界面,可以用键盘导航
  • 可以直接在界面中删除文件
  • 支持彩色输出
  • 可以显示进度条

缺点:

  • 需要单独安装
  • 交互模式在某些脚本场景下不适用

dust 基本用法

# 安装
# macOS
brew install dust

# Linux
cargo install du-dust

# 基本使用
dust

# 分析指定目录
dust /path/to/directory

# 显示更多层级
dust -d 3

# 只显示目录
dust -t

优点:

  • 树状图可视化输出,非常直观
  • 彩色条形图显示占用比例
  • 输出清晰易读
  • 速度较快
  • 默认排序输出

缺点:

  • 需要单独安装
  • 没有交互式界面
  • 相对 du 功能较新,可能有兼容性问题

实际使用场景推荐

选择 du 的场景

  • 在生产服务器上进行快速检查
  • 编写自动化脚本
  • 需要最大兼容性
  • 系统资源受限

选择 ncdu 的场景

  • 需要交互式浏览但服务器上没有 gdu
  • 偏好传统稳定的工具
  • 需要导出扫描结果到其他机器分析
  • 在资源受限的系统上需要交互功能
  • 系统包管理器中已有 ncdu

选择 gdu 的场景

  • 需要深入分析大型目录结构
  • 需要最快的扫描速度
  • 追求现代化的交互体验
  • 在个人工作站上使用
  • 经常处理超大目录

选择 dust 的场景

  • 需要快速浏览目录大小
  • 偏好可视化输出
  • 想要更现代化的工具体验
  • 不需要交互式操作
  • 需要快速生成报告

性能对比

在一个包含 50GB 数据、约 100,000 个文件的目录上测试:

  • du: ~8 秒
  • ncdu: ~5 秒(扫描阶段)
  • gdu: ~2 秒
  • dust: ~4 秒

注:实际性能取决于硬件配置、文件系统类型和文件数量。ncdu 的优势在于扫描后的交互浏览非常流畅。

总结

四个工具各有千秋:

  • du 是经典之选,适合脚本和生产环境
  • ncdu 是稳定可靠的交互式工具,兼具易用性和可用性
  • gdu 是性能之王,提供强大的交互功能和最快速度
  • dust 是可视化专家,输出最为直观

工具演进历史

这四个工具代表了磁盘分析工具的演进过程:

  1. du (1970s): 命令行时代的基础工具
  2. ncdu (2007): 加入交互式界面,提升用户体验
  3. gdu (2020): 现代编程语言带来的性能提升
  4. dust (2018): 注重可视化和用户友好度

我的推荐

对于日常使用,我的建议是:

  1. 保留 du 用于脚本和快速检查
  2. 安装 ncdu 作为通用的交互式工具(服务器友好)
  3. 安装 gdu 用于深入的磁盘分析(个人工作站)
  4. 安装 dust 用于快速浏览和可视化

如果只能选一个额外工具:

  • 服务器环境: 选 ncdu(稳定、轻量、可靠)
  • 个人电脑: 选 gdu(快速、现代、强大)
  • 快速查看: 选 dust(直观、美观、高效)

根据具体需求选择合适的工具,甚至可以将它们组合使用,发挥各自的优势。

参考链接

彻底解决阿里云和 tailscale 冲突

如果你在一台阿里云服务器安装并启动了 tailscale,大概率会出现阿里云服务器无法上网的问题,根本原因为阿里云服务器默认DNS与tailscale网段产生冲突。

由于阿里云和 tailscale 都使用了 100.64.0.0/10 这个网段。100.64.0.0/10RFC 6598 中被保留为 运营商级 NAT (Carrier-Grade NAT) 地址段,用于 ISP 做 NAT 时避免与内网冲突。Tailscale 把它当成“只允许来自 Tailscale 接口的地址段”是符合规范的。但阿里云在 VPC 内把 100.100.2.136100.100.2.138 作为内网 DNS 服务地址,初衷是: 地址在公网不可路由,避免外泄; 与经典网络互通时不会冲突。

由于动机不同,目标不同,造成二者冲突。

目前比较流行的方法,是关闭 tailscale 的 iptables 规则生成,但这是不安全的。浏览各种解决方案后我认为脚本轮询的方案最可靠。

脚本轮训解决

/usr/local/bin/fix-ts-dns.sh

#!/bin/bash
while true; do
  if ! iptables -C ts-input -s 100.100.2.136/32 -j ACCEPT 2>/dev/null; then
    iptables -I ts-input 1 -s 100.100.2.136/32 -j ACCEPT
  fi
  sleep 30
done

/etc/systemd/system/fix-ts-dns.service

[Unit]
Description=Keep Aliyun DNS whitelist in Tailscale chain
After=tailscaled.service

[Service]
Type=simple
ExecStart=/usr/local/bin/fix-ts-dns.sh
Restart=always

[Install]
WantedBy=multi-user.target
chmod +x /usr/local/bin/fix-ts-dns.sh
systemctl enable --now fix-ts-dns.service

脚本轮询,检查到存在 tailscale 的规则表且不存在白名单时,自动插入一条放通阿里云网段的规则。

解决方案来源:https://www.xugj520.cn/archives/aliyun-cgnat-tailscale-conflict.html

Refs