一.系统环境
本文主要基于Kubernetes1.22.2和Linux操作系统Ubuntu 18.04。
| 服务器版本 |
docker软件版本 |
Kubernetes(k8s)集群版本 |
Kata软件版本 |
containerd软件版本 |
CPU架构 |
| Ubuntu 18.04.5 LTS |
Docker version 20.10.14 |
v1.22.2 |
1.11.5 |
1.6.4 |
x86_64 |
Kubernetes集群架构:k8scludes1作为master节点,k8scludes2,k8scludes3作为worker节点。
| 服务器 |
操作系统版本 |
CPU架构 |
进程 |
功能描述 |
| k8scludes1/192.168.110.128 |
Ubuntu 18.04.5 LTS |
x86_64 |
docker,kube-apiserver,etcd,kube-scheduler,kube-controller-manager,kubelet,kube-proxy,coredns,calico |
k8s master节点 |
| k8scludes2/192.168.110.129 |
Ubuntu 18.04.5 LTS |
x86_64 |
docker,kubelet,kube-proxy,calico |
k8s worker节点 |
| k8scludes3/192.168.110.130 |
Ubuntu 18.04.5 LTS |
x86_64 |
docker,kubelet,kube-proxy,calico |
k8s worker节点 |
二.前言
容器技术因其轻量级、可移植和易于管理的特点而受到广泛欢迎。然而,传统容器技术在安全方面存在一定的缺陷。为了解决这些问题,安全容器技术应运而生。本文将重点介绍一种名为 Kata Containers 的安全容器解决方案。另外一种安全容器为gVisor,相关详细操作请查看博客《以沙箱的方式运行容器:安全容器gvisor》。
安全容器是一种运行时技术,为容器应用提供一个完整的操作系统执行环境,但将应用的执行与宿主机操作系统隔离开,避免应用直接访问主机资源,从而可以在容器主机之间或容器之间提供额外的保护。
以沙箱的方式运行容器的前提是已经有一套可以正常运行的Kubernetes集群,关于Kubernetes(k8s)集群的安装部署,可以查看博客《Ubuntu 安装部署Kubernetes(k8s)集群》https://www.cnblogs.com/renshengdezheli/p/17632858.html。
三.Kata Containers 简介
Kata源自希腊文Καταπστευμα(ka-ta-PI-stev-ma),原意是值得信任的人,kata container正是解容器安全的问题而诞生的。传统的容器是基于namespace和cgroup进行隔离,在带来轻量简洁的同时,也带来了安全的隐患。事实上容器虽然提供一个与系统中的其它进程资源相隔离的执行环境,但是与宿主机系统是共享内核的,一旦容器里的应用逃逸到内核,后果不堪设想,尤其是在多租户的场景下。Kata就是在这样的背景下应运而生,kata很好的权衡了传统虚拟机的隔离性、安全性与容器的简洁、轻量。这一点和firecracker很相似,都是轻量的虚拟机。但是他们的本质的区别在于:kata虽然是基于虚机,但是其表现的却跟容器是一样的,可以像使用容器一样使用kata;而firecracker虽然具备容器的轻量、极简性,但是其依然是虚机,一种比QEMU更轻量的VMM,暂时不能兼容容器生态。
Kata的基本原理是,为每一个容器单独开一个虚机(如果是k8s下作为runtime,则是一个pod对应一个虚机而不是容器),具有独立的内核,这样交付的容器就具备了虚机级别的隔离和安全性。kata的原理图如下所示:
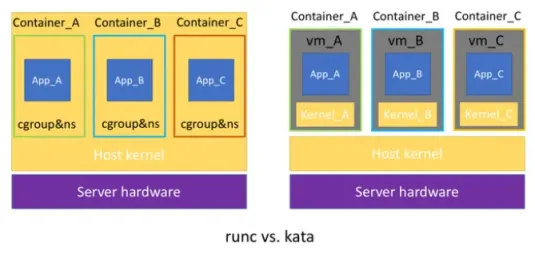
Kata Containers结合了虚拟机和容器的优势,提供了一种更加安全和隔离的容器运行时环境。Kata Containers使用轻量级的虚拟机(如QEMU)来运行容器,每个容器都有一个独立的虚拟机实例,这样可以实现容器之间的完全隔离。
由于Kata Containers使用了虚拟机来运行容器,所以相对于gVisor来说,它的性能开销更大。根据测试数据,Kata Containers的性能损失在20%左右。这主要是因为每个容器都运行在一个独立的虚拟机实例中,需要额外的资源和开销。Kata Containers支持多核并发,可以在多核系统上实现更好的性能。
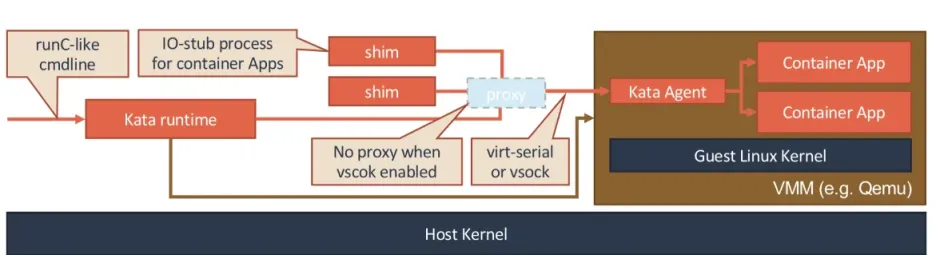
Kata Containers 的本质,就是一个轻量化虚拟机。所以当你启动一个 Kata Containers 之后,你其实就会看到一个正常的虚拟机在运行。这也就意味着,一个标准的虚拟机管理程序(Virtual Machine Manager, VMM)是运行 Kata Containers 必备的一个组件。在我们上面图中,使用的 VMM 就是 Qemu。
而使用了虚拟机作为进程的隔离环境之后,Kata Containers 原生就带有了 Pod 的概念。即:这个 Kata Containers 启动的虚拟机,就是一个 Pod;而用户定义的容器,就是运行在这个轻量级虚拟机里的进程。在具体实现上,Kata Containers 的虚拟机里会有一个特殊的 Init 进程负责管理虚拟机里面的用户容器,并且只为这些容器开启 Mount Namespace。所以,这些用户容器之间,原生就是共享 Network 以及其他 Namespace 的。
此外,为了跟上层编排框架比如 Kubernetes 进行对接,Kata Containers 项目会启动一系列跟用户容器对应的 shim 进程,来负责操作这些用户容器的生命周期。当然,这些操作,实际上还是要靠虚拟机里的 Init 进程来帮你做到。
四.Gvisor与Kata区别对比
无论是 Kata Containers,还是 gVisor,它们实现安全容器的方法其实是殊途同归的。这两种容器实现的本质,都是给进程分配了一个独立的操作系统内核,从而避免了让容器共享宿主机的内核。这样,容器进程能够看到的攻击面,就从整个宿主机内核变成了一个极小的、独立的、以容器为单位的内核,从而有效解决了容器进程发生“逃逸”或者夺取整个宿主机的控制权的问题。
它们的区别在于,Kata Containers 使用的是传统的虚拟化技术,通过虚拟硬件模拟出了一台“小虚拟机”,然后在这个小虚拟机里安装了一个裁剪后的 Linux 内核来实现强隔离。
而 gVisor 的做法则更加激进,Google 的工程师直接用 Go 语言“模拟”出了一个运行在用户态的操作系统内核,然后通过这个模拟的内核来代替容器进程向宿主机发起有限的、可控的系统调用。
五.配置docker使用kata作为runtime
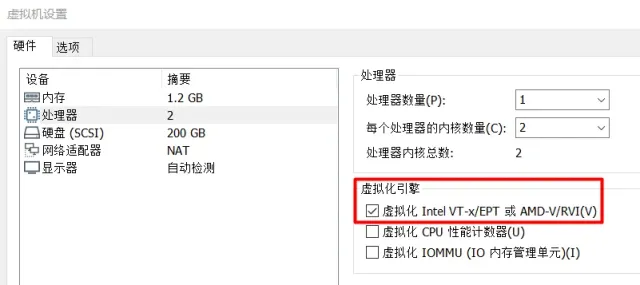
注意:kata本质上是以虚拟机的方式运行的,需要开启虚拟化引擎功能,VMware Workstation需要如下设置:
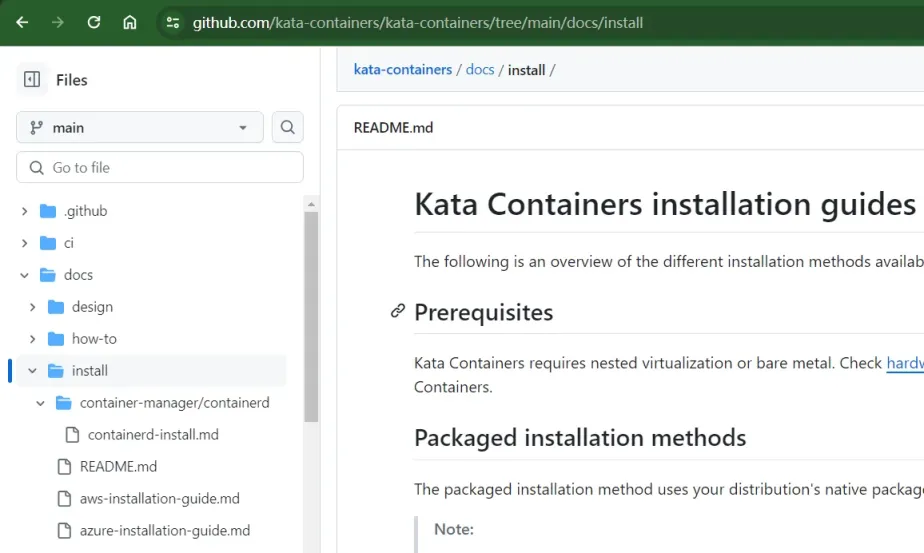
安装kata网址:https://github.com/kata-containers/kata-containers/tree/main/docs/install 。
5.1 安装docker
我们在客户端机器etcd2(centos系统)上安装docker。
[root@etcd2 ~]# yum -y install docker-ce
设置docker开机自启动并现在启动docker。
[root@etcd2 ~]# systemctl enable docker --now
Created symlink from /etc/systemd/system/multi-user.target.wants/docker.service to /usr/lib/systemd/system/docker.service.

[root@etcd2 ~]# systemctl status docker
● docker.service - Docker Application Container Engine
   Loaded: loaded (/usr/lib/systemd/system/docker.service; enabled; vendor preset: disabled)
   Active: active (running) since 二 2022-06-07 11:07:18 CST; 7s ago
     Docs: https://docs.docker.com
 Main PID: 1231 (dockerd)
   Memory: 36.9M
   CGroup: /system.slice/docker.service
           └─1231 /usr/bin/dockerd -H fd:// --containerd=/run/containerd/containerd.sock
查看docker版本。
[root@etcd2 ~]# docker --version
Docker version 20.10.12, build e91ed57
配置docker镜像加速器。
[root@etcd2 ~]# vim /etc/docker/daemon.json

[root@etcd2 ~]# cat /etc/docker/daemon.json
{
"registry-mirrors": ["https://frz7i079.mirror.aliyuncs.com"]
}
重启docker。
[root@etcd2 ~]# systemctl restart docker
设置iptables不对bridge的数据进行处理,启用IP路由转发功能。
[root@etcd2 ~]# vim /etc/sysctl.d/k8s.conf

[root@etcd2 ~]# cat /etc/sysctl.d/k8s.conf
net.bridge.bridge-nf-call-ip6tables = 1
net.bridge.bridge-nf-call-iptables = 1
net.ipv4.ip_forward = 1
使配置生效。
[root@etcd2 ~]# sysctl -p /etc/sysctl.d/k8s.conf
net.bridge.bridge-nf-call-ip6tables = 1
net.bridge.bridge-nf-call-iptables = 1
net.ipv4.ip_forward = 1
现在docker默认的runtime为runc。
[root@etcd2 ~]# docker info | grep -i runtime
 Runtimes: runc io.containerd.runc.v2 io.containerd.runtime.v1.linux
 Default Runtime: runc
接下来配置docker使用kata作为runtime,思路还是首先安装所需的runtime,接着配置docker支持多个runtime。
5.2 安装kata
5.2.1 在线安装(不推荐,下载非常慢)
编辑下载源。
[root@etcd2 ~]# vim /etc/yum.repos.d/home\:katacontainers\:releases\:x86_64\:head.repo

[root@etcd2 ~]# cat /etc/yum.repos.d/home\:katacontainers\:releases\:x86_64\:head.repo
[home_katacontainers_releases_x86_64_head]
name=Branch project for Kata Containers branch head (CentOS_7)
type=rpm-md
baseurl=https://download.opensuse.org/repositories/home:/katacontainers:/releases:/x86_64:/head/CentOS_7/
gpgcheck=1
gpgkey=https://download.opensuse.org/repositories/home:/katacontainers:/releases:/x86_64:/head/CentOS_7/repodata/repomd.xml.key
enabled=1
安装kata。
[root@etcd2 ~]# yum -y install kata-runtime kata-proxy kata-shim
5.2.2 使用rpm包离线安装(推荐)
创建存放文件的目录,先下载centos7的kata 1.11.5 RPM包。
[root@etcd2 ~]# mkdir kata-rpm

[root@etcd2 ~]# cd kata-rpm/

[root@etcd2 kata-rpm]# ll -h
总用量 103M
-rw-r--r-- 1 root root  42M 12月 27 03:14 kata-containers-image-1.11.5-10.1.x86_64.rpm
-rw-r--r-- 1 root root 6.1M 12月 27 03:14 kata-ksm-throttler-1.11.5-10.1.x86_64.rpm
-rw-r--r-- 1 root root 9.1M 12月 27 03:14 kata-linux-container-5.4.32.76-11.1.x86_64.rpm
-rw-r--r-- 1 root root 2.4K 12月 27 03:14 kata-proxy-1.11.5-10.1.x86_64.rpm
-rw-r--r-- 1 root root 1.9M 12月 27 03:14 kata-proxy-bin-1.11.5-10.1.x86_64.rpm
-rw-r--r-- 1 root root  22M 12月 27 03:13 kata-runtime-1.11.5-10.1.x86_64.rpm
-rw-r--r-- 1 root root 2.4K 12月 27 03:13 kata-shim-1.11.5-10.1.x86_64.rpm
-rw-r--r-- 1 root root 7.4M 12月 27 03:13 kata-shim-bin-1.11.5-10.1.x86_64.rpm
-rw-r--r-- 1 root root 2.6K 12月 27 03:13 qemu-vanilla-4.1.1+git.99c5874a9b-10.1.x86_64.rpm
-rw-r--r-- 1 root root 2.6M 12月 27 03:13 qemu-vanilla-bin-4.1.1+git.99c5874a9b-10.1.x86_64.rpm
-rw-r--r-- 1 root root  13M 12月 27 03:14 qemu-vanilla-data-4.1.1+git.99c5874a9b-10.1.x86_64.rpm
安装kata。
[root@etcd2 kata-rpm]# yum -y install ./*
此时kata就安装好了。
[root@etcd2 kata-rpm]# which kata-runtime
/usr/bin/kata-runtime
5.3 配置docker支持kata作为runtime
kata安装好之后,要配置docker支持kata作为runtime。
查看docker状态。
[root@etcd2 kata-rpm]# systemctl status docker
● docker.service - Docker Application Container Engine
   Loaded: loaded (/usr/lib/systemd/system/docker.service; enabled; vendor preset: disabled)
   Active: active (running) since 日 2022-06-12 15:48:15 CST; 58min ago
     Docs: https://docs.docker.com
 Main PID: 1114 (dockerd)
   Memory: 93.1M
   CGroup: /system.slice/docker.service
           └─1114 /usr/bin/dockerd -H fd:// --containerd=/run/containerd/containerd.sock
需要修改docker的启动参数:ExecStart=/usr/bin/dockerd -D –add-runtime kata-runtime=/usr/bin/kata-runtime –default-runtime=kata- runtime -H fd:// –containerd=/run/containerd/containerd.sock
-D –add-runtime kata-runtime=/usr/bin/kata-runtime 表示让docker支持kata作为runtime。
–default-runtime=kata-runtime表示让docker默认以kata作为runtime。
[root@etcd2 kata-rpm]# vim /usr/lib/systemd/system/docker.service

[root@etcd2 kata-rpm]# cat /usr/lib/systemd/system/docker.service | grep ExecStart
#ExecStart=/usr/bin/dockerd --default-runtime runsc -H fd:// --containerd=/run/containerd/containerd.sock
#ExecStart=/usr/bin/dockerd -H fd:// --containerd=/run/containerd/containerd.sock
ExecStart=/usr/bin/dockerd -D --add-runtime kata-runtime=/usr/bin/kata-runtime -H fd:// --containerd=/run/containerd/containerd.sock
重新加载配置文件,重启docker。
[root@etcd2 kata-rpm]# systemctl daemon-reload ; systemctl restart docker
查看docker runtime,可以发现,现在docker支持kata-runtime了。
[root@etcd2 kata-rpm]# docker info | grep -i runtime
 Runtimes: kata-runtime runc runsc io.containerd.runc.v2 io.containerd.runtime.v1.linux
 Default Runtime: runc
5.4 docker使用kata作为runtime创建容器
现在有nginx镜像。
[root@etcd2 kata-rpm]# docker images
REPOSITORY                    TAG       IMAGE ID       CREATED        SIZE
hub.c.163.com/library/nginx   latest    46102226f2fd   5 years ago    109MB
–runtime=kata-runtime 表示使用kata作为runtime创建容器,不过报错了,由报错可知内存不够了,因为kata本质上是kvm虚拟机,所以内存要求比容器大。
[root@etcd2 ~]# docker run -dit --name=nginxweb --restart=always --runtime=kata-runtime hub.c.163.com/library/nginx:latest
2ed23f2ff16723aaa81bdfa01c3cb6ab787925c35362b4b45f3651aef9e74f96
docker: Error response from daemon: OCI runtime create failed: failed to launch qemu: exit status 1, error messages from qemu log: qemu-vanilla-system-x86_64: -device nvdimm,id=nv0,memdev=mem0: not enough space, currently 0x0 in use of total space for memory devices 0x5c00000: unknown.
内存空间不足,需要扩容,我把机器内存从1.2G扩容到2G。
再次创建容器。
[root@etcd2 ~]# docker run -dit --name=nginxweb --restart=always --runtime=kata-runtime hub.c.163.com/library/nginx:latest
04adab727ed79d78b145ad81ea8b395a992df2af7ff50da86993667a1eea929c
容器创建成功。
[root@etcd2 ~]# docker ps
CONTAINER ID   IMAGE                                COMMAND                  CREATED              STATUS              PORTS     NAMES
04adab727ed7   hub.c.163.com/library/nginx:latest   "nginx -g 'daemon of…"   About a minute ago   Up About a minute   80/tcp    nginxweb
bc99f286802f   quay.io/calico/node:v2.6.12          "start_runit"            3 months ago         Up 13 seconds                 calico-node
docker使用kata作为runtime,以沙箱的方式运行容器,在宿主机里就看不到容器里运行的进程了。
[root@etcd2 ~]# ps -ef | grep nginx
root       2152   1369  0 17:09 pts/0    00:00:00 grep --color=auto nginx
查看容器属性,可以发现,现在容器的Runtime为kata-runtime。
[root@etcd2 ~]# docker inspect nginxweb | grep -i runtime
            "Runtime": "kata-runtime",
            "CpuRealtimeRuntime": 0,
删除容器。
[root@etcd2 ~]# docker rm -f nginxweb
nginxweb
六.配置containerd使用kata作为runtime
6.1 安装containerd
如果你熟悉docker,但是不了解containerd,请查看博客《在centos下使用containerd管理容器:5分钟从docker转型到containerd》,里面有详细讲解。
我们在客户端机器ubuntuk8sclient(ubuntu系统)上安装containerd。
更新软件源。
root@ubuntuk8sclient:~# apt-get update
安装containerd。
root@ubuntuk8sclient:~# apt-get -y install containerd.io cri-tools
设置containerd开机自启动并现在启动containerd。
root@ubuntuk8sclient:~# systemctl enable containerd --now
查看containerd状态。
root@ubuntuk8sclient:~# systemctl is-active containerd
active

root@ubuntuk8sclient:~# systemctl status containerd
● containerd.service - containerd container runtime
   Loaded: loaded (/lib/systemd/system/containerd.service; enabled; vendor preset: enabled)
   Active: active (running) since Sat 2022-06-04 15:54:08 CST; 58min ago
     Docs: https://containerd.io
 Main PID: 722 (containerd)
    Tasks: 8
   CGroup: /system.slice/containerd.service
           └─722 /usr/bin/containerd
containerd的配置文件为/etc/containerd/config.toml 。
root@ubuntuk8sclient:~# ll -h /etc/containerd/config.toml
-rw-r--r-- 1 root root 886 May  4 17:04 /etc/containerd/config.toml
containerd的配置文件为/etc/containerd/config.toml ,可以使用containerd config default > /etc/containerd/config.toml生成默认的配置文件,containerd config default生成的配置文件内容还是挺多的。
root@ubuntuk8sclient:~# containerd config default > /etc/containerd/config.toml

root@ubuntuk8sclient:~# vim /etc/containerd/config.toml
containerd config dump显示当前的配置。
root@ubuntuk8sclient:~# containerd config dump
disabled_plugins = []
imports = ["/etc/containerd/config.toml"]
oom_score = 0
plugin_dir = ""
required_plugins = []
root = "/var/lib/containerd"
......
......
  address = ""
  gid = 0
  uid = 0
查看containerd版本。
root@ubuntuk8sclient:~# containerd --version
containerd containerd.io 1.6.4 212e8b6fa2f44b9c21b2798135fc6fb7c53efc16

root@ubuntuk8sclient:~# containerd -v
containerd containerd.io 1.6.4 212e8b6fa2f44b9c21b2798135fc6fb7c53efc16
修改配置文件,添加阿里云镜像加速器。
root@ubuntuk8sclient:~# vim /etc/containerd/config.toml

root@ubuntuk8sclient:~# grep endpoint /etc/containerd/config.toml
    endpoint = "https://frz7i079.mirror.aliyuncs.com"
SystemdCgroup = false修改为SystemdCgroup = true。
root@ubuntuk8sclient:~# vim /etc/containerd/config.toml

root@ubuntuk8sclient:~# grep SystemdCgroup -B 11 /etc/containerd/config.toml
          [plugins."io.containerd.grpc.v1.cri".containerd.runtimes.runc.options]
            BinaryName = ""
            CriuImagePath = ""
            CriuPath = ""
            CriuWorkPath = ""
            IoGid = 0
            IoUid = 0
            NoNewKeyring = false
            NoPivotRoot = false
            Root = ""
            ShimCgroup = ""
            SystemdCgroup = true
有个sandbox的镜像,k8s.gcr.io/pause:3.6访问不了。
root@ubuntuk8sclient:~# grep sandbox_image /etc/containerd/config.toml
    sandbox_image = "k8s.gcr.io/pause:3.6"
修改sandbox镜像为可以访问的阿里云镜像。
root@ubuntuk8sclient:~# vim /etc/containerd/config.toml

root@ubuntuk8sclient:~# grep sandbox_image /etc/containerd/config.toml
    sandbox_image = "registry.aliyuncs.com/google_containers/pause:3.6"
重新加载配置文件并重启containerd服务。
root@ubuntuk8sclient:~# systemctl daemon-reload ; systemctl restart containerd
containerd 客户端工具有 ctr 和 crictl ,如果使用 crictl 命令的话,需要执行 crictl config runtime-endpoint unix:///var/run/containerd/containerd.sock ,不然会有告警。ctr和crictl更多命令细节,请查看博客《在centos下使用containerd管理容器:5分钟从docker转型到containerd》。
root@ubuntuk8sclient:~# crictl config runtime-endpoint unix:///var/run/containerd/containerd.sock
查看containerd信息。
root@ubuntuk8sclient:~# crictl info
{
  "status": {
    "conditions": [
      {
        "type": "RuntimeReady",
        "status": true,
        "reason": "",
        "message": ""
      },
......
    "enableUnprivilegedPorts": false,
    "enableUnprivilegedICMP": false,
    "containerdRootDir": "/var/lib/containerd",
    "containerdEndpoint": "/run/containerd/containerd.sock",
    "rootDir": "/var/lib/containerd/io.containerd.grpc.v1.cri",
    "stateDir": "/run/containerd/io.containerd.grpc.v1.cri"
  },
  "golang": "go1.17.9",
  "lastCNILoadStatus": "cni config load failed: no network config found in /etc/cni/net.d: cni plugin not initialized: failed to load cni config",
  "lastCNILoadStatus.default": "cni config load failed: no network config found in /etc/cni/net.d: cni plugin not initialized: failed to load cni config"
}
containerd 客户端工具 ctr 和 crictl 不好用,推荐使用nerdctl,nerdctl是containerd的cli客户端工具,与docker cli大部分兼容,用法类似docker命令。
使用nerdctl命令需要两个安装包nerdctl-0.20.0-linux-amd64.tar.gz和cni-plugins-linux-amd64-v1.1.1.tgz。
nerdctl-0.20.0-linux-amd64.tar.gz下载地址:https://github.com/containerd/nerdctl/releases 。
网络插件cni-plugins-linux-amd64-v1.1.1.tgz下载地址:https://github.com/containernetworking/plugins/releases 。
root@ubuntuk8sclient:~# ll -h cni-plugins-linux-amd64-v1.1.1.tgz nerdctl-0.20.0-linux-amd64.tar.gz
-rw-r--r-- 1 root root  35M Jun  5 12:19 cni-plugins-linux-amd64-v1.1.1.tgz
-rw-r--r-- 1 root root 9.8M Jun  5 12:15 nerdctl-0.20.0-linux-amd64.tar.gz
分别进行解压。
root@ubuntuk8sclient:~# tar xf nerdctl-0.20.0-linux-amd64.tar.gz -C /usr/local/bin/

root@ubuntuk8sclient:~# ls /usr/local/bin/
containerd-rootless-setuptool.sh  containerd-rootless.sh  nerdctl

root@ubuntuk8sclient:~# mkdir -p /opt/cni/bin

root@ubuntuk8sclient:~# tar xf cni-plugins-linux-amd64-v1.1.1.tgz -C /opt/cni/bin/

root@ubuntuk8sclient:~# ls /opt/cni/bin/
bandwidth  bridge  dhcp  firewall  host-device  host-local  ipvlan  loopback  macvlan  portmap  ptp  sbr  static  tuning  vlan  vrf
配置nerdctl命令tab自动补全,添加source <(nerdctl completion bash)。
root@ubuntuk8sclient:~# vim /etc/profile

root@ubuntuk8sclient:~# cat /etc/profile | head -3
# /etc/profile: system-wide .profile file for the Bourne shell (sh(1))
# and Bourne compatible shells (bash(1), ksh(1), ash(1), ...).
source <(nerdctl completion bash)

root@ubuntuk8sclient:~# nerdctl completion bash
使配置文件/etc/profile生效。
root@ubuntuk8sclient:~# source /etc/profile
查看镜像。
root@ubuntuk8sclient:~# nerdctl images
REPOSITORY    TAG    IMAGE ID    CREATED    PLATFORM    SIZE    BLOB SIZE
查看命名空间。
root@ubuntuk8sclient:~# nerdctl ns list
NAME            CONTAINERS    IMAGES    VOLUMES    LABELS
default         0             0         0
k8s.io          0             4         0
moby            0             0         0
plugins.moby    0             0         0
nerdctl的命令和docker命令很相似,只要把docker命令里的docker换成nerdctl,基本都能执行成功。
拉取镜像。
root@ubuntuk8sclient:~# nerdctl pull hub.c.163.com/library/nginx:latest

root@ubuntuk8sclient:~# nerdctl images
REPOSITORY                     TAG       IMAGE ID        CREATED           PLATFORM       SIZE         BLOB SIZE
hub.c.163.com/library/nginx    latest    8eeb06742b41    22 seconds ago    linux/amd64    115.5 MiB    41.2 MiB
查看containerd信息。
root@ubuntuk8sclient:~# nerdctl info
6.2 安装kata
Ubuntu系统的kata 1.11.5 软件包下载网址:
https://download.opensuse.org/repositories/home:/katacontainers:/releases:/x86_64:/stable-1.11/xUbuntu_18.04/amd64/ 。
提前下载好软件包。
root@ubuntuk8sclient:~/kata-rpm# cd kata-ubuntu/

root@ubuntuk8sclient:~/kata-rpm/kata-ubuntu# ls
ibverbs-providers_17.1-1ubuntu0.2_amd64.deb    kata-proxy_1.12.0~rc0-49_amd64.deb     libnl-route-3-200_3.2.29-0ubuntu3_amd64.deb  librados2_12.2.13-0ubuntu0.18.04.6_amd64.deb
kata-containers-image_1.12.0~rc0-48_amd64.deb  kata-runtime_1.12.0~rc0-56_amd64.deb   libnspr4_2%3a4.18-1ubuntu1_amd64.deb         librbd1_12.2.13-0ubuntu0.18.04.6_amd64.deb
kata-ksm-throttler_1.12.0~rc0-51_amd64.deb     kata-shim_1.12.0~rc0-47_amd64.deb      libnss3_2%3a3.35-2ubuntu2.12_amd64.deb       qemu-vanilla_5.0.0+git.fdd76fecdd-52_amd64.deb
kata-linux-container_5.4.60.89-51_amd64.deb    libibverbs1_17.1-1ubuntu0.2_amd64.deb  libpixman-1-0_0.34.0-2_amd64.deb
更新软件源。
root@ubuntuk8sclient:~/kata-rpm/kata-ubuntu# apt-get update
安装kata。
root@ubuntuk8sclient:~/kata-rpm/kata-ubuntu# apt-get -y install ./*

#如果 apt-get -y install ./* 报错就执行如下:
root@ubuntuk8sclient:~/kata-rpm/kata-ubuntu# sudo apt -y install ./*
现在kata就安装好了。
root@ubuntuk8sclient:~/kata-rpm/kata-ubuntu# which kata-runtime
/usr/bin/kata-runtime
6.3 配置containerd支持kata作为runtime
kata安装好之后,现在要配置containerd支持kata作为runtime。
修改containerd配置文件,runtime_type = “io.containerd.kata.v2” 。
root@ubuntuk8sclient:~# vim /etc/containerd/config.toml

#[plugins."io.containerd.grpc.v1.cri".containerd.runtimes.kata-runtime]下面是新增的内容
root@ubuntuk8sclient:~# cat /etc/containerd/config.toml | grep -A27 "containerd.runtimes.runc"
        [plugins."io.containerd.grpc.v1.cri".containerd.runtimes.runc]
          base_runtime_spec = ""
          cni_conf_dir = ""
          cni_max_conf_num = 0
          container_annotations = []
          pod_annotations = []
          privileged_without_host_devices = false
          runtime_engine = ""
          runtime_path = ""
          runtime_root = ""
          runtime_type = "io.containerd.runc.v2"

          [plugins."io.containerd.grpc.v1.cri".containerd.runtimes.runc.options]
            BinaryName = ""
            CriuImagePath = ""
            CriuPath = ""
            CriuWorkPath = ""
            IoGid = 0
            IoUid = 0
            NoNewKeyring = false
            NoPivotRoot = false
            Root = ""
            ShimCgroup = ""
            SystemdCgroup = true
        [plugins."io.containerd.grpc.v1.cri".containerd.runtimes.kata-runtime]
          base_runtime_spec = ""
          cni_conf_dir = ""
          cni_max_conf_num = 0
          container_annotations = []
          pod_annotations = []
          privileged_without_host_devices = false
          runtime_engine = ""
          runtime_path = ""
          runtime_root = ""
          runtime_type = "io.containerd.kata.v2"
重新加载配置文件,重启containerd。
root@ubuntuk8sclient:~# systemctl daemon-reload ; systemctl restart containerd
查看runtime,现在就可以看到containerd支持三种runtime了:runc,runsc(这个看不到正常),kata-runtime。
root@ubuntuk8sclient:~# crictl info | grep -A44 runtimes
      "runtimes": {
        "kata": {
          "runtimeType": "io.containerd.kata.v2",
          "runtimePath": "",
          "runtimeEngine": "",
          "PodAnnotations": [],
          "ContainerAnnotations": [],
          "runtimeRoot": "",
          "options": null,
          "privileged_without_host_devices": false,
          "baseRuntimeSpec": "",
          "cniConfDir": "",
          "cniMaxConfNum": 0
        },
        "runc": {
          "runtimeType": "io.containerd.runc.v2",
          "runtimePath": "",
          "runtimeEngine": "",
          "PodAnnotations": [],
          "ContainerAnnotations": [],
          "runtimeRoot": "",
          "options": {
            "BinaryName": "",
            "CriuImagePath": "",
            "CriuPath": "",
            "CriuWorkPath": "",
            "IoGid": 0,
            "IoUid": 0,
            "NoNewKeyring": false,
            "NoPivotRoot": false,
            "Root": "",
            "ShimCgroup": "",
            "SystemdCgroup": true
          },
          "privileged_without_host_devices": false,
          "baseRuntimeSpec": "",
          "cniConfDir": "",
          "cniMaxConfNum": 0
        },
        "runsc": {
          "runtimeType": "io.containerd.runsc.v1",
          "runtimePath": "",
          "runtimeEngine": "",
          "PodAnnotations": [],
          "ContainerAnnotations": [],
6.4 containerd使用kata作为runtime创建容器
查看镜像。
root@ubuntuk8sclient:~# nerdctl images | grep nginx
nginx
<none>                                                              2bcabc23b454    7 days ago      linux/amd64    149.1 MiB    54.1 MiB
hub.c.163.com/library/nginx                           latest                                                              8eeb06742b41    7 days ago      linux/amd64    115.5 MiB    41.2 MiB
创建容器,–runtime=kata-runtime 表示containerd使用kata-runtime创建容器。
root@ubuntuk8sclient:~# nerdctl run -d --name=nginxweb --restart=always --runtime=kata-runtime hub.c.163.com/library/nginx:latest
8e1518fe432771417fae9c0a23a9e9a37e71d5e8a87495f60a439f5b172adef4
containerd使用kata作为runtime,以沙箱的方式运行容器,在宿主机里就看不到容器里运行的进程了。
root@ubuntuk8sclient:~# ps -ef | grep nginx
root       1878   1693  0 17:39 pts/1    00:00:00 grep --color=auto nginx
停止容器。
root@ubuntuk8sclient:~# nerdctl ps
CONTAINER ID    IMAGE                                 COMMAND                   CREATED          STATUS    PORTS    NAMES
8e1518fe4327    hub.c.163.com/library/nginx:latest    "nginx -g daemon off;"    3 minutes ago    Up                 nginxweb

root@ubuntuk8sclient:~# nerdctl stop nginxweb
nginxweb
删除容器。
root@ubuntuk8sclient:~# nerdctl rm nginxweb
七.在k8s环境里,配置containerd作为高级别runtime,containerd使用kata作为低级别runtime
7.1 把ubuntuk8sclient节点加入k8s集群
注意docker作为k8s的高级别runtime的时候,不支持kata作为docker的低级别runtime,只有单机版的时候,kata才能作为docker的低级别runtime。
描述一下当前的系统环境:现在有一个k8s集群,1个master,2个worker,三台机器都是使用docker作为高级别runtime,现在添加一个新的worker节点,新的worker节点使用containerd作为高级别runtime,kata作为containerd的低级别runtime。
现在把ubuntuk8sclient机器加入k8s集群,ubuntuk8sclient的CONTAINER-RUNTIME为containerd。
查看集群节点。
root@k8scludes1:~# kubectl get nodes -o wide
NAME         STATUS   ROLES                  AGE   VERSION   INTERNAL-IP       EXTERNAL-IP   OS-IMAGE             KERNEL-VERSION       CONTAINER-RUNTIME
k8scludes1   Ready    control-plane,master   55d   v1.22.2   192.168.110.128
<none>        Ubuntu 18.04.5 LTS   4.15.0-112-generic   docker://20.10.14
k8scludes2   Ready
<none>                 55d   v1.22.2   192.168.110.129   <none>        Ubuntu 18.04.5 LTS   4.15.0-112-generic   docker://20.10.14
k8scludes3   Ready
<none>                 55d   v1.22.2   192.168.110.130   <none>        Ubuntu 18.04.5 LTS   4.15.0-112-generic   docker://20.10.14
先在所有的机器配置IP主机名映射(以ubuntuk8sclient为例)。
root@ubuntuk8sclient:~# vim /etc/hosts

root@ubuntuk8sclient:~# cat /etc/hosts
127.0.0.1   localhost
127.0.1.1   tom
192.168.110.139 ubuntuk8sclient
192.168.110.128 k8scludes1
192.168.110.129 k8scludes2
192.168.110.130 k8scludes3

# The following lines are desirable for IPv6 capable hosts
::1     localhost ip6-localhost ip6-loopback
ff02::1 ip6-allnodes
ff02::2 ip6-allrouters
配置软件源,软件源如下,最后三行是k8s源。
root@ubuntuk8sclient:~# cat /etc/apt/sources.list
deb http://mirrors.aliyun.com/ubuntu/ bionic main restricted universe multiverse
deb-src http://mirrors.aliyun.com/ubuntu/ bionic main restricted universe multiverse

deb http://mirrors.aliyun.com/ubuntu/ bionic-security main restricted universe multiverse
deb-src http://mirrors.aliyun.com/ubuntu/ bionic-security main restricted universe multiverse

deb http://mirrors.aliyun.com/ubuntu/ bionic-updates main restricted universe multiverse
deb-src http://mirrors.aliyun.com/ubuntu/ bionic-updates main restricted universe multiverse

deb http://mirrors.aliyun.com/ubuntu/ bionic-proposed main restricted universe multiverse
deb-src http://mirrors.aliyun.com/ubuntu/ bionic-proposed main restricted universe multiverse

deb http://mirrors.aliyun.com/ubuntu/ bionic-backports main restricted universe multiverse
deb-src http://mirrors.aliyun.com/ubuntu/ bionic-backports main restricted universe multiverse

deb https://mirrors.aliyun.com/kubernetes/apt/ kubernetes-xenial main
deb [arch=amd64] https://mirrors.aliyun.com/docker-ce/linux/ubuntu bionic stable
# deb-src [arch=amd64] https://mirrors.aliyun.com/docker-ce/linux/ubuntu bionic stable
apt-key.gpg是k8s的deb源公钥,加载k8s的deb源公钥 apt-key add apt-key.gpg。
下载并加载k8s的deb源公钥:curl -s https://packages.cloud.google.com/apt/doc/apt-key.gpg | sudo apt-key add – ; apt-get update。但是谷歌的网址访问不了,我们直接去网上下载apt-key.gpg文件,加载k8s的deb源公钥。
root@ubuntuk8sclient:~# cat apt-key.gpg | apt-key add -
OK
更新软件源。
root@ubuntuk8sclient:~# apt-get update
Linux swapoff命令用于关闭系统交换分区(swap area)。如果不关闭swap,就会在kubeadm初始化Kubernetes的时候报错:“[ERROR Swap]: running with swap on is not supported. Please disable swap”。
root@ubuntuk8sclient:~# swapoff -a ;sed -i '/swap/d' /etc/fstab

root@ubuntuk8sclient:~# cat /etc/fstab
# /etc/fstab: static file system information.
#
# Use 'blkid' to print the universally unique identifier for a
# device; this may be used with UUID= as a more robust way to name devices
# that works even if disks are added and removed. See fstab(5).
#
# <file system> <mount point>   <type>  <options>       <dump>  <pass>
/dev/mapper/tom--vg-root /               ext4    errors=remount-ro 0       1
设置containerd当前命名空间为k8s.io。
root@ubuntuk8sclient:~# cat /etc/nerdctl/nerdctl.toml | head -3
namespace = "k8s.io"
加载overlay和br_netfilter模块。
root@ubuntuk8sclient:~# cat > /etc/modules-load.d/containerd.conf <<EOF
> overlay
> br_netfilter
> EOF

root@ubuntuk8sclient:~# cat /etc/modules-load.d/containerd.conf
overlay
br_netfilter

root@ubuntuk8sclient:~# modprobe overlay

root@ubuntuk8sclient:~# modprobe br_netfilter
设置iptables不对bridge的数据进行处理,启用IP路由转发功能。
root@ubuntuk8sclient:~# cat <<EOF> /etc/sysctl.d/k8s.conf
> net.bridge.bridge-nf-call-ip6tables = 1
> net.bridge.bridge-nf-call-iptables = 1
> net.ipv4.ip_forward = 1
> EOF
使配置生效。
root@ubuntuk8sclient:~# sysctl -p /etc/sysctl.d/k8s.conf
net.bridge.bridge-nf-call-ip6tables = 1
net.bridge.bridge-nf-call-iptables = 1
net.ipv4.ip_forward = 1
为了k8s节点间的通信,需要安装cni网络插件,提前下载好calico镜像,calico镜像版本要和k8s的那三个节点的calico版本一致。
root@ubuntuk8sclient:~# nerdctl pull docker.io/calico/cni:v3.22.2

root@ubuntuk8sclient:~# nerdctl pull docker.io/calico/pod2daemon-flexvol:v3.22.2

root@ubuntuk8sclient:~# nerdctl pull docker.io/calico/node:v3.22.2

root@ubuntuk8sclient:~# nerdctl pull docker.io/calico/kube-controllers:v3.22.2

root@ubuntuk8sclient:~# nerdctl images | grep calico
calico/cni                                       v3.22.2                                                             757d06fe361c    4 minutes ago     linux/amd64    227.1 MiB    76.8 MiB
calico/kube-controllers                          v3.22.2                                                             751f1a8ba0af    20 seconds ago    linux/amd64    128.1 MiB    52.4 MiB
calico/node                                      v3.22.2                                                             41aac6d0a440    2 minutes ago     linux/amd64    194.2 MiB    66.5 MiB
calico/pod2daemon-flexvol                        v3.22.2                                                             413c5ebad6a5    3 minutes ago     linux/amd64    19.0 MiB     8.0 MiB
安装kubelet,kubeadm,kubectl。
- Kubelet 是 kubernetes 工作节点上的一个代理组件,运行在每个节点上;
- Kubeadm 是一个快捷搭建kubernetes(k8s)的安装工具,它提供了 kubeadm init 以及 kubeadm join 这两个命令来快速创建 kubernetes 集群;kubeadm 通过执行必要的操作来启动和运行一个最小可用的集群;
- kubectl是Kubernetes集群的命令行工具,通过kubectl能够对集群本身进行管理,并能够在集群上进行容器化应用的安装部署。
root@ubuntuk8sclient:~# apt-get -y install kubelet=1.22.2-00 kubeadm=1.22.2-00 kubectl=1.22.2-00
设置kubelet开机自启动并现在启动。
root@ubuntuk8sclient:~# systemctl enable kubelet --now
在k8s的master节点,查看k8s worker节点加入k8s集群的token。
root@k8scludes1:~# kubeadm token create --print-join-command
kubeadm join 192.168.110.128:6443 --token rwau00.plx8xdksa8zdnfrn --discovery-token-ca-cert-hash sha256:3f401b6187ed44ff8f4b50aa6453cf3eacc3b86d6a72e3bf2caba02556cb918e
把ubuntuk8sclient节点加入k8s集群。
root@ubuntuk8sclient:~# kubeadm join 192.168.110.128:6443 --token rwau00.plx8xdksa8zdnfrn --discovery-token-ca-cert-hash sha256:3f401b6187ed44ff8f4b50aa6453cf3eacc3b86d6a72e3bf2caba02556cb918e
[preflight] Running pre-flight checks
[preflight] Reading configuration from the cluster...
[preflight] FYI: You can look at this config file with 'kubectl -n kube-system get cm kubeadm-config -o yaml'
[kubelet-start] Writing kubelet configuration to file "/var/lib/kubelet/config.yaml"
[kubelet-start] Writing kubelet environment file with flags to file "/var/lib/kubelet/kubeadm-flags.env"
[kubelet-start] Starting the kubelet
[kubelet-start] Waiting for the kubelet to perform the TLS Bootstrap...

This node has joined the cluster:
* Certificate signing request was sent to apiserver and a response was received.
* The Kubelet was informed of the new secure connection details.

Run 'kubectl get nodes' on the control-plane to see this node join the cluster.
去k8s master节点查看是否加入k8s集群,可以看到ubuntuk8sclient成功加入k8s集群,并且CONTAINER-RUNTIME为containerd://1.6.4。
root@k8scludes1:~# kubectl get node -o wide
NAME              STATUS   ROLES                  AGE   VERSION   INTERNAL-IP       EXTERNAL-IP   OS-IMAGE             KERNEL-VERSION       CONTAINER-RUNTIME
k8scludes1        Ready    control-plane,master   55d   v1.22.2   192.168.110.128
<none>        Ubuntu 18.04.5 LTS   4.15.0-112-generic   docker://20.10.14
k8scludes2        Ready
<none>                 55d   v1.22.2   192.168.110.129   <none>        Ubuntu 18.04.5 LTS   4.15.0-112-generic   docker://20.10.14
k8scludes3        Ready
<none>                 55d   v1.22.2   192.168.110.130   <none>        Ubuntu 18.04.5 LTS   4.15.0-112-generic   docker://20.10.14
ubuntuk8sclient   Ready
<none>                 87s   v1.22.2   192.168.110.139   <none>        Ubuntu 18.04.5 LTS   4.15.0-112-generic   containerd://1.6.4
7.2 配置kubelet使其支持Kata
配置kubelet,使其可以支持Kata作为containerd的低级别runtime,修改kubelet参数,让其支持Kata作为runtime。
root@ubuntuk8sclient:~# cat > /etc/systemd/system/kubelet.service.d/0-cri-containerd.conf <<EOF
> [Service]
> Environment="KUBELET_EXTRA_ARGS=--container-runtime=remote --runtime-request-timeout=15m
> --container-runtime-endpoint=unix:///run/containerd/containerd.sock"
> EOF

root@ubuntuk8sclient:~# cat /etc/systemd/system/kubelet.service.d/0-cri-containerd.conf
[Service]
Environment="KUBELET_EXTRA_ARGS=--container-runtime=remote --runtime-request-timeout=15m  --container-runtime-endpoint=unix:///run/containerd/containerd.sock"
重新加载配置文件并重启kubelet。
root@ubuntuk8sclient:~# systemctl daemon-reload ; systemctl restart kubelet

root@ubuntuk8sclient:~# systemctl status kubelet
● kubelet.service - kubelet: The Kubernetes Node Agent
   Loaded: loaded (/lib/systemd/system/kubelet.service; enabled; vendor preset: enabled)
  Drop-In: /etc/systemd/system/kubelet.service.d
           └─0-cri-containerd.conf, 10-kubeadm.conf
   Active: active (running) since Sat 2022-06-11 18:00:31 CST; 14s ago
     Docs: https://kubernetes.io/docs/home/
 Main PID: 31685 (kubelet)
    Tasks: 13 (limit: 1404)
   CGroup: /system.slice/kubelet.service
           └─31685 /usr/bin/kubelet --bootstrap-kubeconfig=/etc/kubernetes/bootstrap-kubelet.conf --kubeconfig=/etc/kubernetes/kubelet.conf --config=/var/lib/kubelet/config.yaml --container-runtime=remote --con
7.3 创建容器运行时类(Runtime Class)
在k8s里使用kata创建pod,需要使用到容器运行时类(Runtime Class)。
RuntimeClass 是一个用于选择容器运行时配置的特性,容器运行时配置用于运行 Pod 中的容器。你可以在不同的 Pod 设置不同的 RuntimeClass,以提供性能与安全性之间的平衡。 例如,如果你的部分工作负载需要高级别的信息安全保证,你可以决定在调度这些 Pod 时,尽量使它们在使用硬件虚拟化的容器运行时中运行。 这样,你将从这些不同运行时所提供的额外隔离中获益,代价是一些额外的开销。
你还可以使用 RuntimeClass 运行具有相同容器运行时,但具有不同设置的 Pod。
注意RuntimeClass是全局生效的,不受命名空间限制。
编辑RuntimeClass配置文件,handler后面写runtime的名字,我们要使用kata就写kata-runtime,handler: kata-runtime表示指定使用kata-runtime作为runtime。
root@k8scludes1:~# cd containerd-kata/

root@k8scludes1:~/containerd-kata# vim mykataruntimeclass.yaml

root@k8scludes1:~/containerd-kata# cat mykataruntimeclass.yaml
# RuntimeClass 定义于 node.k8s.io API 组
apiVersion: node.k8s.io/v1
kind: RuntimeClass
metadata:
  # 用来引用 RuntimeClass 的名字
  # RuntimeClass 是一个集群层面的资源
  name: mykataruntimeclass
# 对应的 CRI 配置的名称
#handler: myconfiguration
#注意:handler后面写runtime的名字,我们要使用kata就写kata-runtime
handler: kata-runtime
创建RuntimeClass。
root@k8scludes1:~/containerd-kata# kubectl apply -f mykataruntimeclass.yaml
runtimeclass.node.k8s.io/mykataruntimeclass created

root@k8scludes1:~/containerd-kata# kubectl get runtimeclass -o wide
NAME                 HANDLER        AGE
mykataruntimeclass   kata-runtime   13s
myruntimeclass       runsc          16h
给ubuntuk8sclient节点创建一个标签con=kata。
root@k8scludes1:~/containerd-kata# kubectl label node ubuntuk8sclient con=kata --overwrite
node/ubuntuk8sclient labeled

root@k8scludes1:~/containerd-kata# kubectl get node -l con=kata -o wide --show-labels
NAME              STATUS   ROLES    AGE   VERSION   INTERNAL-IP       EXTERNAL-IP   OS-IMAGE             KERNEL-VERSION       CONTAINER-RUNTIME    LABELS
ubuntuk8sclient   Ready
<none>   25h   v1.22.2   192.168.110.139   <none>        Ubuntu 18.04.5 LTS   4.15.0-112-generic   containerd://1.6.4   beta.kubernetes.io/arch=amd64,beta.kubernetes.io/os=linux,con=kata,kubernetes.io/arch=amd64,kubernetes.io/hostname=ubuntuk8sclient,kubernetes.io/os=linux
7.4 使用kata创建pod
编辑pod配置文件,在ubuntuk8sclient节点创建pod。
runtimeClassName: mykataruntimeclass 表示使用mykataruntimeclass里的kata作为runtime。
nodeSelector:con: kata指定pod运行在标签为con=kata的ubuntuk8sclient节点。
root@k8scludes1:~/containerd-kata# vim pod.yaml

root@k8scludes1:~/containerd-kata# cat pod.yaml
apiVersion: v1
kind: Pod
metadata:
  creationTimestamp: null
  labels:
    run: podtest
  name: podtest
spec:
  #当需要关闭容器时,立即杀死容器而不等待默认的30秒优雅停机时长。
  terminationGracePeriodSeconds: 0
  #指定容器运行时类
  runtimeClassName: mykataruntimeclass
  nodeSelector:
    con: kata
  containers:
  - image: hub.c.163.com/library/nginx:latest
    #imagePullPolicy: IfNotPresent:表示如果本地已经存在该镜像,则不重新下载;否则从远程 Docker Hub 下载该镜像
    imagePullPolicy: IfNotPresent
    name: podtest
    resources: {}
  dnsPolicy: ClusterFirst
  restartPolicy: Always
status: {}
创建pod,pod运行在ubuntuk8sclient节点。
root@k8scludes1:~/containerd-kata# kubectl apply -f pod.yaml
pod/podtest created

root@k8scludes1:~/containerd-kata# kubectl get pod -o wide
NAME      READY   STATUS    RESTARTS   AGE   IP              NODE              NOMINATED NODE   READINESS GATES
podtest   1/1     Running   0          10s   10.244.228.30   ubuntuk8sclient
<none>           <none>
创建好pod之后,去ubuntuk8sclient节点查看nginx进程,kata以沙箱的方式运行容器,在宿主机里就看不到容器里运行的进程了。
root@ubuntuk8sclient:~# nerdctl ps | grep nginx
6dd99b54705f    hub.c.163.com/library/nginx:latest                            "nginx -g daemon off;"    2 minutes ago     Up                 k8s://minsvcbug/podtest/podtest

root@ubuntuk8sclient:~# ps -ef | grep nginx
root      33736  32877  0 18:52 pts/2    00:00:00 grep --color=auto nginx
kata本质上是kvm虚拟机,需要开启CPU虚拟化功能,显示vmx或者svm,表示已经开启CPU虚拟化功能了。
root@ubuntuk8sclient:~# egrep 'vmx|svm' /proc/cpuinfo
flags       : fpu vme de pse tsc msr pae mce cx8 apic sep mtrr pge mca cmov pat pse36 clflush mmx fxsr sse sse2 ss ht syscall nx pdpe1gb rdtscp lm constant_tsc arch_perfmon nopl xtopology tsc_reliable nonstop_tsc cpuid pni pclmulqdq vmx ssse3 fma cx16 pcid sse4_1 sse4_2 x2apic movbe popcnt tsc_deadline_timer aes xsave avx f16c rdrand hypervisor lahf_lm abm 3dnowprefetch cpuid_fault invpcid_single pti ssbd ibrs ibpb stibp tpr_shadow vnmi ept vpid fsgsbase tsc_adjust bmi1 avx2 smep bmi2 invpcid mpx rdseed adx smap clflushopt xsaveopt xsavec xsaves arat md_clear flush_l1d arch_capabilities
flags       : fpu vme de pse tsc msr pae mce cx8 apic sep mtrr pge mca cmov pat pse36 clflush mmx fxsr sse sse2 ss ht syscall nx pdpe1gb rdtscp lm constant_tsc arch_perfmon nopl xtopology tsc_reliable nonstop_tsc cpuid pni pclmulqdq vmx ssse3 fma cx16 pcid sse4_1 sse4_2 x2apic movbe popcnt tsc_deadline_timer aes xsave avx f16c rdrand hypervisor lahf_lm abm 3dnowprefetch cpuid_fault invpcid_single pti ssbd ibrs ibpb stibp tpr_shadow vnmi ept vpid fsgsbase tsc_adjust bmi1 avx2 smep bmi2 invpcid mpx rdseed adx smap clflushopt xsaveopt xsavec xsaves arat md_clear flush_l1d arch_capabilities
删除pod。
root@k8scludes1:~/containerd-kata# kubectl delete pod podtest
pod "podtest" deleted
可以把ubuntuk8sclient节点从k8s集群删掉。
root@k8scludes1:~/containerd-kata# kubectl get node -o wide
NAME              STATUS   ROLES                  AGE   VERSION   INTERNAL-IP       EXTERNAL-IP   OS-IMAGE             KERNEL-VERSION       CONTAINER-RUNTIME
k8scludes1        Ready    control-plane,master   56d   v1.22.2   192.168.110.128
<none>        Ubuntu 18.04.5 LTS   4.15.0-112-generic   docker://20.10.14
k8scludes2        Ready
<none>                 56d   v1.22.2   192.168.110.129   <none>        Ubuntu 18.04.5 LTS   4.15.0-112-generic   docker://20.10.14
k8scludes3        Ready
<none>                 56d   v1.22.2   192.168.110.130   <none>        Ubuntu 18.04.5 LTS   4.15.0-112-generic   docker://20.10.14
ubuntuk8sclient   Ready
<none>                 25h   v1.22.2   192.168.110.139   <none>        Ubuntu 18.04.5 LTS   4.15.0-112-generic   containerd://1.6.4

root@k8scludes1:~/containerd-kata# kubectl drain ubuntuk8sclient --ignore-daemonsets

root@k8scludes1:~/containerd-kata# kubectl delete nodes ubuntuk8sclient
八.总结
Kata Containers 作为一种安全容器技术,通过硬件虚拟化和沙箱隔离为容器提供了更高的安全性。与传统容器技术相比,Kata Containers 在安全性能方面具有明显优势。在本文中,我们以 Kubernetes 1.22.2 和 Ubuntu 18.04 为例,介绍了如何在 Linux 操作系统上使用 Kata Containers 以沙箱的方式运行容器。希望本文能为您的容器安全部署提供参考。
References